la 4 macazuri, fiecare macaz cu servomotorasul lui, cate 2 butoane de comanda (in stanga / in dreapta, drepta inainte / in stanga, etc) si cate o iesire pentru indicare directie.
Schema este urmatoarea, fiecare servomotor e conectat la cate un pin PWM (am ales D6, D9, D10 si D11)
Definirea pinilor folositi, la schema mea, este facuta in programul albasete_macaz_2b.ino
15.02.2022
Am simulat functionarea programului cu ajutorul programului SimulIDE:
incarcand hex-ul programului meu si am observat ca functionarea este cea corecta, pentru fiecare din cele 4 servomotorase, dupa cum se vede si in cele 2 filmulete:
Dragos (albasete) a inceput sa faca teste cu un macaz real conectat la servomotor). A montat pentru teste pe o placa de forex macazul și servo. In capetele macazului a pus pluta de 2 mm sa nu frece tija de placa și sa culiseze lejer.
Dragos mi-a trimis si un filmulet
Dupa niste discutii cu Dragos, am implementat si memorarea ultimelor pozitii, pentru a evita socurile mecanice la macaze. Programul ce memoreaza pozitiile in EEPROM-ul microcontrolerului de pe placa Arduino este albasete_macaz_3.ino si memoreaza valori doar daca sunt diferite de cele din memorie si la la 5 secunde de la ultima actionare.
17.02.2022
Intre timp, am facut 2 filmulete cu doar 2 servo (astea le-am avut la indemana):
Intarzieree scrierii valorilor fiecarui servo, se recomanda a fi mai mare, in caz ca se tot misca macazele, pentru a uza memoria EEPROM, in ultimul program este dupa 5 secunde dupa ultipa apasare a oricarui buton de comanda (asta si pentru a fi usor de yurmarit la tesste)
dar se poate mari la 30 secunde, valoare variabilei devenind 30000 (reprezentand ms)
In continuarea articolelor in care am prezentat bariere comandate (din buton sau cu senzori), de data asta voi prezenta un macaz comandat din 2 butoane, cate unl pentru directia de deplasare.
Prima schema de test, in care am folosit un program adaptat din cel al barieriei cu butoane, este
Programul folosit este albasete_macaz_1a.ino si modul de functionare este prezentat in filmuleltele:
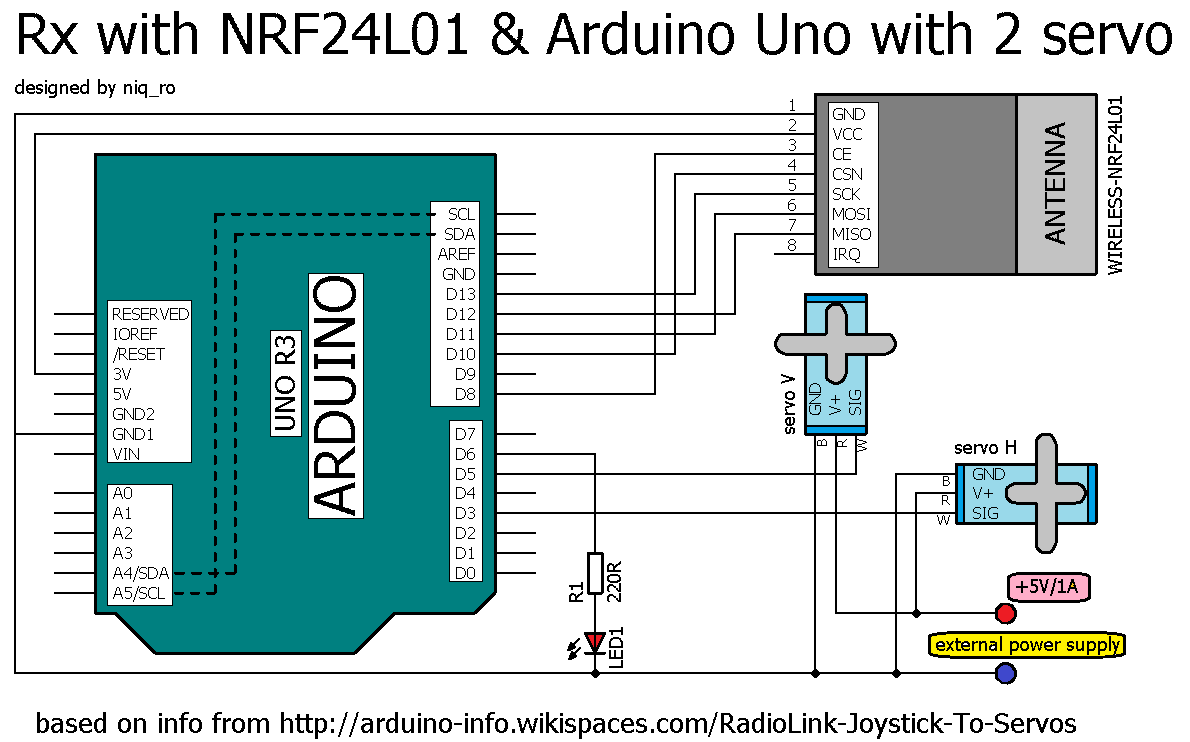
In articolul precedent am transmis pozitia unui joystick (axele x si y), inclusiv pozitia butnonului de pe el (apasat sau liber). Datele transmise si primite se puteau vedea in ecranele de monitorizare seriala. Am zis sa termin sketch-ul din articolul RadioLink-Joystick-To-Servos de pe site-ul arduino-info.wikispaces.com in care se transmitea pozitia joystick-ului catre 2 servomotoare montate, dar nu implementase aprinderea unui led cand se apasa butonul de pe joystick. Schema de conectare a joystick-ului la placa Arduino Uno si a modulului radio NRF24L01 ramane identica cu cea prezentata anterior:
iar receptoprul are schema de conectare astfel:
Am folosit o sursa externa de 5V/1A pentru alimentarea celor 2 servomotoare, decoarece alimentarea prin USB de la calculator nu ar fi fost suficienta.
In articolul Arduino si un servomotor am folosit un servomotor mititel, acum voi testa unul mai "fortos", model MG996R, care are rotile dintate ale reductorului confectionate din metal, fata de celalalt, care le are din plastic.
Deoarece la comanda de se duce in zero, se simtea ca se forteaza, a fost desfacut, sa constat daca are vreun defect mecanic:
Nedepistand nimic mecanic, am ajuns la concluzia ca este partea de comparare a pozitiei, cea cu potentiometru care poate avea rezistent ala capetele de cursa si cea spre masa mai mare... oricum am rezolvat-o din soft, in sensul ca in loc de comanda de a se duce la 00, se duce la 70, care e ok pentru el, iar 1800 devine 1860.
Sketch-ul folosit este:
/*Arduino Servo Test sketchhttp://www.hobbytronics.co.uk/arduino-tutorial2-servosand SWEEEP by BARRAGAN http://barraganstudio.comadapted by niq_ro from http://nicuflorica.blogspot.com*/
#include <Servo.h>
Servo servoMain; // Define our Servovoidsetup()
{
servoMain.attach(9); // servo on digital pin 9pinMode(13, OUTPUT); // initialize the digital pin no 13 as an output.
}
voidloop()
{
// this serve has real 0 degree when comand is 7... 45 is 52=45+7, etc
servoMain.write(7); // Turn Servo Left to 0 degreesdigitalWrite(13, HIGH); // turn ON the LED delay(5000); // Wait 1 seconddigitalWrite(13, LOW); // turn OFF the LED
servoMain.write(52); // Turn Servo Left to 45 degreesdelay(1000); // Wait 1 second
servoMain.write(97); // Turn Servo back to center position (90 degrees)delay(1000); // Wait 1 second
servoMain.write(142); // Turn Servo Right to 135 degreesdelay(1000); // Wait 1 second
servoMain.write(186); // Turn Servo Right to 180 degreesdelay(2000); // Wait 1 second
servoMain.write(142); // Turn Servo Right to 135 degreesdelay(1000); // Wait 1 second
servoMain.write(97); // Turn Servo back to center position (90 degrees)delay(1000); // Wait 1 second
servoMain.write(52); // Turn Servo Left to 45 degreesdelay(1000); // Wait 1 second
servoMain.write(7); // Turn Servo Left to 0 degreesdigitalWrite(13, HIGH); // turn ON the LEDdelay(1000); // Wait 1 seconddigitalWrite(13, LOW); // turn OFF the LED// adapted part from SWEEP examplefor(int pos = 7; pos < 187; pos += 1) // goes from 0 degrees to 180 degrees
{ // in steps of 1 degree
servoMain.write(pos); // tell servo to go to position in variable 'pos' delay(15); // waits 15ms for the servo to reach the position
}
delay(1000);
for(int pos = 186; pos>=7; pos-=1) // goes from 180 degrees to 0 degrees
{
servoMain.write(pos); // tell servo to go to position in variable 'pos' delay(15); // waits 15ms for the servo to reach the position
}
delay (1000);
}
07.02.2014 Pentru a va da seama de diferenta dintre primul servomotor si cel din primul articol, le-am facut poze impreuna:
Servomotorul din poza (micro servo 9g) e nou, altul decat cel initial, asa ca l-am pus la probe si, am constatat, ca nici el nu se duce in 0, asa ca am modificat putin sketch-ul sa imi fie usor de modificat valorile. la minim am lasat 100, iar la maxim 1700.
/*Arduino Servo Test sketchhttp://www.hobbytronics.co.uk/arduino-tutorial2-servosand SWEEEP by BARRAGAN http://barraganstudio.comadapted by niq_ro from http://nicuflorica.blogspot.com*/
#include <Servo.h>
Servo servoMain; // Define our Servovoidsetup()
{
servoMain.attach(9); // servo on digital pin 9pinMode(13, OUTPUT); // initialize the digital pin no 13 as an output.
}
int minim = 0; // theoretical zero degreeint maxim = 180; // theoretical 180 degreeint eroarejos = 10; // error at minimum (restricted area)int eroaresus = -10; // error at maximum (restricted area)int zero = minim + eroarejos; // practical minimum allowedint plin = maxim + eroaresus; // practical maximum allowedint jumate = (plin-zero)/2; // half position (90 degree)int sfert = (plin-zero)/4; // quarterint farasfert = 3*(plin-zero)/4; // theree quartervoidloop()
{
// this serve has real 0 degree when comand is 7... 45 is 52=45+7, etc
servoMain.write(zero); // Turn Servo Left to 0 degreesdigitalWrite(13, HIGH); // turn ON the LED delay(1000); // Wait 1 seconddigitalWrite(13, LOW); // turn OFF the LED
servoMain.write(sfert); // Turn Servo Left to 45 degreesdelay(1000); // Wait 1 second
servoMain.write(jumate); // Turn Servo back to center position (90 degrees)digitalWrite(13, HIGH); // turn ON the LED delay(3000); // Wait 1 seconddigitalWrite(13, LOW); // turn OFF the LED
servoMain.write(farasfert); // Turn Servo Right to 135 degreesdelay(1000); // Wait 1 second
servoMain.write(plin); // Turn Servo Right to 180 degreesdelay(2000); // Wait 1 second
servoMain.write(farasfert); // Turn Servo Right to 135 degreesdelay(1000); // Wait 1 second
servoMain.write(jumate); // Turn Servo back to center position (90 degrees)digitalWrite(13, HIGH); // turn ON the LED delay(3000); // Wait 1 seconddigitalWrite(13, LOW); // turn OFF the LED
servoMain.write(sfert); // Turn Servo Left to 45 degreesdelay(1000); // Wait 1 second
servoMain.write(zero); // Turn Servo Left to 0 degreesdigitalWrite(13, HIGH); // turn ON the LEDdelay(1000); // Wait 1 seconddigitalWrite(13, LOW); // turn OFF the LED// adapted part from SWEEP examplefor(int pos = zero; pos < plin; pos += 1) // goes from 0 degrees to 180 degrees
{ // in steps of 1 degree
servoMain.write(pos); // tell servo to go to position in variable 'pos' delay(15); // waits 15ms for the servo to reach the position
}
delay(1000);
for(int pos = (plin-1); pos>=zero; pos-=1) // goes from 180 degrees to 0 degrees
{
servoMain.write(pos); // tell servo to go to position in variable 'pos' delay(15); // waits 15ms for the servo to reach the position
}
delay (1000);
}
In prezentul articol o sa prezint un modul de acces cu parola, cu inchidere manuala sau temporizata, in care elementul de executie e un servomotor. Acest articol se bazeaza pe informatiile, schemele si programioarele (sketch-urile) din articolele anterioare: - Arduino si o tastatura cu 12 butoane - Arduino si o tastatura cu 12 butoane (II) - Arduino si un servomotor In prima faza am conectat tastatura, afisajul si servomotorul:
// original schematic and schetch from http://www.arduinoevilgenius.com/// adapted schematic by niq_ro ( http://www.tehnic.go.ro/ )// sketch door lock ver.4.0 (19.11.2013) use sketch door lock ver.2.0 (02.03.2013)
#include <EEPROM.h>
char* secretCode = "2255";
intposition = 0;
int position2 = 0;
boolean locked = true;
constbyte rows = 4;
constbyte cols = 3;
char keys[rows][cols] = {
{'1','2','3'},
{'4','5','6'},
{'7','8','9'},
{'*','0','#'}
};
byte rowPins[rows] = {2, 7, 6, 4};
byte colPins[cols] = {3, 1, 5};
Keypadkeypad = Keypad(makeKeymap(keys), rowPins, colPins, rows, cols);
int redPin = 11;
int greenPin = 9;
int bluePin = 10;
int solenoidPin = 13;
// include the library code:
#include <LiquidCrystal.h>
// initialize the library with the numbers of the interface pinsLiquidCrystal lcd(14, 15, 16, 17, 18, 19);
/*---------------------| Arduino | LCD1602 |---------------------| D14(A0) | RS |---------------------| D15(A1) | E |---------------------| D16(A2) | D4 |---------------------| D14(A3) | D5 |---------------------| D14(A4) | D6 |---------------------| D14(A5) | D7 |---------------------*/
#include <Servo.h>
Servo servoMain; // Define our Servovoidsetup()
{
/*pinMode(redPin, OUTPUT);pinMode(greenPin, OUTPUT);pinMode(bluePin, OUTPUT);*///pinMode(9, OUTPUT);
servoMain.attach(9); // servo on digital pin 9//servoMain.write(0); // Turn Servo Left to 0 degrees
lcd.begin(16, 2);
// print my logo
lcd.setCursor(0, 0);
lcd.print("www.tehnic.go.ro");
lcd.setCursor(0, 1);
lcd.print(" by niq_ro");
delay(5000);
lcd.clear();
lcd.setCursor(0, 0);
lcd.print("acces permis la");
lcd.setCursor(2, 1);
lcd.print("introducere");
delay(1000);
lcd.clear();
lcd.setCursor(2, 0);
lcd.print("parola corecta");
lcd.setCursor(2, 1);
lcd.print("versiune 4 .0");
delay(1000);
lcd.clear();
lcd.setCursor(0, 0);
lcd.print("apasa tasta '#'");
lcd.setCursor(0, 1);
lcd.print("pentru stergere");
delay(5000);
lcd.clear();
//eraseCode(); // a first test for initial code at "2255";delay(1000);
loadCode(); // load the code from EEPROM
flash();
updateOutputs();
// print a new message
lcd.clear();
lcd.setCursor(1, 0);
lcd.print("introdu parola");
lcd.setCursor(0, 1);
}
voidloop()
{
//servoMain.write(0); // Turn Servo Left to 0 degreeschar key = keypad.getKey();
if (key)
{
position2 ++;
//digitalWrite(bluePin, HIGH);delay(30);
//digitalWrite(bluePin, LOW);
lcd.print("?");
}
if (key == '*' && ! locked)
{
// unlocked and * pressed so change codeposition = 0;
position2 = 0;
getNewCode();
updateOutputs();
}
if (key == '#')
{
locked = true;
position = 0;
position2= 0;
updateOutputs();
//digitalWrite(bluePin, HIGH);//delay(300);//digitalWrite(bluePin, LOW);
lcd.clear();
lcd.setCursor(1, 0);
lcd.print("yala incuiata");
lcd.setCursor(0, 1);
delay(1000);
lcd.clear();
lcd.setCursor(1, 0);
lcd.print("introdu parola");
lcd.setCursor(0, 1);
//lcd.clear();
}
if (key == secretCode[position])
{
position ++;
}
if (position == 4 & position2 == 4)
{
locked = false;
//digitalWrite(bluePin, HIGH);delay(300);
//digitalWrite(bluePin, LOW);
updateOutputs();
lcd.clear();
lcd.setCursor(0, 0);
lcd.print("parola corecta..");
lcd.setCursor(2, 1);
lcd.print("acces permis");
}
delay(100);
}
void updateOutputs()
{
if (locked)
{
//digitalWrite(redPin, HIGH);//digitalWrite(greenPin, LOW);digitalWrite(solenoidPin, HIGH);
servoMain.write(90); // Turn Servo back to center position (90 degrees)
}
else
{
//digitalWrite(redPin, LOW);//digitalWrite(greenPin, HIGH);digitalWrite(solenoidPin, LOW);
servoMain.write(0); // Turn Servo Left to 0 degrees
}
}
void getNewCode()
{
lcd.clear();
lcd.setCursor(0, 0);
lcd.print("parola noua este");
lcd.setCursor(6, 1);
lcd.print("");
flash();
for (int i = 0; i < 4; i++ )
{
char key;
key = keypad.getKey();
while (key == 0)
{
key = keypad.getKey();
}
flash();
secretCode[i] = key;
lcd.print(key);
}
saveCode();
flash();flash();
}
void loadCode()
{
if (EEPROM.read(0) == 7)
{
secretCode[0] = EEPROM.read(1);
secretCode[1] = EEPROM.read(2);
secretCode[2] = EEPROM.read(3);
secretCode[3] = EEPROM.read(4);
}
}
void saveCode()
{
EEPROM.write(1, secretCode[0]);
EEPROM.write(2, secretCode[1]);
EEPROM.write(3, secretCode[2]);
EEPROM.write(4, secretCode[3]);
EEPROM.write(0, 7);
}
void eraseCode() // code is "2255"
{
EEPROM.write(1, 2);
EEPROM.write(2, 2);
EEPROM.write(3, 5);
EEPROM.write(4, 5);
EEPROM.write(0, 2);
}
void flash()
{
/*digitalWrite(redPin, HIGH);digitalWrite(greenPin, LOW);delay(100);digitalWrite(redPin, LOW);digitalWrite(greenPin, HIGH);*/delay(100);
}
Sketch-ul pentru a 2-a versiune este:
// original schematic and schetch from http://www.arduinoevilgenius.com/// adapted schematic by niq_ro ( http://www.tehnic.go.ro/ )// sketch door lock ver.4.1 (19.11.2013) use sketch door lock ver.2.0 (02.03.2013)