- pentru LM35:


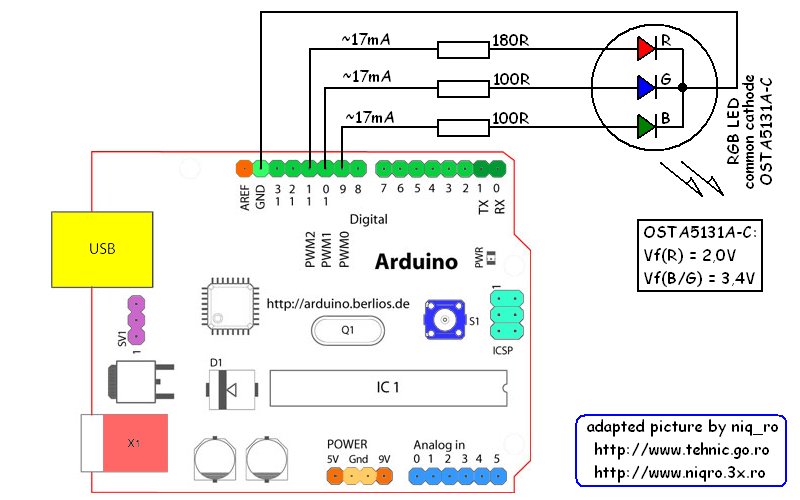
Practic, montajul arata asa:

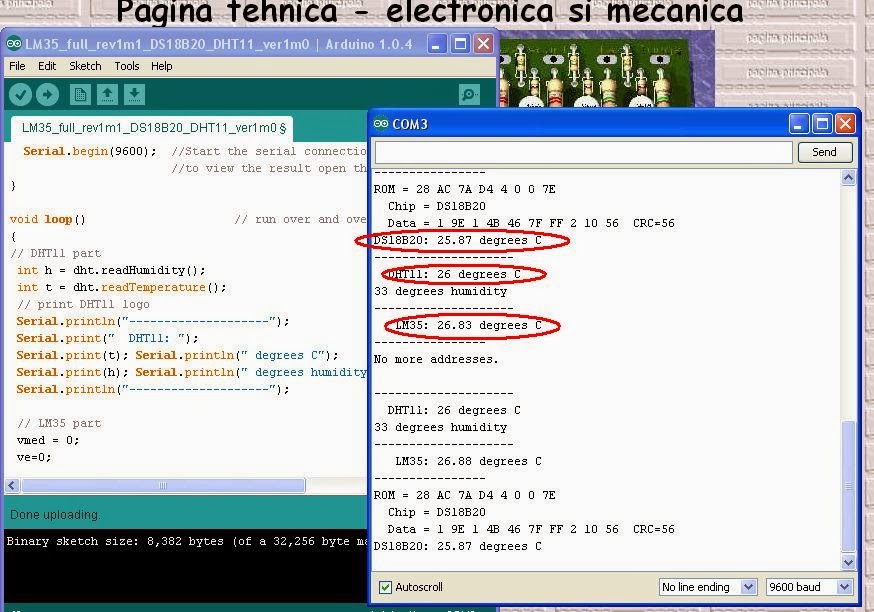
Dupa combinarea sketch-urilor din articolele anterioare am obtinut pe ecran:


Sketch-ul folosit de mine este:
// original sketch from http://learn.adafruit.com/tmp36-temperature-sensor/using-a-temp-sensor
// adapted sketch by niq_ro from http://nicuflorica.blogspot.com
// LM35 datasheet: http://www.ti.com/lit/ds/symlink/lm35.pdf
// inspired by http://www.roroid.ro/wiki/pmwiki.php/Main/TermometruCuArduino
// OneWire DS18S20, DS18B20, DS1822 Temperature Example: http://www.pjrc.com/teensy/td_libs_OneWire.html
// The DallasTemperature library can do all this work for you!
// http://milesburton.com/Dallas_Temperature_Control_Library
#include <OneWire.h>


//LMP35 Pin Variables
int sensorPin = 0; //the analog pin the LM35 Vout (sense) pin is connected to A0
                        //the resolution is 10 mV / degree centigrade with a
int diodePin = 1;  //pin for measure voltage diode

 /*
 * setup() - this function runs once when you turn your Arduino on
 * We initialize the serial connection with the computer
 */

// added part by niq_ro
float vmed = 0;
float ve = 0;

OneWire  ds(10);  // on pin 10 (a 4.7K resistor is necessary)


void setup()
{
  Serial.begin(9600);  //Start the serial connection with the computer
                       //to view the result open the serial monitor
}

void loop()                     // run over and over again
{
 vmed = 0;
 ve=0;

 for (int j = 0; j < 10; j++)  {

 //getting the voltage reading from the temperature sensor
 int reading = analogRead(sensorPin);
 int reading1 = analogRead(diodePin);

 // converting that reading to voltage, for 3.3v arduino use 3.3
 float voltage = (reading - reading1) * 5.0;
 voltage /= 1023.0;

 vmed = vmed + voltage;
 delay(200);

 }
 ve = vmed/10;
 // print LM35 logo
 Serial.println("--------------------");
 Serial.print("   LM35: ");

/*
 // print out the voltage
 Serial.print(ve); Serial.println(" volts");
*/

 // now print out the temperature
 float temperatureC = ve * 100 ;  //converting from 10 mv per degree
                                               //to degrees (voltage) times 100)
 Serial.print(temperatureC); Serial.println(" degrees C");
/*
 // now convert to Fahrenheit
 float temperatureF = (temperatureC * 9.0 / 5.0) + 32.0;
 Serial.print(temperatureF); Serial.println(" degrees F");
*/
 Serial.println("----------------");
 delay(1000);                                     //waiting a second

// DS18B20 part

  byte i;
  byte present = 0;
  byte type_s;
  byte data[12];
  byte addr[8];
  float celsius, fahrenheit;


  if ( !ds.search(addr)) {
    Serial.println("No more addresses.");
    Serial.println();
    ds.reset_search();
    delay(250);
    return;
  }


  Serial.print("ROM =");
  for( i = 0; i < 8; i++) {
    Serial.write(' ');
    Serial.print(addr[i], HEX);
  }

  if (OneWire::crc8(addr, 7) != addr[7]) {
      Serial.println("CRC is not valid!");
      return;
  }
  Serial.println();

  // the first ROM byte indicates which chip
  switch (addr[0]) {
    case 0x10:
      Serial.println("  Chip = DS18S20");  // or old DS1820
      type_s = 1;
      break;
    case 0x28:
      Serial.println("  Chip = DS18B20");
      type_s = 0;
      break;
    case 0x22:
      Serial.println("  Chip = DS1822");
      type_s = 0;
      break;
    default:
      Serial.println("Device is not a DS18x20 family device.");
      return;
  }

  ds.reset();
  ds.select(addr);
  ds.write(0x44, 1);        // start conversion, with parasite power on at the end

  delay(1000);     // maybe 750ms is enough, maybe not
  // we might do a ds.depower() here, but the reset will take care of it.

  present = ds.reset();
  ds.select(addr);
  ds.write(0xBE);         // Read Scratchpad

  Serial.print("  Data = ");
  Serial.print(present, HEX);
  Serial.print(" ");
  for ( i = 0; i < 9; i++) {           // we need 9 bytes
    data[i] = ds.read();
    Serial.print(data[i], HEX);
    Serial.print(" ");
  }
  Serial.print(" CRC=");
  Serial.print(OneWire::crc8(data, 8), HEX);
  Serial.println();

  // Convert the data to actual temperature
  // because the result is a 16 bit signed integer, it should
  // be stored to an "int16_t" type, which is always 16 bits
  // even when compiled on a 32 bit processor.
  int16_t raw = (data[1] << 8) | data[0];
  if (type_s) {
    raw = raw << 3; // 9 bit resolution default
    if (data[7] == 0x10) {
      // "count remain" gives full 12 bit resolution
      raw = (raw & 0xFFF0) + 12 - data[6];
    }
  } else {
    byte cfg = (data[4] & 0x60);
    // at lower res, the low bits are undefined, so let's zero them
    if (cfg == 0x00) raw = raw & ~7;  // 9 bit resolution, 93.75 ms
    else if (cfg == 0x20) raw = raw & ~3; // 10 bit res, 187.5 ms
    else if (cfg == 0x40) raw = raw & ~1; // 11 bit res, 375 ms
    //// default is 12 bit resolution, 750 ms conversion time
  }
  celsius = (float)raw / 16.0;
  fahrenheit = celsius * 1.8 + 32.0;
  Serial.print("DS18B20: ");
  Serial.print(celsius); Serial.println(" degrees C");
/*
  Serial.print(fahrenheit); Serial.println(" degrees F");
*/

delay(2000);
}

+
Cele 2 montaje arata asa:


Filmul, care prezinta valorile obtinute se numeste temperaturi masurate cu LM335, LM35 si DS18B20 folosind Arduino:
Daca tot m-am apucat, am conectat si senzorul DHT11 de umiditate si temperatura, cu care am tot lucrat, incepand cu prezentarea din articolul Ministatie meteo cu senzorul DHT11 si.. Arduino, ca si acolo pinul de date este A2 (doar ca nu e si placa de retea..)


 Sketch-ul a devenit:


// original sketch from http://learn.adafruit.com/tmp36-temperature-sensor/using-a-temp-sensor
// adapted sketch by niq_ro from http://nicuflorica.blogspot.com
// LM35 datasheet: http://www.ti.com/lit/ds/symlink/lm35.pdf
// inspired by http://www.roroid.ro/wiki/pmwiki.php/Main/TermometruCuArduino
// OneWire DS18S20, DS18B20, DS1822 Temperature Example: http://www.pjrc.com/teensy/td_libs_OneWire.html
// The DallasTemperature library can do all this work for you!
// http://milesburton.com/Dallas_Temperature_Control_Library

//LMP35 Pin Variables
int sensorPin = 0; //the analog pin the LM35 Vout (sense) pin is connected to A0
                        //the resolution is 10 mV / degree centigrade with a
int diodePin = 1;  //pin for measure voltage diode

 /*
 * setup() - this function runs once when you turn your Arduino on
 * We initialize the serial connection with the computer
 */

// added part by niq_ro
float vmed = 0;
float ve = 0;

#include <OneWire.h>
OneWire  ds(10);  // on pin 10 (a 4.7K resistor is necessary)

#include "DHT.h"
#define DHTPIN A2     // what pin we're connected to
#define DHTTYPE DHT11   // DHT 11
DHT dht(DHTPIN, DHTTYPE);


void setup()
{
 dht.begin();
  Serial.begin(9600);  //Start the serial connection with the computer
                       //to view the result open the serial monitor
}

void loop()                     // run over and over again
{
// DHT11 part
 int h = dht.readHumidity();
 int t = dht.readTemperature();
 // print DHT11 logo
 Serial.println("--------------------");
 Serial.print("  DHT11: ");
 Serial.print(t); Serial.println(" degrees C");
 Serial.print(h); Serial.println(" degrees humidity");
 Serial.println("--------------------");

 // LM35 part
 vmed = 0;
 ve=0;

 for (int j = 0; j < 10; j++)  {

 //getting the voltage reading from the temperature sensor
 int reading = analogRead(sensorPin);
 int reading1 = analogRead(diodePin);

 // converting that reading to voltage, for 3.3v arduino use 3.3
 float voltage = (reading - reading1) * 5.0;
 voltage /= 1023.0;

 vmed = vmed + voltage;
 delay(200);

 }
 ve = vmed/10;
 // print LM35 logo
// Serial.println("--------------------");
 Serial.print("   LM35: ");

/*
 // print out the voltage
 Serial.print(ve); Serial.println(" volts");
*/

 // now print out the temperature
 float temperatureC = ve * 100 ;  //converting from 10 mv per degree
                                               //to degrees (voltage) times 100)
 Serial.print(temperatureC); Serial.println(" degrees C");
/*
 // now convert to Fahrenheit
 float temperatureF = (temperatureC * 9.0 / 5.0) + 32.0;
 Serial.print(temperatureF); Serial.println(" degrees F");
*/
 Serial.println("----------------");
 delay(1000);                                     //waiting a second

// DS18B20 part

  byte i;
  byte present = 0;
  byte type_s;
  byte data[12];
  byte addr[8];
  float celsius, fahrenheit;


  if ( !ds.search(addr)) {
    Serial.println("No more addresses.");
    Serial.println();
    ds.reset_search();
    delay(250);
    return;
  }


  Serial.print("ROM =");
  for( i = 0; i < 8; i++) {
    Serial.write(' ');
    Serial.print(addr[i], HEX);
  }

  if (OneWire::crc8(addr, 7) != addr[7]) {
      Serial.println("CRC is not valid!");
      return;
  }
  Serial.println();

  // the first ROM byte indicates which chip
  switch (addr[0]) {
    case 0x10:
      Serial.println("  Chip = DS18S20");  // or old DS1820
      type_s = 1;
      break;
    case 0x28:
      Serial.println("  Chip = DS18B20");
      type_s = 0;
      break;
    case 0x22:
      Serial.println("  Chip = DS1822");
      type_s = 0;
      break;
    default:
      Serial.println("Device is not a DS18x20 family device.");
      return;
  }

  ds.reset();
  ds.select(addr);
  ds.write(0x44, 1);        // start conversion, with parasite power on at the end

  delay(1000);     // maybe 750ms is enough, maybe not
  // we might do a ds.depower() here, but the reset will take care of it.

  present = ds.reset();
  ds.select(addr);
  ds.write(0xBE);         // Read Scratchpad

  Serial.print("  Data = ");
  Serial.print(present, HEX);
  Serial.print(" ");
  for ( i = 0; i < 9; i++) {           // we need 9 bytes
    data[i] = ds.read();
    Serial.print(data[i], HEX);
    Serial.print(" ");
  }
  Serial.print(" CRC=");
  Serial.print(OneWire::crc8(data, 8), HEX);
  Serial.println();

  // Convert the data to actual temperature
  // because the result is a 16 bit signed integer, it should
  // be stored to an "int16_t" type, which is always 16 bits
  // even when compiled on a 32 bit processor.
  int16_t raw = (data[1] << 8) | data[0];
  if (type_s) {
    raw = raw << 3; // 9 bit resolution default
    if (data[7] == 0x10) {
      // "count remain" gives full 12 bit resolution
      raw = (raw & 0xFFF0) + 12 - data[6];
    }
  } else {
    byte cfg = (data[4] & 0x60);
    // at lower res, the low bits are undefined, so let's zero them
    if (cfg == 0x00) raw = raw & ~7;  // 9 bit resolution, 93.75 ms
    else if (cfg == 0x20) raw = raw & ~3; // 10 bit res, 187.5 ms
    else if (cfg == 0x40) raw = raw & ~1; // 11 bit res, 375 ms
    //// default is 12 bit resolution, 750 ms conversion time
  }
  celsius = (float)raw / 16.0;
  fahrenheit = celsius * 1.8 + 32.0;
  Serial.print("DS18B20: ");
  Serial.print(celsius); Serial.println(" degrees C");
/*
  Serial.print(fahrenheit); Serial.println(" degrees F");
*/

delay(2000);
}


Va salut cu respect. As vrea daca se poate sa ma ajutati contracost intr-un proiect privind automatizarea unei sere. Pentru contact nr. meu este: 0727619222. Constantin Tudorache
RăspundețiȘtergereBuna ziua, o sa va contactez azi dupa ora 17, cu stima, Nicu Florica
ȘtergereBuna ziua, stiti sa imi spuneti la ce distanta poate functiona un senzor de temperatura tmp36, in proiectul meu as vrea ca arduino sa fie intr-un panou de control(parter) iar senzorul tmp36(etaj) si in ce as putea sa il pun (caracasa plastic) , conteaza la un astfel de proiect daca ii analog sau digital in comparatie cu ds18b20. Multumesc
RăspundețiȘtergerescuze de intarziere.. senzorul digital trimite date, iar cel analog tensiuni cu valoare variabila.. eu as lucra cu DS18B20 pentru distante...
Ștergere