duminică, 5 ianuarie 2014

Termometru cu LM335, LM35, DS18B20 sau DHT11 folosind Arduino

  Pentru a compara indicatiile mai multor senzori diferiti, incep cu unul analogic, LM35, prezentat in articolul Senzorul de temperatura LM35 si Arduino, respectiv cel digital, DS18B20, prezentat in articolul Senzorul de temperatura DS18D20 si Arduino, pe care i-am conectat la o placa Arduino.
- pentru LM35:
- pentru DS18B20:
   Practic, montajul arata asa:
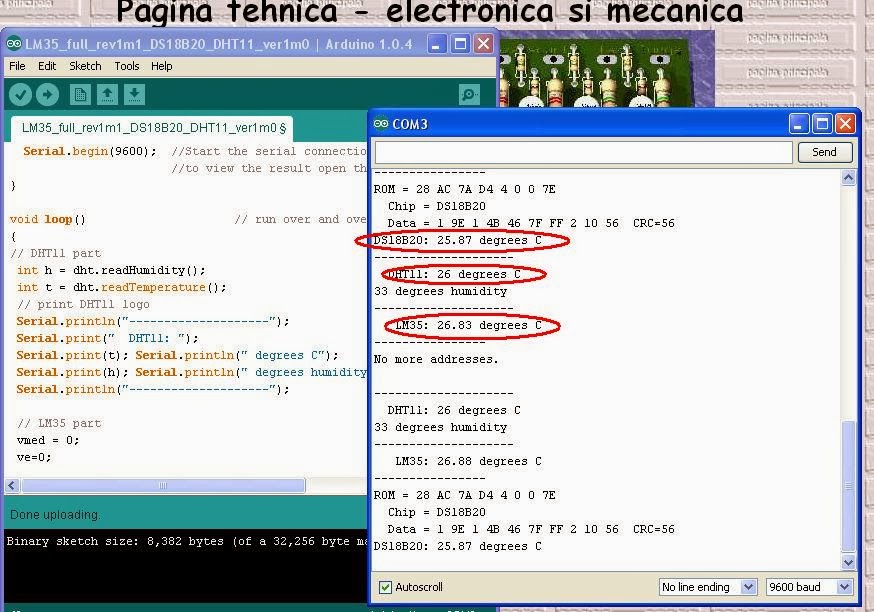
   Dupa combinarea sketch-urilor din articolele anterioare am obtinut pe ecran:
 
   Sketch-ul folosit de mine este:
// original sketch from http://learn.adafruit.com/tmp36-temperature-sensor/using-a-temp-sensor
// adapted sketch by niq_ro from http://nicuflorica.blogspot.com
// LM35 datasheet: http://www.ti.com/lit/ds/symlink/lm35.pdf
// inspired by http://www.roroid.ro/wiki/pmwiki.php/Main/TermometruCuArduino
// OneWire DS18S20, DS18B20, DS1822 Temperature Example: http://www.pjrc.com/teensy/td_libs_OneWire.html
// The DallasTemperature library can do all this work for you!
// http://milesburton.com/Dallas_Temperature_Control_Library
#include <OneWire.h>


//LMP35 Pin Variables
int sensorPin = 0; //the analog pin the LM35 Vout (sense) pin is connected to A0
                        //the resolution is 10 mV / degree centigrade with a
int diodePin = 1;  //pin for measure voltage diode             

 /*
 * setup() - this function runs once when you turn your Arduino on
 * We initialize the serial connection with the computer
 */

// added part by niq_ro
float vmed = 0;
float ve = 0;  

OneWire  ds(10);  // on pin 10 (a 4.7K resistor is necessary)


void setup()
{
  Serial.begin(9600);  //Start the serial connection with the computer
                       //to view the result open the serial monitor 
}
 
void loop()                     // run over and over again
{
 vmed = 0;
 ve=0;
  
 for (int j = 0; j < 10; j++)  {
  
 //getting the voltage reading from the temperature sensor
 int reading = analogRead(sensorPin);  
 int reading1 = analogRead(diodePin);  
    
 // converting that reading to voltage, for 3.3v arduino use 3.3
 float voltage = (reading - reading1) * 5.0;
 voltage /= 1023.0; 
 
 vmed = vmed + voltage;
 delay(200);
 
 }
 ve = vmed/10;
 // print LM35 logo
 Serial.println("--------------------");
 Serial.print("   LM35: ");

/* 
 // print out the voltage
 Serial.print(ve); Serial.println(" volts");
*/

 // now print out the temperature
 float temperatureC = ve * 100 ;  //converting from 10 mv per degree 
                                               //to degrees (voltage) times 100)
 Serial.print(temperatureC); Serial.println(" degrees C");
/* 
 // now convert to Fahrenheit
 float temperatureF = (temperatureC * 9.0 / 5.0) + 32.0;
 Serial.print(temperatureF); Serial.println(" degrees F");
*/
 Serial.println("----------------");
 delay(1000);                                     //waiting a second

// DS18B20 part

  byte i;
  byte present = 0;
  byte type_s;
  byte data[12];
  byte addr[8];
  float celsius, fahrenheit;

 
  if ( !ds.search(addr)) {
    Serial.println("No more addresses.");
    Serial.println();
    ds.reset_search();
    delay(250);
    return;
  }


  Serial.print("ROM =");
  for( i = 0; i < 8; i++) {
    Serial.write(' ');
    Serial.print(addr[i], HEX);
  }

  if (OneWire::crc8(addr, 7) != addr[7]) {
      Serial.println("CRC is not valid!");
      return;
  }
  Serial.println();
 
  // the first ROM byte indicates which chip
  switch (addr[0]) {
    case 0x10:
      Serial.println("  Chip = DS18S20");  // or old DS1820
      type_s = 1;
      break;
    case 0x28:
      Serial.println("  Chip = DS18B20");
      type_s = 0;
      break;
    case 0x22:
      Serial.println("  Chip = DS1822");
      type_s = 0;
      break;
    default:
      Serial.println("Device is not a DS18x20 family device.");
      return;
  } 

  ds.reset();
  ds.select(addr);
  ds.write(0x44, 1);        // start conversion, with parasite power on at the end
  
  delay(1000);     // maybe 750ms is enough, maybe not
  // we might do a ds.depower() here, but the reset will take care of it.
  
  present = ds.reset();
  ds.select(addr);    
  ds.write(0xBE);         // Read Scratchpad

  Serial.print("  Data = ");
  Serial.print(present, HEX);
  Serial.print(" ");
  for ( i = 0; i < 9; i++) {           // we need 9 bytes
    data[i] = ds.read();
    Serial.print(data[i], HEX);
    Serial.print(" ");
  }
  Serial.print(" CRC=");
  Serial.print(OneWire::crc8(data, 8), HEX);
  Serial.println();

  // Convert the data to actual temperature
  // because the result is a 16 bit signed integer, it should
  // be stored to an "int16_t" type, which is always 16 bits
  // even when compiled on a 32 bit processor.
  int16_t raw = (data[1] << 8) | data[0];
  if (type_s) {
    raw = raw << 3; // 9 bit resolution default
    if (data[7] == 0x10) {
      // "count remain" gives full 12 bit resolution
      raw = (raw & 0xFFF0) + 12 - data[6];
    }
  } else {
    byte cfg = (data[4] & 0x60);
    // at lower res, the low bits are undefined, so let's zero them
    if (cfg == 0x00) raw = raw & ~7;  // 9 bit resolution, 93.75 ms
    else if (cfg == 0x20) raw = raw & ~3; // 10 bit res, 187.5 ms
    else if (cfg == 0x40) raw = raw & ~1; // 11 bit res, 375 ms
    //// default is 12 bit resolution, 750 ms conversion time
  }
  celsius = (float)raw / 16.0;
  fahrenheit = celsius * 1.8 + 32.0;
  Serial.print("DS18B20: ");
  Serial.print(celsius); Serial.println(" degrees C");
/*
  Serial.print(fahrenheit); Serial.println(" degrees F");
*/

delay(2000);
}
  Am facut si un filmulet, numit termometru cu Arduino folosind LM35 si DS18B20:
   Am extins comparatiile si pentru LM335, deoarece am un modul cu 2 asemenea senzori, unul pe placuta, iar celalalt cu fir de cca. 1m + indicator de confort (vezi articolul Termometru dublu cu LM335Z si un afisaj LCD cu 16 coloane si 2 randuri (II)
+
   Cele 2 montaje arata asa:
 
   Filmul, care prezinta valorile obtinute se numeste temperaturi masurate cu LM335, LM35 si DS18B20 folosind Arduino:
   Daca tot m-am apucat, am conectat si senzorul DHT11 de umiditate si temperatura, cu care am tot lucrat, incepand cu prezentarea din articolul Ministatie meteo cu senzorul DHT11 si.. Arduino, ca si acolo pinul de date este A2 (doar ca nu e si placa de retea..)


  Sketch-ul a devenit:
// original sketch from http://learn.adafruit.com/tmp36-temperature-sensor/using-a-temp-sensor
// adapted sketch by niq_ro from http://nicuflorica.blogspot.com
// LM35 datasheet: http://www.ti.com/lit/ds/symlink/lm35.pdf
// inspired by http://www.roroid.ro/wiki/pmwiki.php/Main/TermometruCuArduino
// OneWire DS18S20, DS18B20, DS1822 Temperature Example: http://www.pjrc.com/teensy/td_libs_OneWire.html
// The DallasTemperature library can do all this work for you!
// http://milesburton.com/Dallas_Temperature_Control_Library

//LMP35 Pin Variables
int sensorPin = 0; //the analog pin the LM35 Vout (sense) pin is connected to A0
                        //the resolution is 10 mV / degree centigrade with a
int diodePin = 1;  //pin for measure voltage diode             

 /*
 * setup() - this function runs once when you turn your Arduino on
 * We initialize the serial connection with the computer
 */

// added part by niq_ro
float vmed = 0;
float ve = 0;  

#include <OneWire.h>
OneWire  ds(10);  // on pin 10 (a 4.7K resistor is necessary)

#include "DHT.h"
#define DHTPIN A2     // what pin we're connected to
#define DHTTYPE DHT11   // DHT 11 
DHT dht(DHTPIN, DHTTYPE);


void setup()
{
 dht.begin();
  Serial.begin(9600);  //Start the serial connection with the computer
                       //to view the result open the serial monitor 
}
 
void loop()                     // run over and over again
{
// DHT11 part
 int h = dht.readHumidity();
 int t = dht.readTemperature();
 // print DHT11 logo
 Serial.println("--------------------");
 Serial.print("  DHT11: "); 
 Serial.print(t); Serial.println(" degrees C"); 
 Serial.print(h); Serial.println(" degrees humidity"); 
 Serial.println("--------------------");
 
 // LM35 part
 vmed = 0;
 ve=0;
  
 for (int j = 0; j < 10; j++)  {
  
 //getting the voltage reading from the temperature sensor
 int reading = analogRead(sensorPin);  
 int reading1 = analogRead(diodePin);  
    
 // converting that reading to voltage, for 3.3v arduino use 3.3
 float voltage = (reading - reading1) * 5.0;
 voltage /= 1023.0; 
 
 vmed = vmed + voltage;
 delay(200);
 
 }
 ve = vmed/10;
 // print LM35 logo
// Serial.println("--------------------");
 Serial.print("   LM35: ");

/* 
 // print out the voltage
 Serial.print(ve); Serial.println(" volts");
*/

 // now print out the temperature
 float temperatureC = ve * 100 ;  //converting from 10 mv per degree 
                                               //to degrees (voltage) times 100)
 Serial.print(temperatureC); Serial.println(" degrees C");
/* 
 // now convert to Fahrenheit
 float temperatureF = (temperatureC * 9.0 / 5.0) + 32.0;
 Serial.print(temperatureF); Serial.println(" degrees F");
*/
 Serial.println("----------------");
 delay(1000);                                     //waiting a second

// DS18B20 part

  byte i;
  byte present = 0;
  byte type_s;
  byte data[12];
  byte addr[8];
  float celsius, fahrenheit;

  
  if ( !ds.search(addr)) {
    Serial.println("No more addresses.");
    Serial.println();
    ds.reset_search();
    delay(250);
    return;
  }


  Serial.print("ROM =");
  for( i = 0; i < 8; i++) {
    Serial.write(' ');
    Serial.print(addr[i], HEX);
  }

  if (OneWire::crc8(addr, 7) != addr[7]) {
      Serial.println("CRC is not valid!");
      return;
  }
  Serial.println();
 
  // the first ROM byte indicates which chip
  switch (addr[0]) {
    case 0x10:
      Serial.println("  Chip = DS18S20");  // or old DS1820
      type_s = 1;
      break;
    case 0x28:
      Serial.println("  Chip = DS18B20");
      type_s = 0;
      break;
    case 0x22:
      Serial.println("  Chip = DS1822");
      type_s = 0;
      break;
    default:
      Serial.println("Device is not a DS18x20 family device.");
      return;
  } 

  ds.reset();
  ds.select(addr);
  ds.write(0x44, 1);        // start conversion, with parasite power on at the end
  
  delay(1000);     // maybe 750ms is enough, maybe not
  // we might do a ds.depower() here, but the reset will take care of it.
  
  present = ds.reset();
  ds.select(addr);    
  ds.write(0xBE);         // Read Scratchpad

  Serial.print("  Data = ");
  Serial.print(present, HEX);
  Serial.print(" ");
  for ( i = 0; i < 9; i++) {           // we need 9 bytes
    data[i] = ds.read();
    Serial.print(data[i], HEX);
    Serial.print(" ");
  }
  Serial.print(" CRC=");
  Serial.print(OneWire::crc8(data, 8), HEX);
  Serial.println();

  // Convert the data to actual temperature
  // because the result is a 16 bit signed integer, it should
  // be stored to an "int16_t" type, which is always 16 bits
  // even when compiled on a 32 bit processor.
  int16_t raw = (data[1] << 8) | data[0];
  if (type_s) {
    raw = raw << 3; // 9 bit resolution default
    if (data[7] == 0x10) {
      // "count remain" gives full 12 bit resolution
      raw = (raw & 0xFFF0) + 12 - data[6];
    }
  } else {
    byte cfg = (data[4] & 0x60);
    // at lower res, the low bits are undefined, so let's zero them
    if (cfg == 0x00) raw = raw & ~7;  // 9 bit resolution, 93.75 ms
    else if (cfg == 0x20) raw = raw & ~3; // 10 bit res, 187.5 ms
    else if (cfg == 0x40) raw = raw & ~1; // 11 bit res, 375 ms
    //// default is 12 bit resolution, 750 ms conversion time
  }
  celsius = (float)raw / 16.0;
  fahrenheit = celsius * 1.8 + 32.0;
  Serial.print("DS18B20: ");
  Serial.print(celsius); Serial.println(" degrees C");
/*
  Serial.print(fahrenheit); Serial.println(" degrees F");
*/

delay(2000);
}
   Filmuletul care arata ce am zis mai inainte se numeste masurare temperatura cu DHT11, LM35 si DS18B20 + Arduino

sâmbătă, 4 ianuarie 2014

Senzorul de temperatura LM35 si Arduino

   Deoarece am prezentat tot felul de senzori de temperatura, am zis sa nu-l las deoparte nici pe LM35, care este unul din cele mai uzuale.
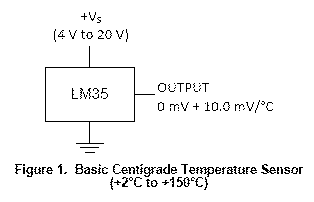
   Informatiile sunt cam aceleasi cu cele din articolul Senzorul de temperatura TMP36 (LM50) si Arduino, doar ca LM-ul nostru nu are acel offset, asa ca modul de conectare simplu, e bun pana pentru temperaturi pozitive:
iar montajul este foarte simplu:
   Am modificat foarte putin sketch-ul de la TMP36 si am obtinut:
   Sketch-ul modificat este:
// original sketch from http://learn.adafruit.com/tmp36-temperature-sensor/using-a-temp-sensor
// adapted sketch by niq_ro from http://nicuflorica.blogspot.com

//LMP35 Pin Variables
int sensorPin = 0; //the analog pin the LM35 Vout (sense) pin is connected to A0
                        //the resolution is 10 mV / degree centigrade with a
           
 /*
 * setup() - this function runs once when you turn your Arduino on
 * We initialize the serial connection with the computer
 */

// added part by niq_ro
float vmed = 0;
float ve = 0;  


void setup()
{
  Serial.begin(9600);  //Start the serial connection with the computer
                       //to view the result open the serial monitor 
}
 
void loop()                     // run over and over again
{
 vmed = 0;
 ve=0;
  
 for (int j = 0; j < 10; j++)  {
  
 //getting the voltage reading from the temperature sensor
 int reading = analogRead(sensorPin);  
    
 // converting that reading to voltage, for 3.3v arduino use 3.3
 float voltage = reading * 5.0;
 voltage /= 1024.0; 
 
 vmed = vmed + voltage;
 delay(200);
 
 }
 ve = vmed/10;
 
 // print out the voltage
 Serial.print(ve); Serial.println(" volts");
 
 // now print out the temperature
 float temperatureC = ve * 100 ;  //converting from 10 mv per degree 
                                               //to degrees (voltage) times 100)
 Serial.print(temperatureC); Serial.println(" degrees C");
 
 // now convert to Fahrenheit
 float temperatureF = (temperatureC * 9.0 / 5.0) + 32.0;
 Serial.print(temperatureF); Serial.println(" degrees F");
 Serial.println("----------------");
 delay(1000);                                     //waiting a second
}
   Deoarece e pacat sa nu folosim toata gama de masura, cu temperaturi negative, trebuie modificata foarte putin schema, prin adaugarea unei rezistente pe iesire si a 2 diode care "salta" tensiunea de iesire...
   Aceasta schema nu prea a fost tratata de utilizatorii Arduino, dar pot spune ca este prezentata in articolul Termometru cu Arduino de pe ROROID unde este/era si un brick (modul de masura):
   Am conectat si eu la fel pinii, pentru ca imi e greu sa redesenez acum, mentionand ca am folosit 2 diode 1N4007 si o rezistenta de 20k:
obtinand pe ecran citirile:
   Sketch-ul folosit este:
// original sketch from http://learn.adafruit.com/tmp36-temperature-sensor/using-a-temp-sensor
// adapted sketch by niq_ro from http://nicuflorica.blogspot.com
// LM35 datasheet: http://www.ti.com/lit/ds/symlink/lm35.pdf
// inspired by http://www.roroid.ro/wiki/pmwiki.php/Main/TermometruCuArduino

//LMP35 Pin Variables
int sensorPin = 0; //the analog pin the LM35 Vout (sense) pin is connected to A0
                        //the resolution is 10 mV / degree centigrade with a
int diodePin = 1;  //pin for measure voltage diode             

 /*
 * setup() - this function runs once when you turn your Arduino on
 * We initialize the serial connection with the computer
 */

// added part by niq_ro
float vmed = 0;
float ve = 0;  


void setup()
{
  Serial.begin(9600);  //Start the serial connection with the computer
                       //to view the result open the serial monitor 
}
 
void loop()                     // run over and over again
{
 vmed = 0;
 ve=0;
  
 for (int j = 0; j < 10; j++)  {
  
 //getting the voltage reading from the temperature sensor
 int reading = analogRead(sensorPin);  
 int reading1 = analogRead(diodePin);  
    
 // converting that reading to voltage, for 3.3v arduino use 3.3
 float voltage = reading * 5.0;
 voltage /= 1024.0; 
 float voltage1 = reading1 * 5.0;
 voltage1 /= 1024.0; 
 
 vmed = vmed + voltage - voltage1;
 delay(200);
 
 }
 ve = vmed/10;
 
 // print out the voltage
 Serial.print(ve); Serial.println(" volts");
 
 // now print out the temperature
 float temperatureC = ve * 100 ;  //converting from 10 mv per degree 
                                               //to degrees (voltage) times 100)
 Serial.print(temperatureC); Serial.println(" degrees C");
 
 // now convert to Fahrenheit
 float temperatureF = (temperatureC * 9.0 / 5.0) + 32.0;
 Serial.print(temperatureF); Serial.println(" degrees F");
 Serial.println("----------------");
 delay(1000);                                     //waiting a second
}
    Am scos LM-ul afara sa masor temperatura, ca-i frig:

Senzorul de temperatura DS18D20 si Arduino

   O alta categorie de senzor de temperatura, in afara celor liniare, prezentate in articole anterioare, este senzorul DS1820, care este produs de Maxim Integrated.
   Chiar la Arduino, este prezentat protocolul de comunica pe un fir la care am desenat schema dupa cum e sketch-ul din exemplu:
   Eu am folosit o rezistenta de 5,1k, in locul celei de 4,7k, deoarece aceea a fost la indemana.
   Practic, montajul de test este simplu de tot:
iar pe eecran apar, ceva de genul:
   Sketch-ul folosit este cel din exemplul lor, doar ca am marit timpul dintre afisari la 2 secunde fata de una:

#include <OneWire.h>
// OneWire DS18S20, DS18B20, DS1822 Temperature Example
//
// http://www.pjrc.com/teensy/td_libs_OneWire.html
//
// The DallasTemperature library can do all this work for you!
// http://milesburton.com/Dallas_Temperature_Control_Library

OneWire  ds(10);  // on pin 10 (a 4.7K resistor is necessary)

void setup(void) {
  Serial.begin(9600);
}

void loop(void) {
  byte i;
  byte present = 0;
  byte type_s;
  byte data[12];
  byte addr[8];
  float celsius, fahrenheit;
  
  if ( !ds.search(addr)) {
    Serial.println("No more addresses.");
    Serial.println();
    ds.reset_search();
    delay(250);
    return;
  }
  
  Serial.print("ROM =");
  for( i = 0; i < 8; i++) {
    Serial.write(' ');
    Serial.print(addr[i], HEX);
  }

  if (OneWire::crc8(addr, 7) != addr[7]) {
      Serial.println("CRC is not valid!");
      return;
  }
  Serial.println();
 
  // the first ROM byte indicates which chip
  switch (addr[0]) {
    case 0x10:
      Serial.println("  Chip = DS18S20");  // or old DS1820
      type_s = 1;
      break;
    case 0x28:
      Serial.println("  Chip = DS18B20");
      type_s = 0;
      break;
    case 0x22:
      Serial.println("  Chip = DS1822");
      type_s = 0;
      break;
    default:
      Serial.println("Device is not a DS18x20 family device.");
      return;
  } 

  ds.reset();
  ds.select(addr);
  ds.write(0x44, 1);        // start conversion, with parasite power on at the end
  
  delay(2000);     // maybe 750ms is enough, maybe not
  // we might do a ds.depower() here, but the reset will take care of it.
  
  present = ds.reset();
  ds.select(addr);    
  ds.write(0xBE);         // Read Scratchpad

  Serial.print("  Data = ");
  Serial.print(present, HEX);
  Serial.print(" ");
  for ( i = 0; i < 9; i++) {           // we need 9 bytes
    data[i] = ds.read();
    Serial.print(data[i], HEX);
    Serial.print(" ");
  }
  Serial.print(" CRC=");
  Serial.print(OneWire::crc8(data, 8), HEX);
  Serial.println();

  // Convert the data to actual temperature
  // because the result is a 16 bit signed integer, it should
  // be stored to an "int16_t" type, which is always 16 bits
  // even when compiled on a 32 bit processor.
  int16_t raw = (data[1] << 8) | data[0];
  if (type_s) {
    raw = raw << 3; // 9 bit resolution default
    if (data[7] == 0x10) {
      // "count remain" gives full 12 bit resolution
      raw = (raw & 0xFFF0) + 12 - data[6];
    }
  } else {
    byte cfg = (data[4] & 0x60);
    // at lower res, the low bits are undefined, so let's zero them
    if (cfg == 0x00) raw = raw & ~7;  // 9 bit resolution, 93.75 ms
    else if (cfg == 0x20) raw = raw & ~3; // 10 bit res, 187.5 ms
    else if (cfg == 0x40) raw = raw & ~1; // 11 bit res, 375 ms
    //// default is 12 bit resolution, 750 ms conversion time
  }
  celsius = (float)raw / 16.0;
  fahrenheit = celsius * 1.8 + 32.0;
  Serial.print("  Temperature = ");
  Serial.print(celsius);
  Serial.print(" Celsius, ");
  Serial.print(fahrenheit);
  Serial.println(" Fahrenheit");
}
   Dupa cum se constata, acest sketch functioneaza si cu senzor de temperatura DS18S20 si DS1822...

joi, 26 decembrie 2013

Verificare caracteristici LED-uri: multicolore (RGB) sau monocolore

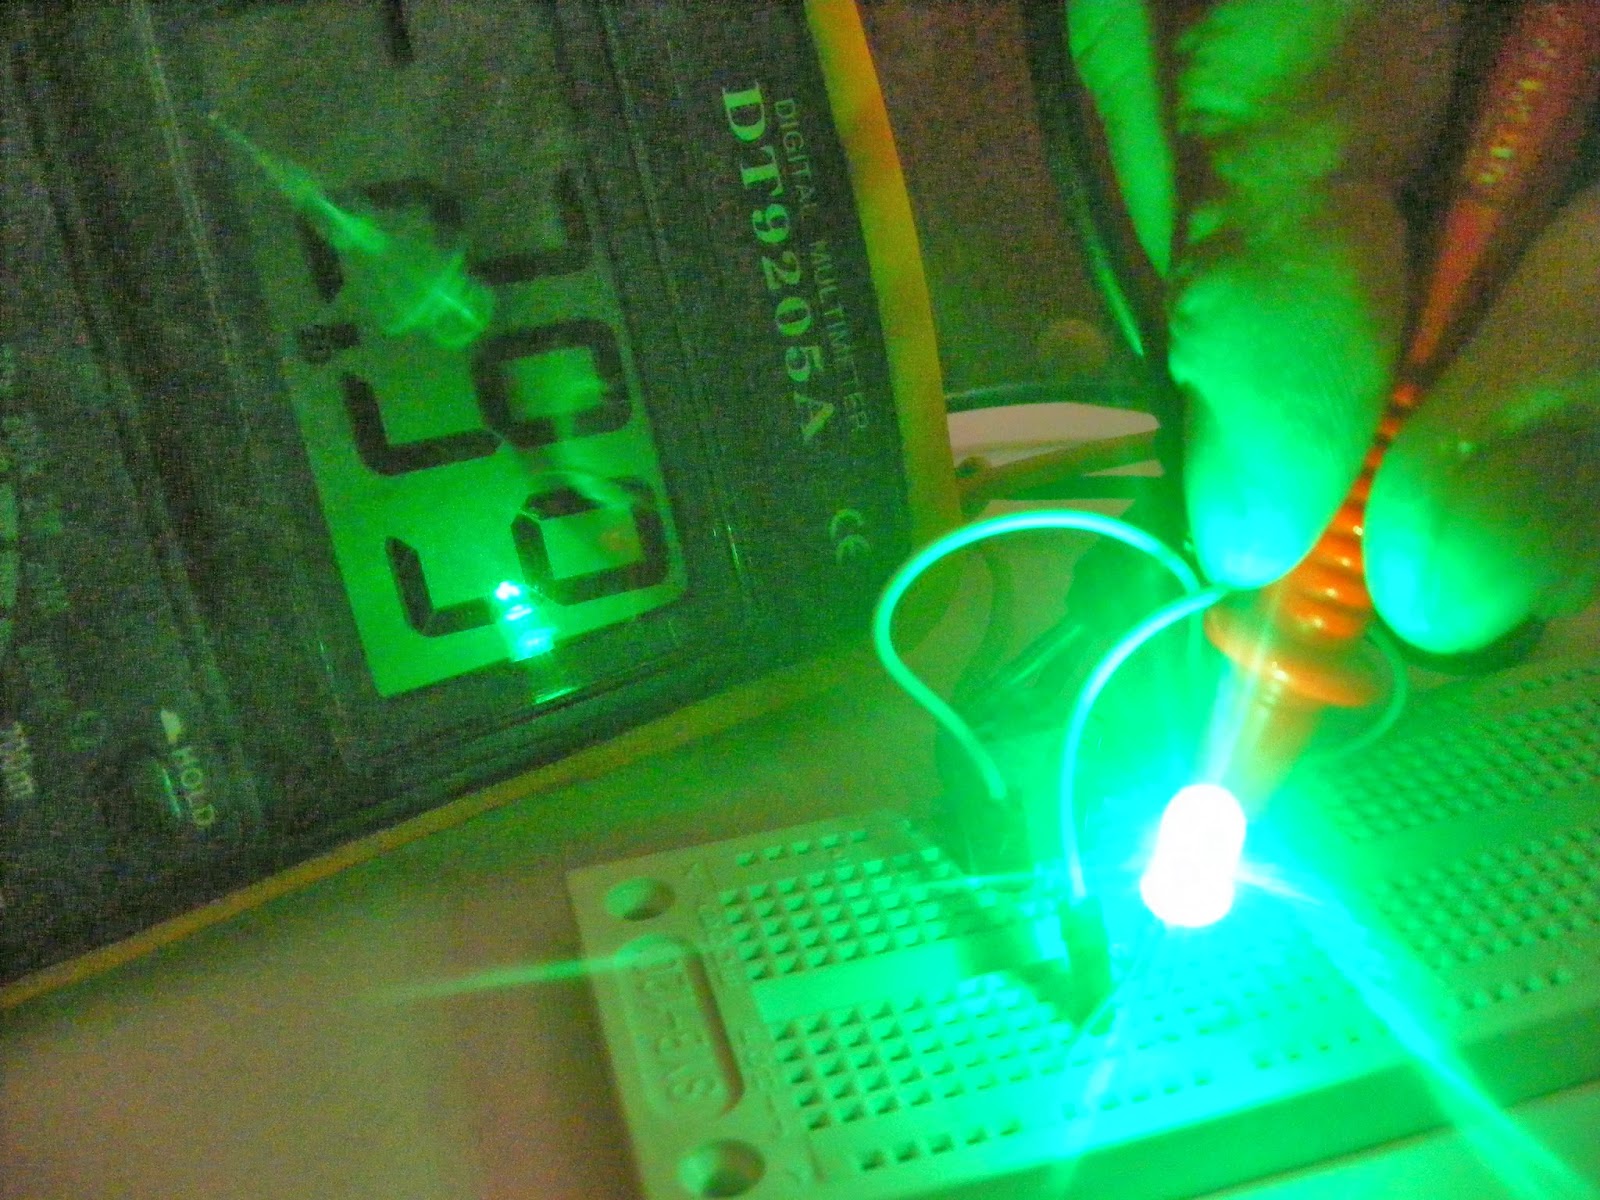
  In pauza dintre sarbatorile de iarna, m-am gandit sa folosesc la un proiect niste LED-uri multicolore (RGB) depsre care nu stiam prea multe (tensiunea pe fiecare tip de LED, daca sunt cu catod comun sau anod comun),asa ca am improvizat un montaj de test.
  Prima data am folosit multimetrul pe domeniul de verificare diode si continuitati, stiind ca piciorusul cel mai lung al unui LED RGB este comun, am depistat, in cazul meu, ca LED-ul este cu catod comun (se alimenteaza cu plus cele 3 LED-uri si masa e comuna).
  Am facut masuratori folosind o sursa de tensiune stabilizata reglata la 5V (4,99V de fapt), inseriind la catodul comun prima data o rezistenta de 220 ohmi, apoi am alimentat fiecare LED si am masurat caderea de tensiune.
   Am schimbat rezistenta cu una de 150 ohmi obtinand:
 
iar in cazul unei rezistente de 100 ohmi:
si daca tot eram la capitolul teste cu rezistenta de 100 ohmi, am veriifcat si un LED alb:
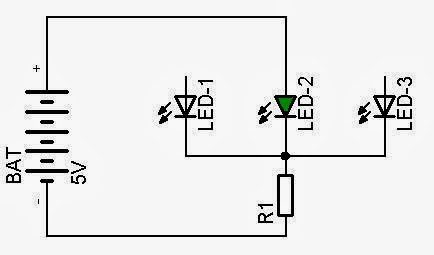
   Schemele de conectare sunt, pentru LED-ul RGB:
 
 
iar pentru cel alb:
   Ca rezumat, pe LED-urile rosii caderea de tensiune este 2..2,1V, pe LED-urile verzi si albastre 2,9..3,1V iar pe cele albe cam 3,2V. 
   NOTA: curentul maxim prin LED-urile obisnuite este de cca. 20mA !!!

joi, 19 decembrie 2013

Senzorul de temperatura TMP36 (LM50) si Arduino

   In pachetul numit "The Arduino Starter kit" se gaseste si senzorul de temperatura TMP36 fabricat de ANALOG DEVICES, care este compatibil 100% cu senzorul fabricat de TEXAS INSTRUMENTS numit LM50 (care lucreaza similar cu mai cunoscutul senzor LM35).
   Fata de senzorul de temperatura LM335, senzorul TMP36 se conecteaza direct la tensiunea de alimentare.
  Un articol cu multe explicatii se gaseste la TMP36 Temperature Sensor de pe site-ul Adafruit Learning System:
   Am realizat si eu montajul si apoi am incarcat primul sketch de acolo obtinand:
   Deoarece valorile citite variaza prea mult, am facut o mica modificare la sketch, cititnd 10 valori la 200ms intre ele si apoi facand o medie.
   Sketch-ul modificat de mine este urmatorul:   
// original sketch from http://learn.adafruit.com/tmp36-temperature-sensor/using-a-temp-sensor
// adapted sketch by niq_ro from http://nicuflorica.blogspot.com

//TMP36 Pin Variables
int sensorPin = 0; //the analog pin the TMP36's Vout (sense) pin is connected to A0
                        //the resolution is 10 mV / degree centigrade with a
                        //500 mV offset to allow for negative temperatures
 /*
 * setup() - this function runs once when you turn your Arduino on
 * We initialize the serial connection with the computer
 */

// added part by niq_ro
float vmed = 0;
float ve = 0;  


void setup()
{
  Serial.begin(9600);  //Start the serial connection with the computer
                       //to view the result open the serial monitor 
}
 
void loop()                     // run over and over again
{
 vmed = 0;
 ve=0;
  
 for (int j = 0; j < 10; j++)  {
  
 //getting the voltage reading from the temperature sensor
 int reading = analogRead(sensorPin);  
    
 // converting that reading to voltage, for 3.3v arduino use 3.3
 float voltage = reading * 5.0;
 voltage /= 1024.0; 
 
 vmed = vmed + voltage;
 delay(200);
 
 }
 ve = vmed/10;
 
 // print out the voltage
 Serial.print(ve); Serial.println(" volts");
 
 // now print out the temperature
 float temperatureC = (ve - 0.5) * 100 ;  //converting from 10 mv per degree wit 500 mV offset
                                               //to degrees ((voltage - 500mV) times 100)
 Serial.print(temperatureC); Serial.println(" degrees C");
 
 // now convert to Fahrenheit
 float temperatureF = (temperatureC * 9.0 / 5.0) + 32.0;
 Serial.print(temperatureF); Serial.println(" degrees F");
 
 delay(1000);                                     //waiting a second
}