MAX7219 poate controla 64 de LED-uri, cum e cazul acestor 8 cifre din 7 segmente + punctul zecimal la fiecare sau o matrice de 8x8 LED-uri.

In articolul Introducing a new serial (SPI) 8-digit seven segment LED display module using MAX7219 se gaseste schema modulului:
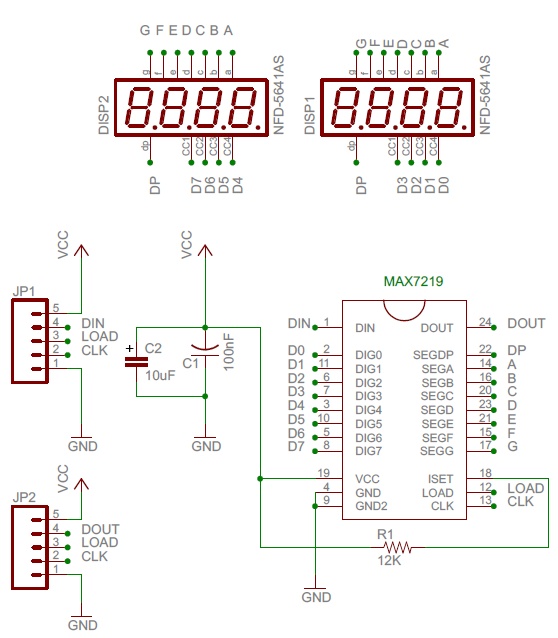
In acel articol sunt prezentate niste scurte exemple, in care se utilizeaza libraria LedControl.h si din comenzile de acolo am facut schema:

Am incercat si eu sketch-urile din articol si din exemplu, modificand unul pentru a afisa cum vreau sa afisez pentru o viitoare statie meteo cu ceas:


si un anume text:


Sketch-ul folosit de mine este:
// adapted sketch by niq_ro from http://www.tehnic.go.ro
// http://nicuflorica.blogspot.ro/
// http://arduinotehniq.blogspot.com/

// orginal sketch from http://embedded-lab.com/blog/?p=6862
#include "LedControl.h"
/*
 Now we need a LedControl to work with.
 ***** These pin numbers will probably not work with your hardware *****
 pin 12 is connected to the DataIn
 pin 11 is connected to the CLK
 pin 10 is connected to LOAD
 We have only a single MAX72XX.
 */
LedControl lc=LedControl(12,11,10,1);

void setup()
{
// Initialize MAX7219 device
lc.shutdown(0,false); // Enable display
lc.setIntensity(0,15); // Set brightness level (0 is min, 15 is max)
lc.clearDisplay(0); // Clear display register
//}
}

void loop()
{

// test afisare un anumit text
lc.clearDisplay(0); // Clear display register
lc.setDigit(0,7,2, false); // afisez un 2 pe prima coloana din stanga (coloane 7)
lc.setDigit(0,6,5, true); // afisez un 5 pe coloana 6 si un punct zecimal
lc.setDigit(0,5,4, false); // afisez un 4 pe coloana 5
lc.setRow(0,4,B1001110);
lc.setDigit(0,2,3, false); // afisez un 5 pe coloana 2
lc.setDigit(0,1,7, false); // afisez un 0 pe coloana 1
lc.setRow(0,0,B0110111);

delay(3000);

// fac alt text
lc.clearDisplay(0); // Clear display register
lc.setDigit(0,7,1, false); // afisez un 1 pe prima coloana din stanga (coloane 7)
lc.setDigit(0,6,2, false); // afisez un 2 pe coloana 6 si un punct zecimal
lc.setRow(0,5,B00000001);
lc.setDigit(0,4,4, false); // afisez un "4" pe coloana 4
lc.setDigit(0,3,2, false); // afisez un "2" pe coloana 3
lc.setRow(0,2,B00000001);
lc.setDigit(0,1,3, false); // afisez un 3 pe coloana 1
lc.setDigit(0,0,6, false); // afisez un 6 pe prima coloana din dreapta, pe coloana 0

delay(3000);

// fac inca un text
lc.clearDisplay(0); // Clear display register
lc.setRow(0,6,B01100010); // "n" sus
lc.setRow(0,5,B00100000); // "i" sus
lc.setRow(0,4,B01110011); // "q" sus
lc.setRow(0,3,B00000001); // bara la mijloc
lc.setRow(0,2,B01000010); // "r" sus
lc.setRow(0,1,B01100011); // "o" sus

delay(3000);
}
test afisaj 8 cifre LED cu 7 segmente fiecare si Arduino, cu un scketch putin modificat:


Sketch-ul scris de mine, din combinarea altora, care folosesc librariile LedControl.h si DHT.h este:
// adapted sketch by niq_ro from http://arduinotehniq.blogspot.com
// and http://nicuflorica.blogspot.ro
// version 1.0 in 6.11.2014, Craiova - Romanaia

// source for LEDControl: http://embedded-lab.com/blog/?p=6862
#include "LedControl.h"
/*
 Now we need a LedControl to work with.
 ***** These pin numbers will probably not work with your hardware *****
 pin 12 is connected to the DataIn
 pin 11 is connected to the CLK
 pin 10 is connected to LOAD
 We have only a single MAX72XX.
 */
LedControl lc=LedControl(12,11,10,1);

// Example testing sketch for various DHT humidity/temperature sensors
// Written by ladyada, public domain
#include "DHT.h"
#define DHTPIN 7     // what pin we're connected to D7
// Uncomment whatever type you're using!
#define DHTTYPE DHT11   // DHT 11
//#define DHTTYPE DHT22   // DHT 22  (AM2302)
//#define DHTTYPE DHT21   // DHT 21 (AM2301)

// if is just sensor:
// Connect pin 1 (on the left) of the sensor to +5V
// Connect pin 2 of the sensor to whatever your DHTPIN is
// Connect pin 4 (on the right) of the sensor to GROUND
// Connect a 10K resistor from pin 2 (data) to pin 1 (power) of the sensor

DHT dht(DHTPIN, DHTTYPE);

// decralaration for type of value
int t, h;

void setup()
{
// Initialize MAX7219 device
lc.shutdown(0,false); // Enable display
lc.setIntensity(0,11); // Set brightness level (0 is min, 15 is max)
lc.clearDisplay(0); // Clear display register

// Initialize HTD sensor
dht.begin();
}

void loop()
{
 // Reading temperature or humidity takes about 250 milliseconds!
  // Sensor readings may also be up to 2 seconds 'old' (its a very slow sensor)
h = dht.readHumidity();
t = dht.readTemperature();

/* test part
// test humidity value
h = 37;
// test temperature value
t = 19;
*/

//
temperatura (t);
umiditate (h);
delay(10000);
}


void umiditate (int umidit)
{
int zu = int(umidit/10); // determin cifra zecilor
int uu = umidit - 10*zu; // determin cifra unitatilor

lc.setDigit(0,2,zu, false); // afisez un 5 pe coloana 2
lc.setDigit(0,1,uu, false); // afisez un 0 pe coloana 1
lc.setRow(0,0,B0110111);  // afisez litera "H"
}


void temperatura (int temper)
{
int zt = int(temper/10); // determin cifra zecilor
int ut = temper - 10*zt; // determin cifra unitatilor

lc.setDigit(0,7,zt, false); // afisez un 5 pe coloana 7
lc.setDigit(0,6,ut, false); // afisez un 0 pe coloana 1
lc.setRow(0,5,B1100011); // afisez un semn de grad pe coloana 5
lc.setRow(0,4,B1001110); // afisez un C pe coloana 4
}

// adapted sketch by niq_ro from http://arduinotehniq.blogspot.com
// and http://nicuflorica.blogspot.ro
// version 1.2 in 6.11.2014, Craiova - Romania

// source for LEDControl: http://embedded-lab.com/blog/?p=6862
#include "LedControl.h"
/*
 Now we need a LedControl to work with.
 ***** These pin numbers will probably not work with your hardware *****
 pin 12 is connected to the DataIn
 pin 11 is connected to the CLK
 pin 10 is connected to LOAD
 We have only a single MAX72XX.
 */
LedControl lc=LedControl(12,11,10,1);

// Example testing sketch for various DHT humidity/temperature sensors
// Written by ladyada, public domain
#include "DHT.h"
#define DHTPIN 7     // what pin we're connected to D7
// Uncomment whatever type you're using!
#define DHTTYPE DHT11   // DHT 11
//#define DHTTYPE DHT22   // DHT 22  (AM2302)
//#define DHTTYPE DHT21   // DHT 21 (AM2301)

// if is just sensor:
// Connect pin 1 (on the left) of the sensor to +5V
// Connect pin 2 of the sensor to whatever your DHTPIN is
// Connect pin 4 (on the right) of the sensor to GROUND
// Connect a 10K resistor from pin 2 (data) to pin 1 (power) of the sensor

DHT dht(DHTPIN, DHTTYPE);

// decralaration for type of value
int t, h;
float tmed;
int tmed1;

void setup()
{
// Initialize MAX7219 device
lc.shutdown(0,false); // Enable display
lc.setIntensity(0,11); // Set brightness level (0 is min, 15 is max)
lc.clearDisplay(0); // Clear display register

// Initialize HTD sensor
dht.begin();

// inital value for tmperature
tmed = 200;
}

void loop()
{
 // Reading temperature or humidity takes about 250 milliseconds!
  // Sensor readings may also be up to 2 seconds 'old' (its a very slow sensor)
h = dht.readHumidity();

tmed = tmed/10;
for(int i = 9 ; i >0  ; i--) {
t = dht.readTemperature();
tmed = tmed + t;
delay(2000);
}
tmed1 = tmed;  // valoarea de inmultita cu zere pentru usurinta afisarii

/* test part
// test humidity value
h = 37;
// test temperature value
t = 19;
*/

//
temperatura (tmed1);
umiditate (h);
delay(1000);
}


void umiditate (int umidit)
{
int zu = int(umidit/10); // determin cifra zecilor
int uu = umidit - 10*zu; // determin cifra unitatilor

lc.setDigit(0,2,zu, false); // afisez un 5 pe coloana 2
lc.setDigit(0,1,uu, false); // afisez un 0 pe coloana 1
lc.setRow(0,0,B0110111);  // afisez litera "H"
}


void temperatura (int temper)
{
int st = int(temper/100); // determin cifra sutelor
temper = temper - 100*st; // restul numarului de la zeci si unitati
int zt = int(temper/10); // determin cifra zecilor
int ut = temper - 10*zt; // determin cifra unitatilor

lc.setDigit(0,7,st, false); // afisez un 5 pe coloana 7
lc.setDigit(0,6,zt, true); // afisez un 0 pe coloana 1 si virgula
lc.setDigit(0,5,ut, false); // afisez un 5 pe coloana 7
//lc.setRow(0,5,B1100011); // afisez un semn de grad pe coloana 5
lc.setRow(0,4,B1001110); // afisez un C pe coloana 4
}


olá, fiz um um projeto com sensor 18b20 e modulo sete segmentos, só consigo com dois digitos exemplo: 24 graus, mas queria com tres digitos assim 24.6 graus. tem como me ajudar no código.
RăspundețiȘtergereYou sould multiply temperature value with 10, e.g. if temperature is 24.6 x 10 = 246 and than split in numbers: 2 4 and 6...
Ștergere