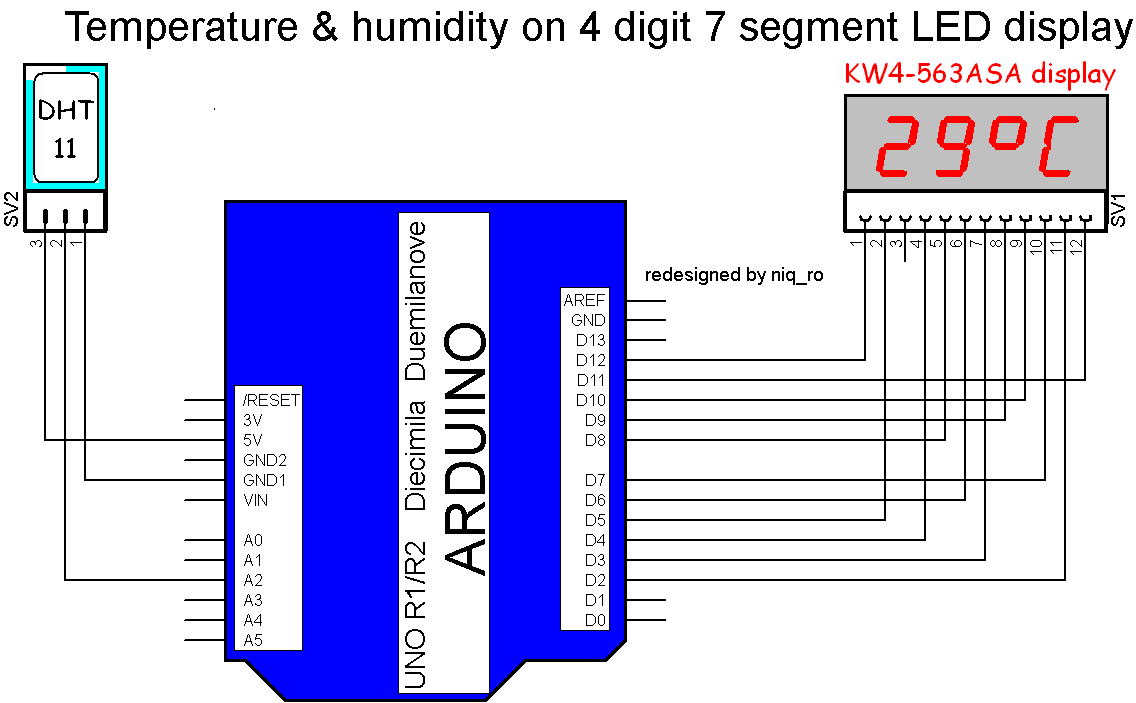
Fata de prima parte prima parte unde doar am facut o prezentare scurta a unui numarator cu indicarea valorilor pe un afisaj cu 4 cifre de 7 segmente tip LED multiplexate, acum fac si altceva mai complex...
Pentru inceput o sa modific modul de conectare al afisajului, deoarece 2 dintre intrarile analogice (A0 si A1) erau conectate ca iesiri digitale. Pe langa faptul ca-mi reduce numarul de intrari analogice, si modul de legare este incurcat...
Fara a folosi o librarie dedicata pentru acest afisaj, am modificat sketch-ul anterior (din articol mentionat inainte), in sensul ca am definit simbolul pentru grad Celsius si 2 litere (C si H). Am definit o subrutina diferita pentru umiditate, fata de cea pentru temperatura si am folosit partea de program de la senzorul de temeperatura si uniditate DHT11, cum e in ultimul sketch din articolul Ministatie meteo cu senzorul DHT11 si.. Arduino , pinul de date fiind tot A2.
VIDEO
Sketch-ul meu este:
/*
6-13-2011
Spark Fun Electronics 2011
Nathan Seidle
This code is public domain but you buy me a beer if you use this and we meet
someday (Beerware license).
4 digit 7 segment display:
Datasheet:
This is an example of how to drive a 7 segment LED display from an ATmega
without the use of current limiting resistors. This technique is very common
but requires some knowledge of electronics - you do run the risk of dumping
too much current through the segments and burning out parts of the display.
If you use the stock code you should be ok, but be careful editing the
brightness values.
This code should work with all colors (red, blue, yellow, green) but the
brightness will vary from one color to the next because the forward voltage
drop of each color is different. This code was written and calibrated for the
red color.
This code will work with most Arduinos but you may want to re-route some of
the pins.
7 segments
4 digits
1 colon
=
12 pins required for full control
*/
// for my Luckylight KW4-563ASA
int digit1 = 11; //PWM Display pin 12 (digit1 is common anonds A1 from right side)
int digit2 = 10; //PWM Display pin 9 (digit2 is common A2)
int digit3 = 9; //PWM Display pin 8 (digit3 is common anods A3)
int digit4 = 6; //PWM Display pin 6 (digit4 is common anods, from left side)
//Pin mapping from Arduino to the ATmega DIP28 if you need it
int segA = 2; //Display pin 11
int segB = 3; //Display pin 7
int segC = 4; //Display pin 4
int segD = 5; //Display pin 2
int segE = 12; //Display pin 1
int segF = 7; //Display pin 10
int segG = 8; //Display pin 5
#include "DHT.h"
#define DHTPIN A2 // what pin we're connected to
#define DHTTYPE DHT11 // DHT 11
DHT dht(DHTPIN, DHTTYPE);
void setup() {
dht.begin();
pinMode(segA, OUTPUT);
pinMode(segB, OUTPUT);
pinMode(segC, OUTPUT);
pinMode(segD, OUTPUT);
pinMode(segE, OUTPUT);
pinMode(segF, OUTPUT);
pinMode(segG, OUTPUT);
pinMode(digit1, OUTPUT);
pinMode(digit2, OUTPUT);
pinMode(digit3, OUTPUT);
pinMode(digit4, OUTPUT);
pinMode(13, OUTPUT);
}
void loop() {
int h = dht.readHumidity();
int t = dht.readTemperature();
for(int i = 1000 ; i >0 ; i--) {
displayNumber(t); // this is number to diplay
}
for(int i = 1000 ; i >0 ; i--) {
displayNumber1(h); // this is number to diplay
}
// displayNumber(12); // this is number to diplay
}
//Given a number, we display 10:22
//After running through the 4 numbers, the display is left turned off
//Display brightness
//Each digit is on for a certain amount of microseconds
//Then it is off until we have reached a total of 20ms for the function call
//Let's assume each digit is on for 1000us
//Each digit is on for 1ms, there are 4 digits, so the display is off for 16ms.
//That's a ratio of 1ms to 16ms or 6.25% on time (PWM).
//Let's define a variable called brightness that varies from:
//5000 blindingly bright (15.7mA current draw per digit)
//2000 shockingly bright (11.4mA current draw per digit)
//1000 pretty bright (5.9mA)
//500 normal (3mA)
//200 dim but readable (1.4mA)
//50 dim but readable (0.56mA)
//5 dim but readable (0.31mA)
//1 dim but readable in dark (0.28mA)
void displayNumber(int toDisplay) {
#define DISPLAY_BRIGHTNESS 500
#define DIGIT_ON HIGH
#define DIGIT_OFF LOW
for(int digit = 4 ; digit > 0 ; digit--) {
//Turn on a digit for a short amount of time
switch(digit) {
case 1:
digitalWrite(digit1, DIGIT_ON);
lightNumber(toDisplay % 10);
toDisplay /= 10;
delayMicroseconds(DISPLAY_BRIGHTNESS);
break;
case 2:
digitalWrite(digit2, DIGIT_ON);
lightNumber(toDisplay % 10);
toDisplay /= 10;
delayMicroseconds(DISPLAY_BRIGHTNESS);
break;
case 3:
digitalWrite(digit3, DIGIT_ON);
lightNumber(11); // display degree symbol
delayMicroseconds(DISPLAY_BRIGHTNESS);
break;
case 4:
digitalWrite(digit4, DIGIT_ON);
lightNumber(12); // display C letter
delayMicroseconds(DISPLAY_BRIGHTNESS);
break;
}
//Turn off all segments
lightNumber(10);
//Turn off all digits
digitalWrite(digit1, DIGIT_OFF);
digitalWrite(digit2, DIGIT_OFF);
digitalWrite(digit3, DIGIT_OFF);
digitalWrite(digit4, DIGIT_OFF);
}
}
void displayNumber1(int toDisplay) {
#define DISPLAY_BRIGHTNESS 500
#define DIGIT_ON HIGH
#define DIGIT_OFF LOW
for(int digit = 4 ; digit > 0 ; digit--) {
//Turn on a digit for a short amount of time
switch(digit) {
case 1:
digitalWrite(digit1, DIGIT_ON);
lightNumber(toDisplay % 10);
toDisplay /= 10;
delayMicroseconds(DISPLAY_BRIGHTNESS);
break;
case 2:
digitalWrite(digit2, DIGIT_ON);
lightNumber(toDisplay % 10);
toDisplay /= 10;
delayMicroseconds(DISPLAY_BRIGHTNESS);
break;
case 3:
digitalWrite(digit3, DIGIT_ON);
lightNumber(10); // display degree symbol
delayMicroseconds(DISPLAY_BRIGHTNESS);
break;
case 4:
digitalWrite(digit4, DIGIT_ON);
lightNumber(13); // display C letter
delayMicroseconds(DISPLAY_BRIGHTNESS);
break;
}
//Turn off all segments
lightNumber(10);
//Turn off all digits
digitalWrite(digit1, DIGIT_OFF);
digitalWrite(digit2, DIGIT_OFF);
digitalWrite(digit3, DIGIT_OFF);
digitalWrite(digit4, DIGIT_OFF);
}
}
//Given a number, turns on those segments
//If number == 10, then turn off number
void lightNumber(int numberToDisplay) {
#define SEGMENT_ON LOW
#define SEGMENT_OFF HIGH
switch (numberToDisplay){
case 0:
digitalWrite(segA, SEGMENT_ON);
digitalWrite(segB, SEGMENT_ON);
digitalWrite(segC, SEGMENT_ON);
digitalWrite(segD, SEGMENT_ON);
digitalWrite(segE, SEGMENT_ON);
digitalWrite(segF, SEGMENT_ON);
digitalWrite(segG, SEGMENT_OFF);
break;
case 1:
digitalWrite(segA, SEGMENT_OFF);
digitalWrite(segB, SEGMENT_ON);
digitalWrite(segC, SEGMENT_ON);
digitalWrite(segD, SEGMENT_OFF);
digitalWrite(segE, SEGMENT_OFF);
digitalWrite(segF, SEGMENT_OFF);
digitalWrite(segG, SEGMENT_OFF);
break;
case 2:
digitalWrite(segA, SEGMENT_ON);
digitalWrite(segB, SEGMENT_ON);
digitalWrite(segC, SEGMENT_OFF);
digitalWrite(segD, SEGMENT_ON);
digitalWrite(segE, SEGMENT_ON);
digitalWrite(segF, SEGMENT_OFF);
digitalWrite(segG, SEGMENT_ON);
break;
case 3:
digitalWrite(segA, SEGMENT_ON);
digitalWrite(segB, SEGMENT_ON);
digitalWrite(segC, SEGMENT_ON);
digitalWrite(segD, SEGMENT_ON);
digitalWrite(segE, SEGMENT_OFF);
digitalWrite(segF, SEGMENT_OFF);
digitalWrite(segG, SEGMENT_ON);
break;
case 4:
digitalWrite(segA, SEGMENT_OFF);
digitalWrite(segB, SEGMENT_ON);
digitalWrite(segC, SEGMENT_ON);
digitalWrite(segD, SEGMENT_OFF);
digitalWrite(segE, SEGMENT_OFF);
digitalWrite(segF, SEGMENT_ON);
digitalWrite(segG, SEGMENT_ON);
break;
case 5:
digitalWrite(segA, SEGMENT_ON);
digitalWrite(segB, SEGMENT_OFF);
digitalWrite(segC, SEGMENT_ON);
digitalWrite(segD, SEGMENT_ON);
digitalWrite(segE, SEGMENT_OFF);
digitalWrite(segF, SEGMENT_ON);
digitalWrite(segG, SEGMENT_ON);
break;
case 6:
digitalWrite(segA, SEGMENT_ON);
digitalWrite(segB, SEGMENT_OFF);
digitalWrite(segC, SEGMENT_ON);
digitalWrite(segD, SEGMENT_ON);
digitalWrite(segE, SEGMENT_ON);
digitalWrite(segF, SEGMENT_ON);
digitalWrite(segG, SEGMENT_ON);
break;
case 7:
digitalWrite(segA, SEGMENT_ON);
digitalWrite(segB, SEGMENT_ON);
digitalWrite(segC, SEGMENT_ON);
digitalWrite(segD, SEGMENT_OFF);
digitalWrite(segE, SEGMENT_OFF);
digitalWrite(segF, SEGMENT_OFF);
digitalWrite(segG, SEGMENT_OFF);
break;
case 8:
digitalWrite(segA, SEGMENT_ON);
digitalWrite(segB, SEGMENT_ON);
digitalWrite(segC, SEGMENT_ON);
digitalWrite(segD, SEGMENT_ON);
digitalWrite(segE, SEGMENT_ON);
digitalWrite(segF, SEGMENT_ON);
digitalWrite(segG, SEGMENT_ON);
break;
case 9:
digitalWrite(segA, SEGMENT_ON);
digitalWrite(segB, SEGMENT_ON);
digitalWrite(segC, SEGMENT_ON);
digitalWrite(segD, SEGMENT_ON);
digitalWrite(segE, SEGMENT_OFF);
digitalWrite(segF, SEGMENT_ON);
digitalWrite(segG, SEGMENT_ON);
break;
// all segment are ON
case 10:
digitalWrite(segA, SEGMENT_OFF);
digitalWrite(segB, SEGMENT_OFF);
digitalWrite(segC, SEGMENT_OFF);
digitalWrite(segD, SEGMENT_OFF);
digitalWrite(segE, SEGMENT_OFF);
digitalWrite(segF, SEGMENT_OFF);
digitalWrite(segG, SEGMENT_OFF);
break;
// degree symbol made by niq_ro
case 11:
digitalWrite(segA, SEGMENT_ON);
digitalWrite(segB, SEGMENT_ON);
digitalWrite(segC, SEGMENT_OFF);
digitalWrite(segD, SEGMENT_OFF);
digitalWrite(segE, SEGMENT_OFF);
digitalWrite(segF, SEGMENT_ON);
digitalWrite(segG, SEGMENT_ON);
break;
// C letter made by niq_ro
case 12:
digitalWrite(segA, SEGMENT_ON);
digitalWrite(segB, SEGMENT_OFF);
digitalWrite(segC, SEGMENT_OFF);
digitalWrite(segD, SEGMENT_ON);
digitalWrite(segE, SEGMENT_ON);
digitalWrite(segF, SEGMENT_ON);
digitalWrite(segG, SEGMENT_OFF);
break;
// H letter made by niq_ro
case 13:
digitalWrite(segA, SEGMENT_OFF);
digitalWrite(segB, SEGMENT_ON);
digitalWrite(segC, SEGMENT_ON);
digitalWrite(segD, SEGMENT_OFF);
digitalWrite(segE, SEGMENT_ON);
digitalWrite(segF, SEGMENT_ON);
digitalWrite(segG, SEGMENT_ON);
break;
}
}
VIDEO
02.iul.2013
M-am gandit ca ar fi mai spectaculos si mai util ca pe afisaj sa am indicata si ora, asa ca am conectat modulul de timp real cu DS1307 si am legat si terminalul de la afisajul multiplexat pentru punctul zecimal, modificand si sketch-ul.
VIDEO
/*
6-13-2011
Spark Fun Electronics 2011
Nathan Seidle
This code is public domain but you buy me a beer if you use this and we meet
someday (Beerware license ).
4 digit 7 segment display:
Datasheet:
This is an example of how to drive a 7 segment LED display from an ATmega
without the use of current limiting resistors. This technique is very common
but requires some knowledge of electronics - you do run the risk of dumping
too much current through the segments and burning out parts of the display.
If you use the stock code you should be ok, but be careful editing the
brightness values.
This code should work with all colors (red, blue, yellow, green) but the
brightness will vary from one color to the next because the forward voltage
drop of each color is different. This code was written and calibrated for the
red color.
This code will work with most Arduinos but you may want to re-route some of
the pins.
7 segments
4 digits
1 colon
=
12 pins required for full control
*/
// for my Luckylight KW4-563ASA
int digit1 = 11; //PWM Display pin 12 (digit1 is common anonds A1 from right side)
int digit2 = 10; //PWM Display pin 9 (digit2 is common A2)
int digit3 = 9; //PWM Display pin 8 (digit3 is common anods A3)
int digit4 = 6; //PWM Display pin 6 (digit4 is common anods, from left side)
//Pin mapping from Arduino to the ATmega DIP28 if you need it
int segA = 2; //Display pin 11
int segB = 3; //Display pin 7
int segC = 4; //Display pin 4
int segD = 5; //Display pin 2
int segE = 12; //Display pin 1
int segF = 7; //Display pin 10
int segG = 8; //Display pin 5
int segDP = 13; // Display pin 3
#include "DHT.h"
#define DHTPIN A2 // what pin we're connected to
#define DHTTYPE DHT11 // DHT 11
DHT dht(DHTPIN, DHTTYPE);
#include <Wire.h>
#include "RTClib.h"
RTC_DS1307 RTC;
// Date and time functions using a DS1307 RTC connected via I2C and Wire lib
void setup() {
Wire.begin();
RTC.begin();
// RTC.adjust(DateTime(__DATE__, __TIME__));
// if you need set clock... just remove // from line above this
// part code for flashing LED
Wire.beginTransmission(0x68);
Wire.write(0x07); // move pointer to SQW address
// Wire.write(0x00); // turns the SQW pin off
Wire.write(0x10); // sends 0x10 (hex) 00010000 (binary) to control register - turns on square wave at 1Hz
// Wire.write(0x13); // sends 0x13 (hex) 00010011 (binary) 32kHz
Wire.endTransmission();
if (! RTC.isrunning()) {
Serial.println("RTC is NOT running!");
// following line sets the RTC to the date & time this sketch was compiled
RTC.adjust(DateTime(__DATE__, __TIME__));
}
dht.begin();
pinMode(segA, OUTPUT);
pinMode(segB, OUTPUT);
pinMode(segC, OUTPUT);
pinMode(segD, OUTPUT);
pinMode(segE, OUTPUT);
pinMode(segF, OUTPUT);
pinMode(segG, OUTPUT);
pinMode(segDP, OUTPUT);
pinMode(digit1, OUTPUT);
pinMode(digit2, OUTPUT);
pinMode(digit3, OUTPUT);
pinMode(digit4, OUTPUT);
// pinMode(13, OUTPUT);
Serial.begin(9600);
Serial.println("test for niq_ro");
}
void loop() {
digitalWrite(segDP, HIGH);
DateTime now = RTC.now();
int timp = now.hour()*100+now.minute();
// int timp = (now.minute(), DEC);
// displayNumber(12); // this is number to diplay
// int timp = 1234;
Serial.print(now.hour(), DEC);
Serial.print(":");
Serial.print(now.minute(), DEC);
Serial.print(" -> ");
Serial.print(timp);
Serial.println(" !");
int h = dht.readHumidity();
int t = dht.readTemperature();
for(int i = 1000 ; i >0 ; i--) {
displayNumber(t); // this is number to diplay
}
for(int i = 1000 ; i >0 ; i--) {
displayNumber1(h); // this is number to diplay
}
for(int i = 1000 ; i >0 ; i--) {
displayNumber0(timp); // this is number to diplay
}
}
//Given a number, we display 10:22
//After running through the 4 numbers, the display is left turned off
//Display brightness
//Each digit is on for a certain amount of microseconds
//Then it is off until we have reached a total of 20ms for the function call
//Let's assume each digit is on for 1000us
//Each digit is on for 1ms, there are 4 digits, so the display is off for 16ms.
//That's a ratio of 1ms to 16ms or 6.25% on time (PWM).
//Let's define a variable called brightness that varies from:
//5000 blindingly bright (15.7mA current draw per digit)
//2000 shockingly bright (11.4mA current draw per digit)
//1000 pretty bright (5.9mA)
//500 normal (3mA)
//200 dim but readable (1.4mA)
//50 dim but readable (0.56mA)
//5 dim but readable (0.31mA)
//1 dim but readable in dark (0.28mA)
void displayNumber(int toDisplay) {
#define DISPLAY_BRIGHTNESS 500
#define DIGIT_ON HIGH
#define DIGIT_OFF LOW
for(int digit = 4 ; digit > 0 ; digit--) {
//Turn on a digit for a short amount of time
switch(digit) {
case 1:
digitalWrite(digit1, DIGIT_ON);
lightNumber(toDisplay % 10);
toDisplay /= 10;
delayMicroseconds(DISPLAY_BRIGHTNESS);
break;
case 2:
digitalWrite(digit2, DIGIT_ON);
lightNumber(toDisplay % 10);
toDisplay /= 10;
delayMicroseconds(DISPLAY_BRIGHTNESS);
break;
case 3:
digitalWrite(digit3, DIGIT_ON);
lightNumber(11); // display degree symbol
delayMicroseconds(DISPLAY_BRIGHTNESS);
break;
case 4:
digitalWrite(digit4, DIGIT_ON);
lightNumber(12); // display C letter
delayMicroseconds(DISPLAY_BRIGHTNESS);
break;
}
//Turn off all segments
lightNumber(10);
//Turn off all digits
digitalWrite(digit1, DIGIT_OFF);
digitalWrite(digit2, DIGIT_OFF);
digitalWrite(digit3, DIGIT_OFF);
digitalWrite(digit4, DIGIT_OFF);
}
}
void displayNumber1(int toDisplay) {
#define DISPLAY_BRIGHTNESS 500
#define DIGIT_ON HIGH
#define DIGIT_OFF LOW
for(int digit = 4 ; digit > 0 ; digit--) {
//Turn on a digit for a short amount of time
switch(digit) {
case 1:
digitalWrite(digit1, DIGIT_ON);
lightNumber(toDisplay % 10);
toDisplay /= 10;
delayMicroseconds(DISPLAY_BRIGHTNESS);
break;
case 2:
digitalWrite(digit2, DIGIT_ON);
lightNumber(toDisplay % 10);
toDisplay /= 10;
delayMicroseconds(DISPLAY_BRIGHTNESS);
break;
case 3:
digitalWrite(digit3, DIGIT_ON);
lightNumber(10); // display degree symbol
delayMicroseconds(DISPLAY_BRIGHTNESS);
break;
case 4:
digitalWrite(digit4, DIGIT_ON);
lightNumber(13); // display C letter
delayMicroseconds(DISPLAY_BRIGHTNESS);
break;
}
//Turn off all segments
lightNumber(10);
//Turn off all digits
digitalWrite(digit1, DIGIT_OFF);
digitalWrite(digit2, DIGIT_OFF);
digitalWrite(digit3, DIGIT_OFF);
digitalWrite(digit4, DIGIT_OFF);
}
}
void displayNumber0(int toDisplay) {
#define DISPLAY_BRIGHTNESS 500
#define DIGIT_ON HIGH
#define DIGIT_OFF LOW
for(int digit = 4 ; digit > 0 ; digit--) {
//Turn on a digit for a short amount of time
switch(digit) {
case 1:
digitalWrite(digit1, DIGIT_ON);
digitalWrite(segDP, HIGH);
break;
case 2:
digitalWrite(digit2, DIGIT_ON);
digitalWrite(segDP, LOW);
break;
case 3:
digitalWrite(digit3, DIGIT_ON);
digitalWrite(segDP, HIGH);
break;
case 4:
digitalWrite(digit4, DIGIT_ON);
digitalWrite(segDP, HIGH);
break;
}
lightNumber(toDisplay % 10);
toDisplay /= 10;
delayMicroseconds(DISPLAY_BRIGHTNESS);
//Turn off all segments
lightNumber(10);
//Turn off all digits
digitalWrite(digit1, DIGIT_OFF);
digitalWrite(digit2, DIGIT_OFF);
digitalWrite(digit3, DIGIT_OFF);
digitalWrite(digit4, DIGIT_OFF);
}
}
//Given a number, turns on those segments
//If number == 10, then turn off number
void lightNumber(int numberToDisplay) {
#define SEGMENT_ON LOW
#define SEGMENT_OFF HIGH
switch (numberToDisplay){
case 0:
digitalWrite(segA, SEGMENT_ON);
digitalWrite(segB, SEGMENT_ON);
digitalWrite(segC, SEGMENT_ON);
digitalWrite(segD, SEGMENT_ON);
digitalWrite(segE, SEGMENT_ON);
digitalWrite(segF, SEGMENT_ON);
digitalWrite(segG, SEGMENT_OFF);
break;
case 1:
digitalWrite(segA, SEGMENT_OFF);
digitalWrite(segB, SEGMENT_ON);
digitalWrite(segC, SEGMENT_ON);
digitalWrite(segD, SEGMENT_OFF);
digitalWrite(segE, SEGMENT_OFF);
digitalWrite(segF, SEGMENT_OFF);
digitalWrite(segG, SEGMENT_OFF);
break;
case 2:
digitalWrite(segA, SEGMENT_ON);
digitalWrite(segB, SEGMENT_ON);
digitalWrite(segC, SEGMENT_OFF);
digitalWrite(segD, SEGMENT_ON);
digitalWrite(segE, SEGMENT_ON);
digitalWrite(segF, SEGMENT_OFF);
digitalWrite(segG, SEGMENT_ON);
break;
case 3:
digitalWrite(segA, SEGMENT_ON);
digitalWrite(segB, SEGMENT_ON);
digitalWrite(segC, SEGMENT_ON);
digitalWrite(segD, SEGMENT_ON);
digitalWrite(segE, SEGMENT_OFF);
digitalWrite(segF, SEGMENT_OFF);
digitalWrite(segG, SEGMENT_ON);
break;
case 4:
digitalWrite(segA, SEGMENT_OFF);
digitalWrite(segB, SEGMENT_ON);
digitalWrite(segC, SEGMENT_ON);
digitalWrite(segD, SEGMENT_OFF);
digitalWrite(segE, SEGMENT_OFF);
digitalWrite(segF, SEGMENT_ON);
digitalWrite(segG, SEGMENT_ON);
break;
case 5:
digitalWrite(segA, SEGMENT_ON);
digitalWrite(segB, SEGMENT_OFF);
digitalWrite(segC, SEGMENT_ON);
digitalWrite(segD, SEGMENT_ON);
digitalWrite(segE, SEGMENT_OFF);
digitalWrite(segF, SEGMENT_ON);
digitalWrite(segG, SEGMENT_ON);
break;
case 6:
digitalWrite(segA, SEGMENT_ON);
digitalWrite(segB, SEGMENT_OFF);
digitalWrite(segC, SEGMENT_ON);
digitalWrite(segD, SEGMENT_ON);
digitalWrite(segE, SEGMENT_ON);
digitalWrite(segF, SEGMENT_ON);
digitalWrite(segG, SEGMENT_ON);
break;
case 7:
digitalWrite(segA, SEGMENT_ON);
digitalWrite(segB, SEGMENT_ON);
digitalWrite(segC, SEGMENT_ON);
digitalWrite(segD, SEGMENT_OFF);
digitalWrite(segE, SEGMENT_OFF);
digitalWrite(segF, SEGMENT_OFF);
digitalWrite(segG, SEGMENT_OFF);
break;
case 8:
digitalWrite(segA, SEGMENT_ON);
digitalWrite(segB, SEGMENT_ON);
digitalWrite(segC, SEGMENT_ON);
digitalWrite(segD, SEGMENT_ON);
digitalWrite(segE, SEGMENT_ON);
digitalWrite(segF, SEGMENT_ON);
digitalWrite(segG, SEGMENT_ON);
break;
case 9:
digitalWrite(segA, SEGMENT_ON);
digitalWrite(segB, SEGMENT_ON);
digitalWrite(segC, SEGMENT_ON);
digitalWrite(segD, SEGMENT_ON);
digitalWrite(segE, SEGMENT_OFF);
digitalWrite(segF, SEGMENT_ON);
digitalWrite(segG, SEGMENT_ON);
break;
// all segment are ON
case 10:
digitalWrite(segA, SEGMENT_OFF);
digitalWrite(segB, SEGMENT_OFF);
digitalWrite(segC, SEGMENT_OFF);
digitalWrite(segD, SEGMENT_OFF);
digitalWrite(segE, SEGMENT_OFF);
digitalWrite(segF, SEGMENT_OFF);
digitalWrite(segG, SEGMENT_OFF);
break;
// degree symbol made by niq_ro
case 11:
digitalWrite(segA, SEGMENT_ON);
digitalWrite(segB, SEGMENT_ON);
digitalWrite(segC, SEGMENT_OFF);
digitalWrite(segD, SEGMENT_OFF);
digitalWrite(segE, SEGMENT_OFF);
digitalWrite(segF, SEGMENT_ON);
digitalWrite(segG, SEGMENT_ON);
break;
// C letter made by niq_ro
case 12:
digitalWrite(segA, SEGMENT_ON);
digitalWrite(segB, SEGMENT_OFF);
digitalWrite(segC, SEGMENT_OFF);
digitalWrite(segD, SEGMENT_ON);
digitalWrite(segE, SEGMENT_ON);
digitalWrite(segF, SEGMENT_ON);
digitalWrite(segG, SEGMENT_OFF);
break;
// H letter made by niq_ro
case 13:
digitalWrite(segA, SEGMENT_OFF);
digitalWrite(segB, SEGMENT_ON);
digitalWrite(segC, SEGMENT_ON);
digitalWrite(segD, SEGMENT_OFF);
digitalWrite(segE, SEGMENT_ON);
digitalWrite(segF, SEGMENT_ON);
digitalWrite(segG, SEGMENT_ON);
break;
}
}
Deoarece ma deranja acel zero din fata orei, am modificat sketch-ul sa am afisata ora fara acel zero...
/*
6-13-2011
Spark Fun Electronics 2011
Nathan Seidle
This code is public domain but you buy me a beer if you use this and we meet
someday (Beerware license).
4 digit 7 segment display:
Datasheet:
This is an example of how to drive a 7 segment LED display from an ATmega
without the use of current limiting resistors. This technique is very common
but requires some knowledge of electronics - you do run the risk of dumping
too much current through the segments and burning out parts of the display.
If you use the stock code you should be ok, but be careful editing the
brightness values.
This code should work with all colors (red, blue, yellow, green) but the
brightness will vary from one color to the next because the forward voltage
drop of each color is different. This code was written and calibrated for the
red color.
This code will work with most Arduinos but you may want to re-route some of
the pins.
7 segments
4 digits
1 colon
=
12 pins required for full control
*/
// for my Luckylight KW4-563ASA
int digit1 = 11; //PWM Display pin 12 (digit1 is common anonds A1 from right side)
int digit2 = 10; //PWM Display pin 9 (digit2 is common A2)
int digit3 = 9; //PWM Display pin 8 (digit3 is common anods A3)
int digit4 = 6; //PWM Display pin 6 (digit4 is common anods, from left side)
//Pin mapping from Arduino to the ATmega DIP28 if you need it
int segA = 2; //Display pin 11
int segB = 3; //Display pin 7
int segC = 4; //Display pin 4
int segD = 5; //Display pin 2
int segE = 12; //Display pin 1
int segF = 7; //Display pin 10
int segG = 8; //Display pin 5
int segDP = 13; // Display pin 3
#include "DHT.h"
#define DHTPIN A2 // what pin we're connected to
#define DHTTYPE DHT11 // DHT 11
DHT dht(DHTPIN, DHTTYPE);
#include <Wire.h>
#include "RTClib.h"
RTC_DS1307 RTC;
// Date and time functions using a DS1307 RTC connected via I2C and Wire lib
void setup() {
Wire.begin();
RTC.begin();
// RTC.adjust(DateTime(__DATE__, __TIME__));
// if you need set clock... just remove // from line above this
// part code for flashing LED
Wire.beginTransmission(0x68);
Wire.write(0x07); // move pointer to SQW address
// Wire.write(0x00); // turns the SQW pin off
Wire.write(0x10); // sends 0x10 (hex) 00010000 (binary) to control register - turns on square wave at 1Hz
// Wire.write(0x13); // sends 0x13 (hex) 00010011 (binary) 32kHz
Wire.endTransmission();
if (! RTC.isrunning()) {
Serial.println("RTC is NOT running!");
// following line sets the RTC to the date & time this sketch was compiled
RTC.adjust(DateTime(__DATE__, __TIME__));
}
dht.begin();
pinMode(segA, OUTPUT);
pinMode(segB, OUTPUT);
pinMode(segC, OUTPUT);
pinMode(segD, OUTPUT);
pinMode(segE, OUTPUT);
pinMode(segF, OUTPUT);
pinMode(segG, OUTPUT);
pinMode(segDP, OUTPUT);
pinMode(digit1, OUTPUT);
pinMode(digit2, OUTPUT);
pinMode(digit3, OUTPUT);
pinMode(digit4, OUTPUT);
// pinMode(13, OUTPUT);
Serial.begin(9600);
Serial.println("test for niq_ro");
}
void loop() {
digitalWrite(segDP, HIGH);
DateTime now = RTC.now();
int timp = now.hour()*100+now.minute();
// int timp = (now.minute(), DEC);
// displayNumber(12); // this is number to diplay
// int timp = 1234;
Serial.print(now.hour(), DEC);
Serial.print(":");
Serial.print(now.minute(), DEC);
Serial.print(" -> ");
Serial.print(timp);
Serial.println(" !");
int h = dht.readHumidity();
int t = dht.readTemperature();
for(int i = 1000 ; i >0 ; i--) {
displayNumber(t); // this is number to diplay
}
for(int i = 1000 ; i >0 ; i--) {
displayNumber1(h); // this is number to diplay
}
for(int i = 1000 ; i >0 ; i--) {
if (timp > 1000) displayNumber01(timp);
else displayNumber02(timp);
}
}
//Given a number, we display 10:22
//After running through the 4 numbers, the display is left turned off
//Display brightness
//Each digit is on for a certain amount of microseconds
//Then it is off until we have reached a total of 20ms for the function call
//Let's assume each digit is on for 1000us
//Each digit is on for 1ms, there are 4 digits, so the display is off for 16ms.
//That's a ratio of 1ms to 16ms or 6.25% on time (PWM).
//Let's define a variable called brightness that varies from:
//5000 blindingly bright (15.7mA current draw per digit)
//2000 shockingly bright (11.4mA current draw per digit)
//1000 pretty bright (5.9mA)
//500 normal (3mA)
//200 dim but readable (1.4mA)
//50 dim but readable (0.56mA)
//5 dim but readable (0.31mA)
//1 dim but readable in dark (0.28mA)
void displayNumber(int toDisplay) {
#define DISPLAY_BRIGHTNESS 500
#define DIGIT_ON HIGH
#define DIGIT_OFF LOW
for(int digit = 4 ; digit > 0 ; digit--) {
//Turn on a digit for a short amount of time
switch(digit) {
case 1:
digitalWrite(digit1, DIGIT_ON);
lightNumber(toDisplay % 10);
toDisplay /= 10;
delayMicroseconds(DISPLAY_BRIGHTNESS);
break;
case 2:
digitalWrite(digit2, DIGIT_ON);
lightNumber(toDisplay % 10);
toDisplay /= 10;
delayMicroseconds(DISPLAY_BRIGHTNESS);
break;
case 3:
digitalWrite(digit3, DIGIT_ON);
lightNumber(11); // display degree symbol
delayMicroseconds(DISPLAY_BRIGHTNESS);
break;
case 4:
digitalWrite(digit4, DIGIT_ON);
lightNumber(12); // display C letter
delayMicroseconds(DISPLAY_BRIGHTNESS);
break;
}
//Turn off all segments
lightNumber(10);
//Turn off all digits
digitalWrite(digit1, DIGIT_OFF);
digitalWrite(digit2, DIGIT_OFF);
digitalWrite(digit3, DIGIT_OFF);
digitalWrite(digit4, DIGIT_OFF);
}
}
void displayNumber1(int toDisplay) {
#define DISPLAY_BRIGHTNESS 500
#define DIGIT_ON HIGH
#define DIGIT_OFF LOW
for(int digit = 4 ; digit > 0 ; digit--) {
//Turn on a digit for a short amount of time
switch(digit) {
case 1:
digitalWrite(digit1, DIGIT_ON);
lightNumber(toDisplay % 10);
toDisplay /= 10;
delayMicroseconds(DISPLAY_BRIGHTNESS);
break;
case 2:
digitalWrite(digit2, DIGIT_ON);
lightNumber(toDisplay % 10);
toDisplay /= 10;
delayMicroseconds(DISPLAY_BRIGHTNESS);
break;
case 3:
digitalWrite(digit3, DIGIT_ON);
lightNumber(10); // display degree symbol
delayMicroseconds(DISPLAY_BRIGHTNESS);
break;
case 4:
digitalWrite(digit4, DIGIT_ON);
lightNumber(13); // display C letter
delayMicroseconds(DISPLAY_BRIGHTNESS);
break;
}
//Turn off all segments
lightNumber(10);
//Turn off all digits
digitalWrite(digit1, DIGIT_OFF);
digitalWrite(digit2, DIGIT_OFF);
digitalWrite(digit3, DIGIT_OFF);
digitalWrite(digit4, DIGIT_OFF);
}
}
void displayNumber01(int toDisplay) {
#define DISPLAY_BRIGHTNESS 500
#define DIGIT_ON HIGH
#define DIGIT_OFF LOW
for(int digit = 4 ; digit > 0 ; digit--) {
//Turn on a digit for a short amount of time
switch(digit) {
case 1:
digitalWrite(digit1, DIGIT_ON);
digitalWrite(segDP, HIGH);
break;
case 2:
digitalWrite(digit2, DIGIT_ON);
digitalWrite(segDP, LOW);
break;
case 3:
digitalWrite(digit3, DIGIT_ON);
digitalWrite(segDP, HIGH);
break;
case 4:
digitalWrite(digit4, DIGIT_ON);
digitalWrite(segDP, HIGH);
break;
}
lightNumber(toDisplay % 10);
toDisplay /= 10;
delayMicroseconds(DISPLAY_BRIGHTNESS);
//Turn off all segments
lightNumber(10);
//Turn off all digits
digitalWrite(digit1, DIGIT_OFF);
digitalWrite(digit2, DIGIT_OFF);
digitalWrite(digit3, DIGIT_OFF);
digitalWrite(digit4, DIGIT_OFF);
}
}
void displayNumber02(int toDisplay) {
#define DISPLAY_BRIGHTNESS 500
#define DIGIT_ON HIGH
#define DIGIT_OFF LOW
for(int digit = 4 ; digit > 0 ; digit--) {
//Turn on a digit for a short amount of time
switch(digit) {
case 1:
lightNumber(10);
digitalWrite(segDP, HIGH);
break;
case 2:
digitalWrite(digit2, DIGIT_ON);
digitalWrite(segDP, LOW);
break;
case 3:
digitalWrite(digit3, DIGIT_ON);
digitalWrite(segDP, HIGH);
break;
case 4:
digitalWrite(digit4, DIGIT_ON);
digitalWrite(segDP, HIGH);
break;
}
lightNumber(toDisplay % 10);
toDisplay /= 10;
delayMicroseconds(DISPLAY_BRIGHTNESS);
//Turn off all segments
lightNumber(10);
//Turn off all digits
digitalWrite(digit1, DIGIT_OFF);
digitalWrite(digit2, DIGIT_OFF);
digitalWrite(digit3, DIGIT_OFF);
digitalWrite(digit4, DIGIT_OFF);
}
}
//Given a number, turns on those segments
//If number == 10, then turn off number
void lightNumber(int numberToDisplay) {
#define SEGMENT_ON LOW
#define SEGMENT_OFF HIGH
switch (numberToDisplay){
case 0:
digitalWrite(segA, SEGMENT_ON);
digitalWrite(segB, SEGMENT_ON);
digitalWrite(segC, SEGMENT_ON);
digitalWrite(segD, SEGMENT_ON);
digitalWrite(segE, SEGMENT_ON);
digitalWrite(segF, SEGMENT_ON);
digitalWrite(segG, SEGMENT_OFF);
break;
case 1:
digitalWrite(segA, SEGMENT_OFF);
digitalWrite(segB, SEGMENT_ON);
digitalWrite(segC, SEGMENT_ON);
digitalWrite(segD, SEGMENT_OFF);
digitalWrite(segE, SEGMENT_OFF);
digitalWrite(segF, SEGMENT_OFF);
digitalWrite(segG, SEGMENT_OFF);
break;
case 2:
digitalWrite(segA, SEGMENT_ON);
digitalWrite(segB, SEGMENT_ON);
digitalWrite(segC, SEGMENT_OFF);
digitalWrite(segD, SEGMENT_ON);
digitalWrite(segE, SEGMENT_ON);
digitalWrite(segF, SEGMENT_OFF);
digitalWrite(segG, SEGMENT_ON);
break;
case 3:
digitalWrite(segA, SEGMENT_ON);
digitalWrite(segB, SEGMENT_ON);
digitalWrite(segC, SEGMENT_ON);
digitalWrite(segD, SEGMENT_ON);
digitalWrite(segE, SEGMENT_OFF);
digitalWrite(segF, SEGMENT_OFF);
digitalWrite(segG, SEGMENT_ON);
break;
case 4:
digitalWrite(segA, SEGMENT_OFF);
digitalWrite(segB, SEGMENT_ON);
digitalWrite(segC, SEGMENT_ON);
digitalWrite(segD, SEGMENT_OFF);
digitalWrite(segE, SEGMENT_OFF);
digitalWrite(segF, SEGMENT_ON);
digitalWrite(segG, SEGMENT_ON);
break;
case 5:
digitalWrite(segA, SEGMENT_ON);
digitalWrite(segB, SEGMENT_OFF);
digitalWrite(segC, SEGMENT_ON);
digitalWrite(segD, SEGMENT_ON);
digitalWrite(segE, SEGMENT_OFF);
digitalWrite(segF, SEGMENT_ON);
digitalWrite(segG, SEGMENT_ON);
break;
case 6:
digitalWrite(segA, SEGMENT_ON);
digitalWrite(segB, SEGMENT_OFF);
digitalWrite(segC, SEGMENT_ON);
digitalWrite(segD, SEGMENT_ON);
digitalWrite(segE, SEGMENT_ON);
digitalWrite(segF, SEGMENT_ON);
digitalWrite(segG, SEGMENT_ON);
break;
case 7:
digitalWrite(segA, SEGMENT_ON);
digitalWrite(segB, SEGMENT_ON);
digitalWrite(segC, SEGMENT_ON);
digitalWrite(segD, SEGMENT_OFF);
digitalWrite(segE, SEGMENT_OFF);
digitalWrite(segF, SEGMENT_OFF);
digitalWrite(segG, SEGMENT_OFF);
break;
case 8:
digitalWrite(segA, SEGMENT_ON);
digitalWrite(segB, SEGMENT_ON);
digitalWrite(segC, SEGMENT_ON);
digitalWrite(segD, SEGMENT_ON);
digitalWrite(segE, SEGMENT_ON);
digitalWrite(segF, SEGMENT_ON);
digitalWrite(segG, SEGMENT_ON);
break;
case 9:
digitalWrite(segA, SEGMENT_ON);
digitalWrite(segB, SEGMENT_ON);
digitalWrite(segC, SEGMENT_ON);
digitalWrite(segD, SEGMENT_ON);
digitalWrite(segE, SEGMENT_OFF);
digitalWrite(segF, SEGMENT_ON);
digitalWrite(segG, SEGMENT_ON);
break;
// all segment are ON
case 10:
digitalWrite(segA, SEGMENT_OFF);
digitalWrite(segB, SEGMENT_OFF);
digitalWrite(segC, SEGMENT_OFF);
digitalWrite(segD, SEGMENT_OFF);
digitalWrite(segE, SEGMENT_OFF);
digitalWrite(segF, SEGMENT_OFF);
digitalWrite(segG, SEGMENT_OFF);
break;
// degree symbol made by niq_ro
case 11:
digitalWrite(segA, SEGMENT_ON);
digitalWrite(segB, SEGMENT_ON);
digitalWrite(segC, SEGMENT_OFF);
digitalWrite(segD, SEGMENT_OFF);
digitalWrite(segE, SEGMENT_OFF);
digitalWrite(segF, SEGMENT_ON);
digitalWrite(segG, SEGMENT_ON);
break;
case 12:
digitalWrite(segA, SEGMENT_ON);
digitalWrite(segB, SEGMENT_OFF);
digitalWrite(segC, SEGMENT_OFF);
digitalWrite(segD, SEGMENT_ON);
digitalWrite(segE, SEGMENT_ON);
digitalWrite(segF, SEGMENT_ON);
digitalWrite(segG, SEGMENT_OFF);
break;
// H letter made by niq_ro
case 13:
digitalWrite(segA, SEGMENT_OFF);
digitalWrite(segB, SEGMENT_ON);
digitalWrite(segC, SEGMENT_ON);
digitalWrite(segD, SEGMENT_OFF);
digitalWrite(segE, SEGMENT_ON);
digitalWrite(segF, SEGMENT_ON);
digitalWrite(segG, SEGMENT_ON);
break;
}
}