Deoarece pentru tastatura folosesc 7 intrari digitale (D1..D7), iar pentru LED-ul multicolor inca 3 (D9, D10, D11) + o iesire pentru electromagnet (D13), nu am suficiente iesiri digitale pentru afisajul LCD... imi trebuie 6... asa ca o sa folosesc cele 6 intrari analogice A0..A5 ca iesiri digitale D14..D19, dupa cum am gasit in cartea "30 Arduino Projects for the Evil Genius" scrisa de Simon Monk si in articolul How to add 6 extra pins to your Arduino with no extra hardware

Schema de conectare, din bucatele este:
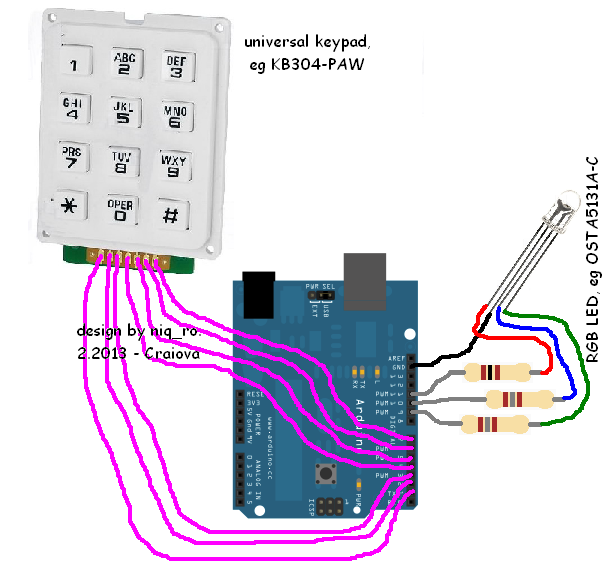


O poza cu montajul:

Schema completa este:

Un sketch care are implementata si partea de afisare si acces functie de parola, iar inchiderea se face apasand tasta '#'. Schimbarea parolei se face cand zavorul este decuplat (acces permis) dupa apasarea tastei '*' (stocarea datelor se face in memoria interna EEPROM a microcontrolerului ATmega). LED-ul multicolor se aprinde in rosu, cand yala este incuiata, verde cand este descuiata si "palpaie" in albastru cand se apasa oricare tasta.
Am facut 2 filmulete in care sunt toate starile si prezint modul de functionare:
Sketch-ul pentru ce am prezentat mai inainte este:
// original schematic and schetch from http://www.arduinoevilgenius.com/// adapted schematic by niq_ro ( http://www.tehnic.go.ro/ )
// sketch door lock ver.3.1 (16.11.2013) use sketch door lock ver.2.0 (02.03.2013)
#include <Keypad.h>
#include <EEPROM.h>
char* secretCode = "2255";
int position = 0;
int position2 = 0;
boolean locked = true;
const byte rows = 4;
const byte cols = 3;
char keys[rows][cols] = {
{'1','2','3'},
{'4','5','6'},
{'7','8','9'},
{'*','0','#'}
};
byte rowPins[rows] = {2, 7, 6, 4};
byte colPins[cols] = {3, 1, 5};

Keypad keypad = Keypad(makeKeymap(keys), rowPins, colPins, rows, cols);
int redPin = 11;
int greenPin = 9;
int bluePin = 10;
int solenoidPin = 13;

// include the library code:
#include <LiquidCrystal.h>

// initialize the library with the numbers of the interface pins
LiquidCrystal lcd(14, 15, 16, 17, 18, 19);

/*
---------------------
| Arduino | LCD1602 |
---------------------
| D14(A0) |    RS   |
---------------------
| D15(A1) |    E    |
---------------------
| D16(A2) |    D4   |
---------------------
| D14(A3) |    D5   |
---------------------
| D14(A4) |    D6   |
---------------------
| D14(A5) |    D7   |
---------------------

*/

void setup()
{
pinMode(redPin, OUTPUT);
pinMode(greenPin, OUTPUT);
pinMode(bluePin, OUTPUT);

lcd.begin(16, 2);
// print my logo
lcd.setCursor(0, 0);
lcd.print("www.tehnic.go.ro");
lcd.setCursor(0, 1);
lcd.print("   by niq_ro");
delay(5000);
lcd.clear();

lcd.setCursor(0, 0);
lcd.print("acces permis la");
lcd.setCursor(2, 1);
lcd.print("introducere");
delay(1000);
lcd.clear();

lcd.setCursor(2, 0);
lcd.print("parola corecta");
lcd.setCursor(2, 1);
lcd.print("versiune 3.0");
delay(1000);
lcd.clear();

lcd.setCursor(0, 0);
lcd.print("apasa tasta '#'");
lcd.setCursor(0, 1);
lcd.print("pentru stergere");
delay(5000);
lcd.clear();


//eraseCode(); // a first test for initial code at "2255";
delay(1000);
loadCode(); // load the code from EEPROM

flash();
updateOutputs();

// print a new message
lcd.clear();
lcd.setCursor(1, 0);
lcd.print("introdu parola");
lcd.setCursor(0, 1);

}
void loop()
{

char key = keypad.getKey();
if (key)
{
position2 ++;
digitalWrite(bluePin, HIGH);
delay(30);
digitalWrite(bluePin, LOW);
lcd.print("?");
}
if (key == '*' && ! locked)
{
// unlocked and * pressed so change code
position = 0;
position2 = 0;
getNewCode();
updateOutputs();
}
if (key == '#')
{
locked = true;
position = 0;
position2= 0;
updateOutputs();
digitalWrite(bluePin, HIGH);
delay(300);
digitalWrite(bluePin, LOW);

lcd.clear();
lcd.setCursor(1, 0);
lcd.print("yala incuiata");
lcd.setCursor(0, 1);
delay(1000);
lcd.clear();
lcd.setCursor(1, 0);
lcd.print("introdu parola");
lcd.setCursor(0, 1);

//lcd.clear();

}
if (key == secretCode[position])
{
position ++;
}
if (position == 4 & position2 == 4)
{
locked = false;
digitalWrite(bluePin, HIGH);
delay(300);
digitalWrite(bluePin, LOW);
updateOutputs();
lcd.clear();
lcd.setCursor(0, 0);
lcd.print("parola corecta..");
lcd.setCursor(2, 1);
lcd.print("acces permis");
}
delay(100);

}

void updateOutputs()
{
if (locked)
{
digitalWrite(redPin, HIGH);
digitalWrite(greenPin, LOW);
digitalWrite(solenoidPin, HIGH);
}
else
{
digitalWrite(redPin, LOW);
digitalWrite(greenPin, HIGH);
digitalWrite(solenoidPin, LOW);
}
}

void getNewCode()
{
lcd.clear();
lcd.setCursor(0, 0);
lcd.print("parola noua este");
lcd.setCursor(6, 1);
lcd.print("");

flash();
for (int i = 0; i < 4; i++ )
{
char key;
key = keypad.getKey();
while (key == 0)
{
key = keypad.getKey();
}
flash();
secretCode[i] = key;
lcd.print(key);
}
saveCode();
flash();flash();

}


void loadCode()
{
if (EEPROM.read(0) == 7)
{
secretCode[0] = EEPROM.read(1);
secretCode[1] = EEPROM.read(2);
secretCode[2] = EEPROM.read(3);
secretCode[3] = EEPROM.read(4);
}
}

void saveCode()
{
EEPROM.write(1, secretCode[0]);
EEPROM.write(2, secretCode[1]);
EEPROM.write(3, secretCode[2]);
EEPROM.write(4, secretCode[3]);
EEPROM.write(0, 7);
}


void eraseCode() // code is "2255"
{
EEPROM.write(1, 2);
EEPROM.write(2, 2);
EEPROM.write(3, 5);
EEPROM.write(4, 5);
EEPROM.write(0, 2);
}


void flash()
{
digitalWrite(redPin, HIGH);
digitalWrite(greenPin, LOW);
delay(100);
digitalWrite(redPin, LOW);
digitalWrite(greenPin, HIGH);
delay(100);
}
Sketch-ul modificat este:
// original schematic and schetch from http://www.arduinoevilgenius.com/// adapted schematic by niq_ro ( http://www.tehnic.go.ro/ )
// sketch door lock ver.3.4 (17.11.2013) use sketch door lock ver.2.0 (02.03.2013)
#include <Keypad.h>
#include <EEPROM.h>
char* secretCode = "2255";
int position = 0;
int position2 = 0;
boolean locked = true;
const byte rows = 4;
const byte cols = 3;
char keys[rows][cols] = {
{'1','2','3'},
{'4','5','6'},
{'7','8','9'},
{'*','0','#'}
};
byte rowPins[rows] = {2, 7, 6, 4};
byte colPins[cols] = {3, 1, 5};

Keypad keypad = Keypad(makeKeymap(keys), rowPins, colPins, rows, cols);
int redPin = 11;
int greenPin = 9;
int bluePin = 10;
int solenoidPin = 13;

// include the library code:
#include <LiquidCrystal.h>

// initialize the library with the numbers of the interface pins
LiquidCrystal lcd(14, 15, 16, 17, 18, 19);

/*
---------------------
| Arduino | LCD1602 |
---------------------
| D14(A0) |    RS   |
---------------------
| D15(A1) |    E    |
---------------------
| D16(A2) |    D4   |
---------------------
| D14(A3) |    D5   |
---------------------
| D14(A4) |    D6   |
---------------------
| D14(A5) |    D7   |
---------------------
*/

void setup()
{
pinMode(redPin, OUTPUT);
pinMode(greenPin, OUTPUT);
pinMode(bluePin, OUTPUT);

lcd.begin(16, 2);
// print my logo
lcd.setCursor(0, 0);
lcd.print("www.tehnic.go.ro");
lcd.setCursor(0, 1);
lcd.print("   by niq_ro");
delay(5000);
lcd.clear();

lcd.setCursor(0, 0);
lcd.print("acces permis la");
lcd.setCursor(2, 1);
lcd.print("introducere");
delay(1000);
lcd.clear();

lcd.setCursor(1, 0);
lcd.print("parola corecta");
lcd.setCursor(2, 1);
lcd.print("versiune 3.4");
delay(1000);
lcd.clear();


lcd.setCursor(1, 0);
lcd.print("apasa tasta '#'");
lcd.setCursor(2, 1);
lcd.print("pentru stergere");
delay(1000);
lcd.clear();


//eraseCode(); // a first test for initial code at "2255";
delay(1000);
loadCode(); // load the code from EEPROM

flash();
updateOutputs();
afisaj();

}
void loop()
{

char key = keypad.getKey();
if (key)
{
position2 ++;
digitalWrite(bluePin, HIGH);
delay(30);
digitalWrite(bluePin, LOW);
lcd.print("?");
}


if (key == '*' && ! locked)
{
// unlocked and * pressed so change code
position = 0;
position2 = 0;
getNewCode();
updateOutputs();
afisaj();
}
if (key == '#' )   // manual locked when push '#'
{
locked = true;
position = 0;
position2= 0;
updateOutputs();
digitalWrite(bluePin, HIGH);
delay(300);
digitalWrite(bluePin, LOW);
afisaj();
}

if (key == secretCode[position])
{
position ++;
}
if (position == 4 & position2 == 4)
{
locked = false;
digitalWrite(bluePin, HIGH);
delay(300);
digitalWrite(bluePin, LOW);
lcd.clear();
lcd.setCursor(0, 0);
lcd.print("parola corecta..");
lcd.setCursor(0, 1);
lcd.print("acces permis 5s");
updateOutputs();
afisaj();
}
}


void updateOutputs()
{
if (locked)
{
digitalWrite(redPin, HIGH);
digitalWrite(greenPin, LOW);
digitalWrite(solenoidPin, HIGH);
}
else
{
digitalWrite(redPin, LOW);
digitalWrite(greenPin, HIGH);
digitalWrite(solenoidPin, LOW);

delay (50);
for (int i=0; i <= 100; i++)
{
char key;
key = keypad.getKey();
if (key == '*')
{
// unlocked and * pressed so change code
position = 0;
position2 = 0;
getNewCode();
updateOutputs();
}
delay (50);
}
digitalWrite(redPin, HIGH);
digitalWrite(greenPin, LOW);
digitalWrite(solenoidPin, HIGH);
locked = true;
position = 0;
position2= 0;
}
}


void getNewCode()
{
lcd.clear();
lcd.setCursor(0, 0);
lcd.print("parola noua este");
lcd.setCursor(6, 1);
lcd.print("");

flash();
for (int i = 0; i < 4; i++ )
{
char key;
key = keypad.getKey();
while (key == 0)
{
key = keypad.getKey();
}
flash();
secretCode[i] = key;
lcd.print(key);
}
saveCode();
flash();flash();
//delay(400);
//afisaj();
}


void loadCode()
{
if (EEPROM.read(0) == 7)
{
secretCode[0] = EEPROM.read(1);
secretCode[1] = EEPROM.read(2);
secretCode[2] = EEPROM.read(3);
secretCode[3] = EEPROM.read(4);
}
}

void saveCode()
{
EEPROM.write(1, secretCode[0]);
EEPROM.write(2, secretCode[1]);
EEPROM.write(3, secretCode[2]);
EEPROM.write(4, secretCode[3]);
EEPROM.write(0, 7);
}


void eraseCode() // code is "2255"
{
EEPROM.write(1, 2);
EEPROM.write(2, 2);
EEPROM.write(3, 5);
EEPROM.write(4, 5);
EEPROM.write(0, 2);
}


void flash()
{
digitalWrite(redPin, HIGH);
digitalWrite(greenPin, LOW);
delay(100);
digitalWrite(redPin, LOW);
digitalWrite(greenPin, HIGH);
delay(100);
}

void afisaj()
{
lcd.clear();
lcd.setCursor(1, 0);
lcd.print("yala incuiata");
lcd.setCursor(0, 1);
delay(500);
lcd.clear();
lcd.setCursor(1, 0);
lcd.print("introdu parola");
lcd.setCursor(0, 1);
}


