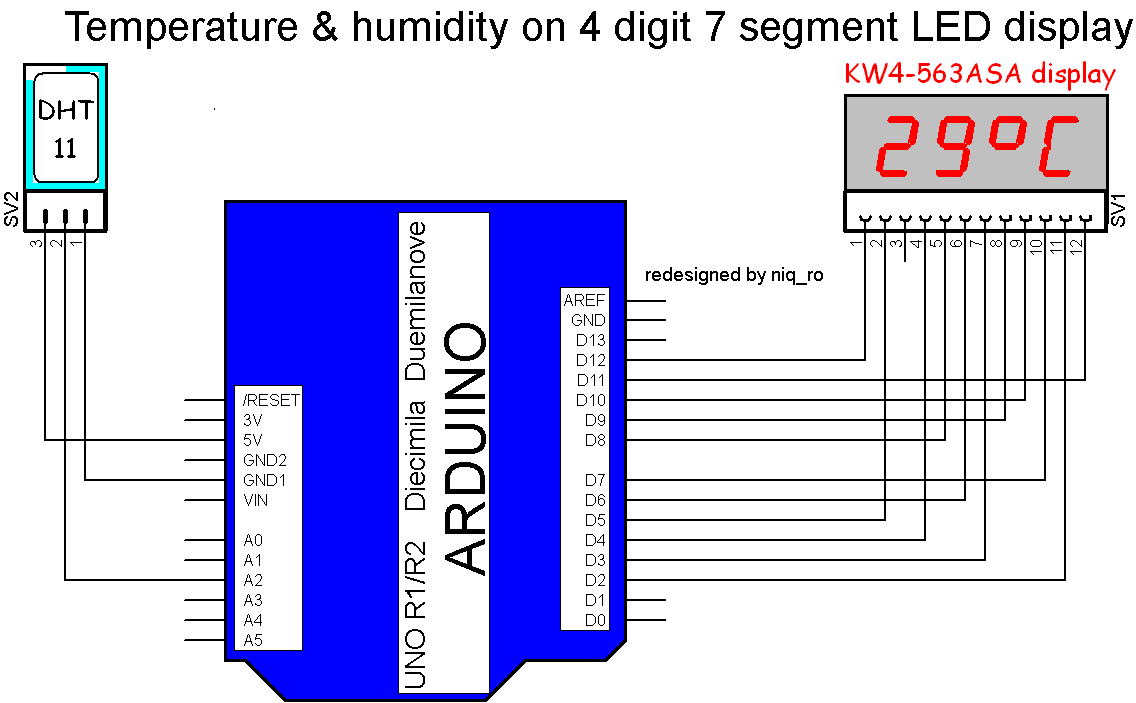
Pentru inceput o sa modific modul de conectare al afisajului, deoarece 2 dintre intrarile analogice (A0 si A1) erau conectate ca iesiri digitale. Pe langa faptul ca-mi reduce numarul de intrari analogice, si modul de legare este incurcat...

Fara a folosi o librarie dedicata pentru acest afisaj, am modificat sketch-ul anterior (din articol mentionat inainte), in sensul ca am definit simbolul pentru grad Celsius si 2 litere (C si H). Am definit o subrutina diferita pentru umiditate, fata de cea pentru temperatura si am folosit partea de program de la senzorul de temeperatura si uniditate DHT11, cum e in ultimul sketch din articolul Ministatie meteo cu senzorul DHT11 si.. Arduino, pinul de date fiind tot A2.


Un film, in care se prezinta modul de afisare, se numeste temperature & humidity on 7 segment LED display
Sketch-ul meu este:
/*
6-13-2011
Spark Fun Electronics 2011
Nathan Seidle
This code is public domain but you buy me a beer if you use this and we meet
someday (Beerware license).
4 digit 7 segment display:
Datasheet:
This is an example of how to drive a 7 segment LED display from an ATmega
without the use of current limiting resistors. This technique is very common
but requires some knowledge of electronics - you do run the risk of dumping
too much current through the segments and burning out parts of the display.
If you use the stock code you should be ok, but be careful editing the
brightness values.
This code should work with all colors (red, blue, yellow, green) but the
brightness will vary from one color to the next because the forward voltage
drop of each color is different. This code was written and calibrated for the
red color.
This code will work with most Arduinos but you may want to re-route some of
the pins.
7 segments
4 digits
1 colon
=
12 pins required for full control
*/
// modified connexion by niq_ro from http://nicuflorica.blogspot.com
// for my Luckylight KW4-563ASA
int digit1 = 11; //PWM Display pin 12 (digit1 is common anonds A1 from right side)
int digit2 = 10; //PWM Display pin 9 (digit2 is common A2)
int digit3 = 9; //PWM Display pin 8 (digit3 is common anods A3)
int digit4 = 6; //PWM Display pin 6 (digit4 is common anods, from left side)
//Pin mapping from Arduino to the ATmega DIP28 if you need it
int segA = 2; //Display pin 11
int segB = 3; //Display pin 7
int segC = 4; //Display pin 4
int segD = 5; //Display pin 2
int segE = 12; //Display pin 1
int segF = 7; //Display pin 10
int segG = 8; //Display pin 5
#include "DHT.h"
#define DHTPIN A2 // what pin we're connected to
#define DHTTYPE DHT11 // DHT 11
DHT dht(DHTPIN, DHTTYPE);
void setup() {
dht.begin();
pinMode(segA, OUTPUT);
pinMode(segB, OUTPUT);
pinMode(segC, OUTPUT);
pinMode(segD, OUTPUT);
pinMode(segE, OUTPUT);
pinMode(segF, OUTPUT);
pinMode(segG, OUTPUT);
pinMode(digit1, OUTPUT);
pinMode(digit2, OUTPUT);
pinMode(digit3, OUTPUT);
pinMode(digit4, OUTPUT);
pinMode(13, OUTPUT);
}
void loop() {
int h = dht.readHumidity();
int t = dht.readTemperature();
for(int i = 1000 ; i >0 ; i--) {
displayNumber(t); // this is number to diplay
}
for(int i = 1000 ; i >0 ; i--) {
displayNumber1(h); // this is number to diplay
}
// displayNumber(12); // this is number to diplay
}
//Given a number, we display 10:22
//After running through the 4 numbers, the display is left turned off
//Display brightness
//Each digit is on for a certain amount of microseconds
//Then it is off until we have reached a total of 20ms for the function call
//Let's assume each digit is on for 1000us
//Each digit is on for 1ms, there are 4 digits, so the display is off for 16ms.
//That's a ratio of 1ms to 16ms or 6.25% on time (PWM).
//Let's define a variable called brightness that varies from:
//5000 blindingly bright (15.7mA current draw per digit)
//2000 shockingly bright (11.4mA current draw per digit)
//1000 pretty bright (5.9mA)
//500 normal (3mA)
//200 dim but readable (1.4mA)
//50 dim but readable (0.56mA)
//5 dim but readable (0.31mA)
//1 dim but readable in dark (0.28mA)
void displayNumber(int toDisplay) {
#define DISPLAY_BRIGHTNESS 500
#define DIGIT_ON HIGH
#define DIGIT_OFF LOW
for(int digit = 4 ; digit > 0 ; digit--) {
//Turn on a digit for a short amount of time
switch(digit) {
case 1:
digitalWrite(digit1, DIGIT_ON);
lightNumber(toDisplay % 10);
toDisplay /= 10;
delayMicroseconds(DISPLAY_BRIGHTNESS);
break;
case 2:
digitalWrite(digit2, DIGIT_ON);
lightNumber(toDisplay % 10);
toDisplay /= 10;
delayMicroseconds(DISPLAY_BRIGHTNESS);
break;
case 3:
digitalWrite(digit3, DIGIT_ON);
lightNumber(11); // display degree symbol
delayMicroseconds(DISPLAY_BRIGHTNESS);
break;
case 4:
digitalWrite(digit4, DIGIT_ON);
lightNumber(12); // display C letter
delayMicroseconds(DISPLAY_BRIGHTNESS);
break;
}
//Turn off all segments
lightNumber(10);
//Turn off all digits
digitalWrite(digit1, DIGIT_OFF);
digitalWrite(digit2, DIGIT_OFF);
digitalWrite(digit3, DIGIT_OFF);
digitalWrite(digit4, DIGIT_OFF);
}
}
void displayNumber1(int toDisplay) {
#define DISPLAY_BRIGHTNESS 500
#define DIGIT_ON HIGH
#define DIGIT_OFF LOW
for(int digit = 4 ; digit > 0 ; digit--) {
//Turn on a digit for a short amount of time
switch(digit) {
case 1:
digitalWrite(digit1, DIGIT_ON);
lightNumber(toDisplay % 10);
toDisplay /= 10;
delayMicroseconds(DISPLAY_BRIGHTNESS);
break;
case 2:
digitalWrite(digit2, DIGIT_ON);
lightNumber(toDisplay % 10);
toDisplay /= 10;
delayMicroseconds(DISPLAY_BRIGHTNESS);
break;
case 3:
digitalWrite(digit3, DIGIT_ON);
lightNumber(10); // display degree symbol
delayMicroseconds(DISPLAY_BRIGHTNESS);
break;
case 4:
digitalWrite(digit4, DIGIT_ON);
lightNumber(13); // display C letter
delayMicroseconds(DISPLAY_BRIGHTNESS);
break;
}
//Turn off all segments
lightNumber(10);
//Turn off all digits
digitalWrite(digit1, DIGIT_OFF);
digitalWrite(digit2, DIGIT_OFF);
digitalWrite(digit3, DIGIT_OFF);
digitalWrite(digit4, DIGIT_OFF);
}
}
//Given a number, turns on those segments
//If number == 10, then turn off number
void lightNumber(int numberToDisplay) {
#define SEGMENT_ON LOW
#define SEGMENT_OFF HIGH
switch (numberToDisplay){
case 0:
digitalWrite(segA, SEGMENT_ON);
digitalWrite(segB, SEGMENT_ON);
digitalWrite(segC, SEGMENT_ON);
digitalWrite(segD, SEGMENT_ON);
digitalWrite(segE, SEGMENT_ON);
digitalWrite(segF, SEGMENT_ON);
digitalWrite(segG, SEGMENT_OFF);
break;
case 1:
digitalWrite(segA, SEGMENT_OFF);
digitalWrite(segB, SEGMENT_ON);
digitalWrite(segC, SEGMENT_ON);
digitalWrite(segD, SEGMENT_OFF);
digitalWrite(segE, SEGMENT_OFF);
digitalWrite(segF, SEGMENT_OFF);
digitalWrite(segG, SEGMENT_OFF);
break;
case 2:
digitalWrite(segA, SEGMENT_ON);
digitalWrite(segB, SEGMENT_ON);
digitalWrite(segC, SEGMENT_OFF);
digitalWrite(segD, SEGMENT_ON);
digitalWrite(segE, SEGMENT_ON);
digitalWrite(segF, SEGMENT_OFF);
digitalWrite(segG, SEGMENT_ON);
break;
case 3:
digitalWrite(segA, SEGMENT_ON);
digitalWrite(segB, SEGMENT_ON);
digitalWrite(segC, SEGMENT_ON);
digitalWrite(segD, SEGMENT_ON);
digitalWrite(segE, SEGMENT_OFF);
digitalWrite(segF, SEGMENT_OFF);
digitalWrite(segG, SEGMENT_ON);
break;
case 4:
digitalWrite(segA, SEGMENT_OFF);
digitalWrite(segB, SEGMENT_ON);
digitalWrite(segC, SEGMENT_ON);
digitalWrite(segD, SEGMENT_OFF);
digitalWrite(segE, SEGMENT_OFF);
digitalWrite(segF, SEGMENT_ON);
digitalWrite(segG, SEGMENT_ON);
break;
case 5:
digitalWrite(segA, SEGMENT_ON);
digitalWrite(segB, SEGMENT_OFF);
digitalWrite(segC, SEGMENT_ON);
digitalWrite(segD, SEGMENT_ON);
digitalWrite(segE, SEGMENT_OFF);
digitalWrite(segF, SEGMENT_ON);
digitalWrite(segG, SEGMENT_ON);
break;
case 6:
digitalWrite(segA, SEGMENT_ON);
digitalWrite(segB, SEGMENT_OFF);
digitalWrite(segC, SEGMENT_ON);
digitalWrite(segD, SEGMENT_ON);
digitalWrite(segE, SEGMENT_ON);
digitalWrite(segF, SEGMENT_ON);
digitalWrite(segG, SEGMENT_ON);
break;
case 7:
digitalWrite(segA, SEGMENT_ON);
digitalWrite(segB, SEGMENT_ON);
digitalWrite(segC, SEGMENT_ON);
digitalWrite(segD, SEGMENT_OFF);
digitalWrite(segE, SEGMENT_OFF);
digitalWrite(segF, SEGMENT_OFF);
digitalWrite(segG, SEGMENT_OFF);
break;
case 8:
digitalWrite(segA, SEGMENT_ON);
digitalWrite(segB, SEGMENT_ON);
digitalWrite(segC, SEGMENT_ON);
digitalWrite(segD, SEGMENT_ON);
digitalWrite(segE, SEGMENT_ON);
digitalWrite(segF, SEGMENT_ON);
digitalWrite(segG, SEGMENT_ON);
break;
case 9:
digitalWrite(segA, SEGMENT_ON);
digitalWrite(segB, SEGMENT_ON);
digitalWrite(segC, SEGMENT_ON);
digitalWrite(segD, SEGMENT_ON);
digitalWrite(segE, SEGMENT_OFF);
digitalWrite(segF, SEGMENT_ON);
digitalWrite(segG, SEGMENT_ON);
break;
// all segment are ON
case 10:
digitalWrite(segA, SEGMENT_OFF);
digitalWrite(segB, SEGMENT_OFF);
digitalWrite(segC, SEGMENT_OFF);
digitalWrite(segD, SEGMENT_OFF);
digitalWrite(segE, SEGMENT_OFF);
digitalWrite(segF, SEGMENT_OFF);
digitalWrite(segG, SEGMENT_OFF);
break;
// degree symbol made by niq_ro
case 11:
digitalWrite(segA, SEGMENT_ON);
digitalWrite(segB, SEGMENT_ON);
digitalWrite(segC, SEGMENT_OFF);
digitalWrite(segD, SEGMENT_OFF);
digitalWrite(segE, SEGMENT_OFF);
digitalWrite(segF, SEGMENT_ON);
digitalWrite(segG, SEGMENT_ON);
break;
// C letter made by niq_ro
case 12:
digitalWrite(segA, SEGMENT_ON);
digitalWrite(segB, SEGMENT_OFF);
digitalWrite(segC, SEGMENT_OFF);
digitalWrite(segD, SEGMENT_ON);
digitalWrite(segE, SEGMENT_ON);
digitalWrite(segF, SEGMENT_ON);
digitalWrite(segG, SEGMENT_OFF);
break;
// H letter made by niq_ro
case 13:
digitalWrite(segA, SEGMENT_OFF);
digitalWrite(segB, SEGMENT_ON);
digitalWrite(segC, SEGMENT_ON);
digitalWrite(segD, SEGMENT_OFF);
digitalWrite(segE, SEGMENT_ON);
digitalWrite(segF, SEGMENT_ON);
digitalWrite(segG, SEGMENT_ON);
break;
}
}
Un filmulet, la o calitate mai buna, se numeste temperature & humidity on 7 segment LED display (II)
02.iul.2013
M-am gandit ca ar fi mai spectaculos si mai util ca pe afisaj sa am indicata si ora, asa ca am conectat modulul de timp real cu DS1307 si am legat si terminalul de la afisajul multiplexat pentru punctul zecimal, modificand si sketch-ul.


Am facut un filmulet, care se numeste hour, temperature & humidity on 7-segment LED display with Arduino:
/*
6-13-2011
Spark Fun Electronics 2011
Nathan Seidle
This code is public domain but you buy me a beer if you use this and we meet
someday (Beerware license).
4 digit 7 segment display:
Datasheet:
This is an example of how to drive a 7 segment LED display from an ATmega
without the use of current limiting resistors. This technique is very common
but requires some knowledge of electronics - you do run the risk of dumping
too much current through the segments and burning out parts of the display.
If you use the stock code you should be ok, but be careful editing the
brightness values.
This code should work with all colors (red, blue, yellow, green) but the
brightness will vary from one color to the next because the forward voltage
drop of each color is different. This code was written and calibrated for the
red color.
This code will work with most Arduinos but you may want to re-route some of
the pins.
7 segments
4 digits
1 colon
=
12 pins required for full control
*/
// modified connexion by niq_ro from http://nicuflorica.blogspot.com
// for my Luckylight KW4-563ASA
int digit1 = 11; //PWM Display pin 12 (digit1 is common anonds A1 from right side)
int digit2 = 10; //PWM Display pin 9 (digit2 is common A2)
int digit3 = 9; //PWM Display pin 8 (digit3 is common anods A3)
int digit4 = 6; //PWM Display pin 6 (digit4 is common anods, from left side)
//Pin mapping from Arduino to the ATmega DIP28 if you need it
int segA = 2; //Display pin 11
int segB = 3; //Display pin 7
int segC = 4; //Display pin 4
int segD = 5; //Display pin 2
int segE = 12; //Display pin 1
int segF = 7; //Display pin 10
int segG = 8; //Display pin 5
int segDP = 13; // Display pin 3
#include "DHT.h"
#define DHTPIN A2 // what pin we're connected to
#define DHTTYPE DHT11 // DHT 11
DHT dht(DHTPIN, DHTTYPE);
#include <Wire.h>
#include "RTClib.h"
RTC_DS1307 RTC;
// Date and time functions using a DS1307 RTC connected via I2C and Wire lib
// original sketck from http://learn.adafruit.com/ds1307-real-time-clock-breakout-board-kit/
// add part with SQW=1Hz from http://tronixstuff.wordpress.com/2010/10/20/tutorial-arduino-and-the-i2c-bus/
void setup() {
Wire.begin();
RTC.begin();
// RTC.adjust(DateTime(__DATE__, __TIME__));
// if you need set clock... just remove // from line above this
// part code for flashing LED
Wire.beginTransmission(0x68);
Wire.write(0x07); // move pointer to SQW address
// Wire.write(0x00); // turns the SQW pin off
Wire.write(0x10); // sends 0x10 (hex) 00010000 (binary) to control register - turns on square wave at 1Hz
// Wire.write(0x13); // sends 0x13 (hex) 00010011 (binary) 32kHz
Wire.endTransmission();
if (! RTC.isrunning()) {
Serial.println("RTC is NOT running!");
// following line sets the RTC to the date & time this sketch was compiled
RTC.adjust(DateTime(__DATE__, __TIME__));
}
dht.begin();
pinMode(segA, OUTPUT);
pinMode(segB, OUTPUT);
pinMode(segC, OUTPUT);
pinMode(segD, OUTPUT);
pinMode(segE, OUTPUT);
pinMode(segF, OUTPUT);
pinMode(segG, OUTPUT);
pinMode(segDP, OUTPUT);
pinMode(digit1, OUTPUT);
pinMode(digit2, OUTPUT);
pinMode(digit3, OUTPUT);
pinMode(digit4, OUTPUT);
// pinMode(13, OUTPUT);
Serial.begin(9600);
Serial.println("test for niq_ro");
}
void loop() {
digitalWrite(segDP, HIGH);
DateTime now = RTC.now();
int timp = now.hour()*100+now.minute();
// int timp = (now.minute(), DEC);
// displayNumber(12); // this is number to diplay
// int timp = 1234;
Serial.print(now.hour(), DEC);
Serial.print(":");
Serial.print(now.minute(), DEC);
Serial.print(" -> ");
Serial.print(timp);
Serial.println(" !");
int h = dht.readHumidity();
int t = dht.readTemperature();
for(int i = 1000 ; i >0 ; i--) {
displayNumber(t); // this is number to diplay
}
for(int i = 1000 ; i >0 ; i--) {
displayNumber1(h); // this is number to diplay
}
for(int i = 1000 ; i >0 ; i--) {
displayNumber0(timp); // this is number to diplay
}
}
//Given a number, we display 10:22
//After running through the 4 numbers, the display is left turned off
//Display brightness
//Each digit is on for a certain amount of microseconds
//Then it is off until we have reached a total of 20ms for the function call
//Let's assume each digit is on for 1000us
//Each digit is on for 1ms, there are 4 digits, so the display is off for 16ms.
//That's a ratio of 1ms to 16ms or 6.25% on time (PWM).
//Let's define a variable called brightness that varies from:
//5000 blindingly bright (15.7mA current draw per digit)
//2000 shockingly bright (11.4mA current draw per digit)
//1000 pretty bright (5.9mA)
//500 normal (3mA)
//200 dim but readable (1.4mA)
//50 dim but readable (0.56mA)
//5 dim but readable (0.31mA)
//1 dim but readable in dark (0.28mA)
void displayNumber(int toDisplay) {
#define DISPLAY_BRIGHTNESS 500
#define DIGIT_ON HIGH
#define DIGIT_OFF LOW
for(int digit = 4 ; digit > 0 ; digit--) {
//Turn on a digit for a short amount of time
switch(digit) {
case 1:
digitalWrite(digit1, DIGIT_ON);
lightNumber(toDisplay % 10);
toDisplay /= 10;
delayMicroseconds(DISPLAY_BRIGHTNESS);
break;
case 2:
digitalWrite(digit2, DIGIT_ON);
lightNumber(toDisplay % 10);
toDisplay /= 10;
delayMicroseconds(DISPLAY_BRIGHTNESS);
break;
case 3:
digitalWrite(digit3, DIGIT_ON);
lightNumber(11); // display degree symbol
delayMicroseconds(DISPLAY_BRIGHTNESS);
break;
case 4:
digitalWrite(digit4, DIGIT_ON);
lightNumber(12); // display C letter
delayMicroseconds(DISPLAY_BRIGHTNESS);
break;
}
//Turn off all segments
lightNumber(10);
//Turn off all digits
digitalWrite(digit1, DIGIT_OFF);
digitalWrite(digit2, DIGIT_OFF);
digitalWrite(digit3, DIGIT_OFF);
digitalWrite(digit4, DIGIT_OFF);
}
}
void displayNumber1(int toDisplay) {
#define DISPLAY_BRIGHTNESS 500
#define DIGIT_ON HIGH
#define DIGIT_OFF LOW
for(int digit = 4 ; digit > 0 ; digit--) {
//Turn on a digit for a short amount of time
switch(digit) {
case 1:
digitalWrite(digit1, DIGIT_ON);
lightNumber(toDisplay % 10);
toDisplay /= 10;
delayMicroseconds(DISPLAY_BRIGHTNESS);
break;
case 2:
digitalWrite(digit2, DIGIT_ON);
lightNumber(toDisplay % 10);
toDisplay /= 10;
delayMicroseconds(DISPLAY_BRIGHTNESS);
break;
case 3:
digitalWrite(digit3, DIGIT_ON);
lightNumber(10); // display degree symbol
delayMicroseconds(DISPLAY_BRIGHTNESS);
break;
case 4:
digitalWrite(digit4, DIGIT_ON);
lightNumber(13); // display C letter
delayMicroseconds(DISPLAY_BRIGHTNESS);
break;
}
//Turn off all segments
lightNumber(10);
//Turn off all digits
digitalWrite(digit1, DIGIT_OFF);
digitalWrite(digit2, DIGIT_OFF);
digitalWrite(digit3, DIGIT_OFF);
digitalWrite(digit4, DIGIT_OFF);
}
}
void displayNumber0(int toDisplay) {
#define DISPLAY_BRIGHTNESS 500
#define DIGIT_ON HIGH
#define DIGIT_OFF LOW
for(int digit = 4 ; digit > 0 ; digit--) {
//Turn on a digit for a short amount of time
switch(digit) {
case 1:
digitalWrite(digit1, DIGIT_ON);
digitalWrite(segDP, HIGH);
break;
case 2:
digitalWrite(digit2, DIGIT_ON);
digitalWrite(segDP, LOW);
break;
case 3:
digitalWrite(digit3, DIGIT_ON);
digitalWrite(segDP, HIGH);
break;
case 4:
digitalWrite(digit4, DIGIT_ON);
digitalWrite(segDP, HIGH);
break;
}
lightNumber(toDisplay % 10);
toDisplay /= 10;
delayMicroseconds(DISPLAY_BRIGHTNESS);
//Turn off all segments
lightNumber(10);
//Turn off all digits
digitalWrite(digit1, DIGIT_OFF);
digitalWrite(digit2, DIGIT_OFF);
digitalWrite(digit3, DIGIT_OFF);
digitalWrite(digit4, DIGIT_OFF);
}
}
//Given a number, turns on those segments
//If number == 10, then turn off number
void lightNumber(int numberToDisplay) {
#define SEGMENT_ON LOW
#define SEGMENT_OFF HIGH
switch (numberToDisplay){
case 0:
digitalWrite(segA, SEGMENT_ON);
digitalWrite(segB, SEGMENT_ON);
digitalWrite(segC, SEGMENT_ON);
digitalWrite(segD, SEGMENT_ON);
digitalWrite(segE, SEGMENT_ON);
digitalWrite(segF, SEGMENT_ON);
digitalWrite(segG, SEGMENT_OFF);
break;
case 1:
digitalWrite(segA, SEGMENT_OFF);
digitalWrite(segB, SEGMENT_ON);
digitalWrite(segC, SEGMENT_ON);
digitalWrite(segD, SEGMENT_OFF);
digitalWrite(segE, SEGMENT_OFF);
digitalWrite(segF, SEGMENT_OFF);
digitalWrite(segG, SEGMENT_OFF);
break;
case 2:
digitalWrite(segA, SEGMENT_ON);
digitalWrite(segB, SEGMENT_ON);
digitalWrite(segC, SEGMENT_OFF);
digitalWrite(segD, SEGMENT_ON);
digitalWrite(segE, SEGMENT_ON);
digitalWrite(segF, SEGMENT_OFF);
digitalWrite(segG, SEGMENT_ON);
break;
case 3:
digitalWrite(segA, SEGMENT_ON);
digitalWrite(segB, SEGMENT_ON);
digitalWrite(segC, SEGMENT_ON);
digitalWrite(segD, SEGMENT_ON);
digitalWrite(segE, SEGMENT_OFF);
digitalWrite(segF, SEGMENT_OFF);
digitalWrite(segG, SEGMENT_ON);
break;
case 4:
digitalWrite(segA, SEGMENT_OFF);
digitalWrite(segB, SEGMENT_ON);
digitalWrite(segC, SEGMENT_ON);
digitalWrite(segD, SEGMENT_OFF);
digitalWrite(segE, SEGMENT_OFF);
digitalWrite(segF, SEGMENT_ON);
digitalWrite(segG, SEGMENT_ON);
break;
case 5:
digitalWrite(segA, SEGMENT_ON);
digitalWrite(segB, SEGMENT_OFF);
digitalWrite(segC, SEGMENT_ON);
digitalWrite(segD, SEGMENT_ON);
digitalWrite(segE, SEGMENT_OFF);
digitalWrite(segF, SEGMENT_ON);
digitalWrite(segG, SEGMENT_ON);
break;
case 6:
digitalWrite(segA, SEGMENT_ON);
digitalWrite(segB, SEGMENT_OFF);
digitalWrite(segC, SEGMENT_ON);
digitalWrite(segD, SEGMENT_ON);
digitalWrite(segE, SEGMENT_ON);
digitalWrite(segF, SEGMENT_ON);
digitalWrite(segG, SEGMENT_ON);
break;
case 7:
digitalWrite(segA, SEGMENT_ON);
digitalWrite(segB, SEGMENT_ON);
digitalWrite(segC, SEGMENT_ON);
digitalWrite(segD, SEGMENT_OFF);
digitalWrite(segE, SEGMENT_OFF);
digitalWrite(segF, SEGMENT_OFF);
digitalWrite(segG, SEGMENT_OFF);
break;
case 8:
digitalWrite(segA, SEGMENT_ON);
digitalWrite(segB, SEGMENT_ON);
digitalWrite(segC, SEGMENT_ON);
digitalWrite(segD, SEGMENT_ON);
digitalWrite(segE, SEGMENT_ON);
digitalWrite(segF, SEGMENT_ON);
digitalWrite(segG, SEGMENT_ON);
break;
case 9:
digitalWrite(segA, SEGMENT_ON);
digitalWrite(segB, SEGMENT_ON);
digitalWrite(segC, SEGMENT_ON);
digitalWrite(segD, SEGMENT_ON);
digitalWrite(segE, SEGMENT_OFF);
digitalWrite(segF, SEGMENT_ON);
digitalWrite(segG, SEGMENT_ON);
break;
// all segment are ON
case 10:
digitalWrite(segA, SEGMENT_OFF);
digitalWrite(segB, SEGMENT_OFF);
digitalWrite(segC, SEGMENT_OFF);
digitalWrite(segD, SEGMENT_OFF);
digitalWrite(segE, SEGMENT_OFF);
digitalWrite(segF, SEGMENT_OFF);
digitalWrite(segG, SEGMENT_OFF);
break;
// degree symbol made by niq_ro
case 11:
digitalWrite(segA, SEGMENT_ON);
digitalWrite(segB, SEGMENT_ON);
digitalWrite(segC, SEGMENT_OFF);
digitalWrite(segD, SEGMENT_OFF);
digitalWrite(segE, SEGMENT_OFF);
digitalWrite(segF, SEGMENT_ON);
digitalWrite(segG, SEGMENT_ON);
break;
// C letter made by niq_ro
case 12:
digitalWrite(segA, SEGMENT_ON);
digitalWrite(segB, SEGMENT_OFF);
digitalWrite(segC, SEGMENT_OFF);
digitalWrite(segD, SEGMENT_ON);
digitalWrite(segE, SEGMENT_ON);
digitalWrite(segF, SEGMENT_ON);
digitalWrite(segG, SEGMENT_OFF);
break;
// H letter made by niq_ro
case 13:
digitalWrite(segA, SEGMENT_OFF);
digitalWrite(segB, SEGMENT_ON);
digitalWrite(segC, SEGMENT_ON);
digitalWrite(segD, SEGMENT_OFF);
digitalWrite(segE, SEGMENT_ON);
digitalWrite(segF, SEGMENT_ON);
digitalWrite(segG, SEGMENT_ON);
break;
}
}
Deoarece ma deranja acel zero din fata orei, am modificat sketch-ul sa am afisata ora fara acel zero...


/*
6-13-2011
Spark Fun Electronics 2011
Nathan Seidle
This code is public domain but you buy me a beer if you use this and we meet
someday (Beerware license).
4 digit 7 segment display:
Datasheet:
This is an example of how to drive a 7 segment LED display from an ATmega
without the use of current limiting resistors. This technique is very common
but requires some knowledge of electronics - you do run the risk of dumping
too much current through the segments and burning out parts of the display.
If you use the stock code you should be ok, but be careful editing the
brightness values.
This code should work with all colors (red, blue, yellow, green) but the
brightness will vary from one color to the next because the forward voltage
drop of each color is different. This code was written and calibrated for the
red color.
This code will work with most Arduinos but you may want to re-route some of
the pins.
7 segments
4 digits
1 colon
=
12 pins required for full control
*/
// modified connexion by niq_ro from http://nicuflorica.blogspot.com
// for my Luckylight KW4-563ASA
int digit1 = 11; //PWM Display pin 12 (digit1 is common anonds A1 from right side)
int digit2 = 10; //PWM Display pin 9 (digit2 is common A2)
int digit3 = 9; //PWM Display pin 8 (digit3 is common anods A3)
int digit4 = 6; //PWM Display pin 6 (digit4 is common anods, from left side)
//Pin mapping from Arduino to the ATmega DIP28 if you need it
int segA = 2; //Display pin 11
int segB = 3; //Display pin 7
int segC = 4; //Display pin 4
int segD = 5; //Display pin 2
int segE = 12; //Display pin 1
int segF = 7; //Display pin 10
int segG = 8; //Display pin 5
int segDP = 13; // Display pin 3
#include "DHT.h"
#define DHTPIN A2 // what pin we're connected to
#define DHTTYPE DHT11 // DHT 11
DHT dht(DHTPIN, DHTTYPE);
#include <Wire.h>
#include "RTClib.h"
RTC_DS1307 RTC;
// Date and time functions using a DS1307 RTC connected via I2C and Wire lib
// original sketck from http://learn.adafruit.com/ds1307-real-time-clock-breakout-board-kit/
// add part with SQW=1Hz from http://tronixstuff.wordpress.com/2010/10/20/tutorial-arduino-and-the-i2c-bus/
void setup() {
Wire.begin();
RTC.begin();
// RTC.adjust(DateTime(__DATE__, __TIME__));
// if you need set clock... just remove // from line above this
// part code for flashing LED
Wire.beginTransmission(0x68);
Wire.write(0x07); // move pointer to SQW address
// Wire.write(0x00); // turns the SQW pin off
Wire.write(0x10); // sends 0x10 (hex) 00010000 (binary) to control register - turns on square wave at 1Hz
// Wire.write(0x13); // sends 0x13 (hex) 00010011 (binary) 32kHz
Wire.endTransmission();
if (! RTC.isrunning()) {
Serial.println("RTC is NOT running!");
// following line sets the RTC to the date & time this sketch was compiled
RTC.adjust(DateTime(__DATE__, __TIME__));
}
dht.begin();
pinMode(segA, OUTPUT);
pinMode(segB, OUTPUT);
pinMode(segC, OUTPUT);
pinMode(segD, OUTPUT);
pinMode(segE, OUTPUT);
pinMode(segF, OUTPUT);
pinMode(segG, OUTPUT);
pinMode(segDP, OUTPUT);
pinMode(digit1, OUTPUT);
pinMode(digit2, OUTPUT);
pinMode(digit3, OUTPUT);
pinMode(digit4, OUTPUT);
// pinMode(13, OUTPUT);
Serial.begin(9600);
Serial.println("test for niq_ro");
}
void loop() {
digitalWrite(segDP, HIGH);
DateTime now = RTC.now();
int timp = now.hour()*100+now.minute();
// int timp = (now.minute(), DEC);
// displayNumber(12); // this is number to diplay
// int timp = 1234;
Serial.print(now.hour(), DEC);
Serial.print(":");
Serial.print(now.minute(), DEC);
Serial.print(" -> ");
Serial.print(timp);
Serial.println(" !");
int h = dht.readHumidity();
int t = dht.readTemperature();
for(int i = 1000 ; i >0 ; i--) {
displayNumber(t); // this is number to diplay
}
for(int i = 1000 ; i >0 ; i--) {
displayNumber1(h); // this is number to diplay
}
for(int i = 1000 ; i >0 ; i--) {
if (timp > 1000) displayNumber01(timp);
else displayNumber02(timp);
}
}
//Given a number, we display 10:22
//After running through the 4 numbers, the display is left turned off
//Display brightness
//Each digit is on for a certain amount of microseconds
//Then it is off until we have reached a total of 20ms for the function call
//Let's assume each digit is on for 1000us
//Each digit is on for 1ms, there are 4 digits, so the display is off for 16ms.
//That's a ratio of 1ms to 16ms or 6.25% on time (PWM).
//Let's define a variable called brightness that varies from:
//5000 blindingly bright (15.7mA current draw per digit)
//2000 shockingly bright (11.4mA current draw per digit)
//1000 pretty bright (5.9mA)
//500 normal (3mA)
//200 dim but readable (1.4mA)
//50 dim but readable (0.56mA)
//5 dim but readable (0.31mA)
//1 dim but readable in dark (0.28mA)
void displayNumber(int toDisplay) {
#define DISPLAY_BRIGHTNESS 500
#define DIGIT_ON HIGH
#define DIGIT_OFF LOW
for(int digit = 4 ; digit > 0 ; digit--) {
//Turn on a digit for a short amount of time
switch(digit) {
case 1:
digitalWrite(digit1, DIGIT_ON);
lightNumber(toDisplay % 10);
toDisplay /= 10;
delayMicroseconds(DISPLAY_BRIGHTNESS);
break;
case 2:
digitalWrite(digit2, DIGIT_ON);
lightNumber(toDisplay % 10);
toDisplay /= 10;
delayMicroseconds(DISPLAY_BRIGHTNESS);
break;
case 3:
digitalWrite(digit3, DIGIT_ON);
lightNumber(11); // display degree symbol
delayMicroseconds(DISPLAY_BRIGHTNESS);
break;
case 4:
digitalWrite(digit4, DIGIT_ON);
lightNumber(12); // display C letter
delayMicroseconds(DISPLAY_BRIGHTNESS);
break;
}
//Turn off all segments
lightNumber(10);
//Turn off all digits
digitalWrite(digit1, DIGIT_OFF);
digitalWrite(digit2, DIGIT_OFF);
digitalWrite(digit3, DIGIT_OFF);
digitalWrite(digit4, DIGIT_OFF);
}
}
void displayNumber1(int toDisplay) {
#define DISPLAY_BRIGHTNESS 500
#define DIGIT_ON HIGH
#define DIGIT_OFF LOW
for(int digit = 4 ; digit > 0 ; digit--) {
//Turn on a digit for a short amount of time
switch(digit) {
case 1:
digitalWrite(digit1, DIGIT_ON);
lightNumber(toDisplay % 10);
toDisplay /= 10;
delayMicroseconds(DISPLAY_BRIGHTNESS);
break;
case 2:
digitalWrite(digit2, DIGIT_ON);
lightNumber(toDisplay % 10);
toDisplay /= 10;
delayMicroseconds(DISPLAY_BRIGHTNESS);
break;
case 3:
digitalWrite(digit3, DIGIT_ON);
lightNumber(10); // display degree symbol
delayMicroseconds(DISPLAY_BRIGHTNESS);
break;
case 4:
digitalWrite(digit4, DIGIT_ON);
lightNumber(13); // display C letter
delayMicroseconds(DISPLAY_BRIGHTNESS);
break;
}
//Turn off all segments
lightNumber(10);
//Turn off all digits
digitalWrite(digit1, DIGIT_OFF);
digitalWrite(digit2, DIGIT_OFF);
digitalWrite(digit3, DIGIT_OFF);
digitalWrite(digit4, DIGIT_OFF);
}
}
void displayNumber01(int toDisplay) {
#define DISPLAY_BRIGHTNESS 500
#define DIGIT_ON HIGH
#define DIGIT_OFF LOW
for(int digit = 4 ; digit > 0 ; digit--) {
//Turn on a digit for a short amount of time
switch(digit) {
case 1:
digitalWrite(digit1, DIGIT_ON);
digitalWrite(segDP, HIGH);
break;
case 2:
digitalWrite(digit2, DIGIT_ON);
digitalWrite(segDP, LOW);
break;
case 3:
digitalWrite(digit3, DIGIT_ON);
digitalWrite(segDP, HIGH);
break;
case 4:
digitalWrite(digit4, DIGIT_ON);
digitalWrite(segDP, HIGH);
break;
}
lightNumber(toDisplay % 10);
toDisplay /= 10;
delayMicroseconds(DISPLAY_BRIGHTNESS);
//Turn off all segments
lightNumber(10);
//Turn off all digits
digitalWrite(digit1, DIGIT_OFF);
digitalWrite(digit2, DIGIT_OFF);
digitalWrite(digit3, DIGIT_OFF);
digitalWrite(digit4, DIGIT_OFF);
}
}
void displayNumber02(int toDisplay) {
#define DISPLAY_BRIGHTNESS 500
#define DIGIT_ON HIGH
#define DIGIT_OFF LOW
for(int digit = 4 ; digit > 0 ; digit--) {
//Turn on a digit for a short amount of time
switch(digit) {
case 1:
lightNumber(10);
digitalWrite(segDP, HIGH);
break;
case 2:
digitalWrite(digit2, DIGIT_ON);
digitalWrite(segDP, LOW);
break;
case 3:
digitalWrite(digit3, DIGIT_ON);
digitalWrite(segDP, HIGH);
break;
case 4:
digitalWrite(digit4, DIGIT_ON);
digitalWrite(segDP, HIGH);
break;
}
lightNumber(toDisplay % 10);
toDisplay /= 10;
delayMicroseconds(DISPLAY_BRIGHTNESS);
//Turn off all segments
lightNumber(10);
//Turn off all digits
digitalWrite(digit1, DIGIT_OFF);
digitalWrite(digit2, DIGIT_OFF);
digitalWrite(digit3, DIGIT_OFF);
digitalWrite(digit4, DIGIT_OFF);
}
}
//Given a number, turns on those segments
//If number == 10, then turn off number
void lightNumber(int numberToDisplay) {
#define SEGMENT_ON LOW
#define SEGMENT_OFF HIGH
switch (numberToDisplay){
case 0:
digitalWrite(segA, SEGMENT_ON);
digitalWrite(segB, SEGMENT_ON);
digitalWrite(segC, SEGMENT_ON);
digitalWrite(segD, SEGMENT_ON);
digitalWrite(segE, SEGMENT_ON);
digitalWrite(segF, SEGMENT_ON);
digitalWrite(segG, SEGMENT_OFF);
break;
case 1:
digitalWrite(segA, SEGMENT_OFF);
digitalWrite(segB, SEGMENT_ON);
digitalWrite(segC, SEGMENT_ON);
digitalWrite(segD, SEGMENT_OFF);
digitalWrite(segE, SEGMENT_OFF);
digitalWrite(segF, SEGMENT_OFF);
digitalWrite(segG, SEGMENT_OFF);
break;
case 2:
digitalWrite(segA, SEGMENT_ON);
digitalWrite(segB, SEGMENT_ON);
digitalWrite(segC, SEGMENT_OFF);
digitalWrite(segD, SEGMENT_ON);
digitalWrite(segE, SEGMENT_ON);
digitalWrite(segF, SEGMENT_OFF);
digitalWrite(segG, SEGMENT_ON);
break;
case 3:
digitalWrite(segA, SEGMENT_ON);
digitalWrite(segB, SEGMENT_ON);
digitalWrite(segC, SEGMENT_ON);
digitalWrite(segD, SEGMENT_ON);
digitalWrite(segE, SEGMENT_OFF);
digitalWrite(segF, SEGMENT_OFF);
digitalWrite(segG, SEGMENT_ON);
break;
case 4:
digitalWrite(segA, SEGMENT_OFF);
digitalWrite(segB, SEGMENT_ON);
digitalWrite(segC, SEGMENT_ON);
digitalWrite(segD, SEGMENT_OFF);
digitalWrite(segE, SEGMENT_OFF);
digitalWrite(segF, SEGMENT_ON);
digitalWrite(segG, SEGMENT_ON);
break;
case 5:
digitalWrite(segA, SEGMENT_ON);
digitalWrite(segB, SEGMENT_OFF);
digitalWrite(segC, SEGMENT_ON);
digitalWrite(segD, SEGMENT_ON);
digitalWrite(segE, SEGMENT_OFF);
digitalWrite(segF, SEGMENT_ON);
digitalWrite(segG, SEGMENT_ON);
break;
case 6:
digitalWrite(segA, SEGMENT_ON);
digitalWrite(segB, SEGMENT_OFF);
digitalWrite(segC, SEGMENT_ON);
digitalWrite(segD, SEGMENT_ON);
digitalWrite(segE, SEGMENT_ON);
digitalWrite(segF, SEGMENT_ON);
digitalWrite(segG, SEGMENT_ON);
break;
case 7:
digitalWrite(segA, SEGMENT_ON);
digitalWrite(segB, SEGMENT_ON);
digitalWrite(segC, SEGMENT_ON);
digitalWrite(segD, SEGMENT_OFF);
digitalWrite(segE, SEGMENT_OFF);
digitalWrite(segF, SEGMENT_OFF);
digitalWrite(segG, SEGMENT_OFF);
break;
case 8:
digitalWrite(segA, SEGMENT_ON);
digitalWrite(segB, SEGMENT_ON);
digitalWrite(segC, SEGMENT_ON);
digitalWrite(segD, SEGMENT_ON);
digitalWrite(segE, SEGMENT_ON);
digitalWrite(segF, SEGMENT_ON);
digitalWrite(segG, SEGMENT_ON);
break;
case 9:
digitalWrite(segA, SEGMENT_ON);
digitalWrite(segB, SEGMENT_ON);
digitalWrite(segC, SEGMENT_ON);
digitalWrite(segD, SEGMENT_ON);
digitalWrite(segE, SEGMENT_OFF);
digitalWrite(segF, SEGMENT_ON);
digitalWrite(segG, SEGMENT_ON);
break;
// all segment are ON
case 10:
digitalWrite(segA, SEGMENT_OFF);
digitalWrite(segB, SEGMENT_OFF);
digitalWrite(segC, SEGMENT_OFF);
digitalWrite(segD, SEGMENT_OFF);
digitalWrite(segE, SEGMENT_OFF);
digitalWrite(segF, SEGMENT_OFF);
digitalWrite(segG, SEGMENT_OFF);
break;
// degree symbol made by niq_ro
case 11:
digitalWrite(segA, SEGMENT_ON);
digitalWrite(segB, SEGMENT_ON);
digitalWrite(segC, SEGMENT_OFF);
digitalWrite(segD, SEGMENT_OFF);
digitalWrite(segE, SEGMENT_OFF);
digitalWrite(segF, SEGMENT_ON);
digitalWrite(segG, SEGMENT_ON);
break;
// C letter made by niq_ro
case 12:
digitalWrite(segA, SEGMENT_ON);
digitalWrite(segB, SEGMENT_OFF);
digitalWrite(segC, SEGMENT_OFF);
digitalWrite(segD, SEGMENT_ON);
digitalWrite(segE, SEGMENT_ON);
digitalWrite(segF, SEGMENT_ON);
digitalWrite(segG, SEGMENT_OFF);
break;
// H letter made by niq_ro
case 13:
digitalWrite(segA, SEGMENT_OFF);
digitalWrite(segB, SEGMENT_ON);
digitalWrite(segC, SEGMENT_ON);
digitalWrite(segD, SEGMENT_OFF);
digitalWrite(segE, SEGMENT_ON);
digitalWrite(segF, SEGMENT_ON);
digitalWrite(segG, SEGMENT_ON);
break;
}
}
Un film cu noua prezentare se numeste hour, temperature & humidity on 7-segment LED display with Arduino (II):


imi scrie asa ceva ajutati ma va rog
RăspundețiȘtergeresketch_jul03h:60: error: 'DHT' does not name a type
DHT dht(DHTPIN, DHTTYPE);
^
C:\Users\oscared51\Documents\Arduino\sketch_jul03h\sketch_jul03h.ino: In function 'void setup()':
sketch_jul03h:64: error: 'dht' was not declared in this scope
dht.begin();
^
C:\Users\oscared51\Documents\Arduino\sketch_jul03h\sketch_jul03h.ino: In function 'void loop()':
sketch_jul03h:84: error: 'dht' was not declared in this scope
int h = dht.readHumidity();
^
exit status 1
'DHT' does not name a type
nu ai libraria DHT corecta sau nu o ai deloc...
RăspundețiȘtergereHow to set indian time zone?
RăspundețiȘtergerewhat time zone? how is ïndian time zone"... this clock indicate just hour and minute...
ȘtergereWhen I complie the code and upload it. The time set -5.30 hour from current time
RăspundețiȘtergereReply please
RăspundețiȘtergereset local hour..
ȘtergereHow to set local hour, where i connect manual adjust button?
RăspundețiȘtergerein this article is just "automatic".. find line
Ștergere// RTC.adjust(DateTime(__DATE__, __TIME__));
// if you need set clock... just remove // from line above this
remove // upload sketch, add // and upload... RTC module give PC hour and minutes
Ok i try it.
Ștergeresee other article: https://nicuflorica.blogspot.ro/2013/12/afisaje-led-cu-7-segmente-si-arduino-iv.html
RăspundețiȘtergereThere is no temp, humidity sensor
ȘtergereIt's works fine now. If there is also manual adjust button, it's good for everyone. Please remodify it for public.
RăspundețiȘtergereSir, i successfully made it. But one problem... the time is not set in rtc, after power off, it back to complie time.
RăspundețiȘtergereHello, Nicu FLORICA,
RăspundețiȘtergereI would like to ask you to explain much more variables of project about thermostat. The program was anywhere here, but I cannot understand everything of it. Please comment more variables, each one if possible, how and for what is it used for....
I would buy you much more than a beer, because I will try to make a thermoregulator , with alarm clock turning on heater and manual turn off. I mean there will be in later project (after just perfect running thermoregulator itself).
With respect : Anatoliy
for thermostat see in english version of my blog: http://arduinotehniq.blogspot.ro/2015/05/arduino-thermostat-on-7-segment-led.html and http://arduinotehniq.blogspot.ro/2015/05/arduino-thermostat-with-2-thresholds-on.html
ȘtergereSir please provide code for common cathode display
RăspundețiȘtergerechange all line
Ștergere#define SEGMENT_ON LOW
#define SEGMENT_OFF HIGH
with
#define SEGMENT_ON HIGH
#define SEGMENT_OFF LOW
and
#define DIGIT_ON HIGH
#define DIGIT_OFF LOW
with
#define DIGIT_ON LOW
#define DIGIT_OFF HIGH
Thanks, i successfully made it.
ȘtergereSir, is it possible to show 00.00 replace 0.00? Like 8.15=08.15, 9.30=09.30
RăspundețiȘtergereSunteti unul din putinii romani care chiar fac si altceva inafara de a aprinde un led.
RăspundețiȘtergereAm cautat un astfel de proiect cu afisor 7seg, initial gasisem un proiect care includea si un 74hc595 (ma interesa metoda de afisare pe 7seg), cu mai putine fire dar tot nu functiona corect. Legat de acest proiect, cum pot face ca dp-ul sa licare? Aparent orice delay pe care il scriu da programul peste cap. Am incercat cu intreruperi dar imi licare si atunci cand se afiseaza temperatura, si din cate am inteles atunci cand se trateaza o intrerupere se i-a o pauza de la functionarea normala, ceea ce ar produce,cred, o intarziere la contorizarea timpului.
cred ca ar fi bine sa urmaresti articolele urmatoare si gasesti solutia.. nu folosesti delay la multiplexare...
Ștergere