luni, 19 ianuarie 2015

Indicator stare acumulator auto cu LED multicolor comandat de un ATtiny85(45)

   Dupa ce am vazut cum se poate programa un microcontroler ATtiny85 cu sketch Arduino si avand in vedere ca este mai ieftin decat un ATmega328P-PU, poate functiona si fara cuart (oscilator intern la 1MHz), am zis sa fac "ceva" si, avand in vedere ca este iarma si pot fi probleme cu acumulatorul masinii, am facut un indicator pentru starea acumulatorului si pentru alternator si releul regulator.
   Schema initiala de test a fost cea in care am pus un semireglabil conectat intre +5V si masa, iar cursorul la intrarea analogica:
ulterior am pus si divizorul rezistiv de la intrare:
si am facut un filmulet cu prima varianta la care ma gandisem, numit indicator stare acumulator auto cu ATtiny85 programat cu sketch Arduino
dar are prea deranjanta cu modul de afisare, asa ca am modificat sketch-ul sa am mai putine situatii si sa am o afisare frumoasa si nederanjanta, facand si schema completa cu alimentarea de la acumulator prin intermediul unui LM7805:
   Am facut si 3 filmulete:
- RGB LED battery status with ATtiny85 as Arduino (descriere in "engleza mea"):
   Am facut si poze pentru starile indicate:
- tensiune pe acumulator mai mica de 10,8V (acumulatorul descarcat... ledul se aprinde cu intermitenta):
- tensiune pe acumulator intre 10,8V si 11,8V (daca motorul este oprit, bateria este destul de descarcata si sunt sanse sa nu porneasca masina, daca tensiunea este cu motorul pornit sunt probleme cu alternatorul si releul regulator, ledul este aprins permanent in rosu): 
- tensiune pe acumulator intre 11,8V si 13,5V (daca motorul este oprit, situatia este normala, daca motorul este pornit, bateria poate fi descarcata dupa o perioada de nefolosire sau alternatorul nu incarca suficient, trebuie verificat alternatorul si releul regulator):
- tensiune pe acumulator intre 13,5V si 14,37V (motor pornit, becuri aprinse sau nu, situatia normala, se aprinde doar ledul verde):
- tensiune pe acumulator mai mare de 14,37 (motor pornit, acumulator supravoltat, se aprinde permanent ledul albastru, iar ledul verde se aprinde cu intermitenta, trebuie verificat alternatorul si releul regulator):
   Sketch-ul scris de mine pentru schema de mai sus este:
/*
basesd sketch named "Analog Input" from Examples -> 03.Analog
created by David Cuartielles, modified 30 Aug 2011, By Tom Igoe
http://arduino.cc/en/Tutorial/AnalogInput
*/

/* original circuit made by niq_ro from http://www.tehnic.go.ro
http://nicuflorica.blogspot.ro/
http://arduinotehniq.blogspot.com/
1) uC: ATtiny85 (ATtiny45) at 1MHz (internal clock)
2) common chatode RGB LED code OSTA5131A-C, see http://nicuflorica.blogspot.ro/2012/12/arduino-uno-si-un-led-multicolor-rgb.html
- an 180ohms resistor at pin D0 (phisical pin 5) in series with RED LED at GND
- an 100ohms resistor at pin D1 (phisical pin 6) in series with GREN LED at GND
- an 100ohms resistor at pin D2 (phisical pin 7) in series with BLUE LED at GND
3) a voltage divisor 1:4 made like this: +BAT --|=10k=|-|=10k=|-|=10k=|-A2|=10k=|-GND, pin A2 is phisical pin 3
- for tests can use an 10-50kohms variabile resistor put at +5V and GND, midle at A2 (phisical pin 3)
4) Vcc (phisical pin 8) at 5V
5) GND (phisixcal pin 4) at GND
*/

int sensorPin = A2;   // select the input pin for the potentiometer / resistor divider
int ledRPin = 0;      // select the pin for the RED LED
int ledGPin = 1;      // select the pin for the GREEN LED
int ledBPin = 2;      // select the pin for the BLUE LED

int u = 0;  // variable to store the value coming from the sensor

float k=4.95/5; // corection voltage
// define voltage steps:
int treapta1 = 552/k;       // Ubat=10,8V
int treapta2 = 604/k;       // Ubat=11,8V
int treapta3 = 690/k;       // Ubat=13,5V
int treapta4 = 735/k;       // Ubat=14,37V (14,4V)


void setup() {
  // declare the ledPins as an OUTPUT:
  pinMode(ledRPin, OUTPUT);  
  pinMode(ledGPin, OUTPUT);
  pinMode(ledBPin, OUTPUT);
}

void loop() {
/*
  // all leds are off
    digitalWrite(ledRPin, LOW);    // turn the red led off
    digitalWrite(ledGPin, LOW);    // turn the green led off
    digitalWrite(ledBPin, LOW);    // turn the blue led off
*/ 
  
  // read the value from the sensor:
  u = analogRead(sensorPin);    

// voltage below 10,8V
if (u < treapta1)
{
  digitalWrite(ledGPin, LOW);    // turn the green led off
  digitalWrite(ledBPin, LOW);    // turn the blue led off

  digitalWrite(ledRPin, HIGH);   // turn the red led on
  delay(100);
  digitalWrite(ledRPin, LOW);    // turn the red led off
  delay(100);
  digitalWrite(ledRPin, HIGH);   // turn the red led on
  delay(100);
  digitalWrite(ledRPin, LOW);    // turn the red led off
  delay(1000);
}

// voltage ower 10,8V & below 11,8V
if (u > treapta1 && u < treapta2)
{
  digitalWrite(ledGPin, LOW);    // turn the green led off
  digitalWrite(ledBPin, LOW);    // turn the blue led off

  digitalWrite(ledRPin, HIGH);   // turn the red led on
  delay(100);
}

// voltage ower 11,8V & below 13,5V
if (u > treapta2 && u < treapta3)
{ 
  digitalWrite(ledBPin, LOW);    // turn the blue led off
 
  digitalWrite(ledRPin, HIGH);   // turn the red led on
  delay(500);
  digitalWrite(ledRPin, LOW);    // turn the red led off
  delay(100);
  digitalWrite(ledGPin, HIGH);   // turn the green led on
  delay(200);
}

// voltage ower 13,5V & below 14,37V
if (u >= treapta3 && u < treapta4)
{ 
  digitalWrite(ledRPin, LOW);    // turn the red led off
  digitalWrite(ledBPin, LOW);    // turn the blue led off

  digitalWrite(ledGPin, HIGH);   // turn the green led on
  delay(100);
}

// voltage ower 14,37
if (u > treapta4)
{
  digitalWrite(ledRPin, LOW);    // turn the red led off
  
  digitalWrite(ledGPin, HIGH);   // turn the green led on
  delay(500);
  digitalWrite(ledGPin, LOW);   // turn the green led off
  delay(100);
  digitalWrite(ledBPin, HIGH);   // turn the blue led on
  delay(200);
}
}
   Scrierea sketch-ului in microcontrolerul nostru, care poate fi ATTiny85 sau ATtiny45, datorita dimensiunii reduse...
se face conform indicatiilor din articolul Programarea unui microcontroler ATTiny85 cu sketch Arduino.
PS: Am desenat cu ajutorul programului CadSoft EAGLE PCB Design o varianta de cablaj pentru acest montaj:
21.01.2015
   Pentru cei care vor sa programeze clasic microcontrolerul ATtiny85 (lucreaza la 1MHz cu oscilatorul intern), pun si continutul fisierului "hex":
:1000000027C04BC04AC049C048C072C146C045C0A5
:1000100044C043C042C041C040C03FC03EC00000D9
:10002000000037000000000038000000000036002B
:10003000020202020202020202020102040810206D
:1000400020041008010200000400000000004E001F
:1000500011241FBECFE5D2E0DEBFCDBF10E0A0E689
:10006000B0E0E4EAF7E002C005900D92AA36B107CD
:10007000D9F710E0AAE6B0E001C01D92A038B107A0
:10008000E1F710E0C0E5D0E003C02297FE0184D381
:10009000CE34D107D1F789D283C3B2CFEF92FF928A
:1000A0000F931F93E0906600F09067000091680046
:1000B0001091690060E070E08AE094E4A801970183
:1000C0007FD2E6D270936F0060936E0060E070E0C4
:1000D00087E194E4A801970173D2DAD2709371009A
:1000E0006093700060E070E88CE294E4A8019701EE
:1000F00067D2CED2709373006093720060E070ECB0
:1001000087E394E4A80197015BD2C2D27093750093
:10011000609374001F910F91FF90EF90089580916C
:100120006000ADD190936D0080936C0020916E00C3
:1001300030916F008217930764F58091620060E050
:10014000F6D18091640060E0F2D180916A0061E0B4
:10015000EED164E670E080E090E01ED180916A000C
:1001600060E0E5D164E670E080E090E015D1809138
:100170006A0061E0DCD164E670E080E090E00CD1E0
:1001800080916A0060E0D3D168EE73E080E090E097
:1001900003D120916C0030916D0080916E009091A0
:1001A0006F0082179307C4F48091700090917100E2
:1001B000281739078CF48091620060E0B8D18091F3
:1001C000640060E0B4D180916A0061E0B0D164E67F
:1001D00070E080E090E0E0D020916C0030916D0004
:1001E00080917000909171008217930734F580918F
:1001F00072009091730028173907FCF48091640015
:1002000060E095D180916A0061E091D164EF71E086
:1002100080E090E0C1D080916A0060E088D164E61F
:1002200070E080E090E0B8D08091620061E07FD122
:1002300068EC70E080E090E0AFD020916C003091ED
:100240006D00809172009091730028173907C4F0F7
:100250008091740090917500281739078CF4809173
:100260006A0060E064D18091640060E060D18091B8
:10027000620061E05CD164E670E080E090E08CD0E8
:1002800020916C0030916D00809174009091750008
:1002900082179307FCF480916A0060E048D1809156
:1002A000620061E044D164EF71E080E090E074D0DE
:1002B0008091620060E03BD164E670E080E090E015
:1002C0006BD08091640061E032D168EC70E080E036
:1002D00090E062D0089580916A0061E0E9D0809159
:1002E000620061E0E5D08091640061E0E1D00895B2
:1002F0001F920F920FB60F9211242F933F934F939B
:100300005F936F937F938F939F93AF93BF9320914E
:100310007A0030917B0040917C0050917D0070917B
:100320007E00DA01C9014096A11DB11D672F605DF5
:100330006D3730F06D57DA01C9014196A11DB11D2D
:1003400060937E0080937A0090937B00A0937C0062
:10035000B0937D008091760090917700A091780015
:10036000B09179000196A11DB11D80937600909304
:100370007700A0937800B0937900BF91AF919F91DF
:100380008F917F916F915F914F913F912F910F903E
:100390000FBE0F901F9018959B01AC017FB7F8948A
:1003A0008091760090917700A0917800B0917900CB
:1003B00062B708B601FE05C06F3F19F00196A11D96
:1003C000B11D7FBFBA2FA92F982F8827860F911DA7
:1003D000A11DB11D66E0880F991FAA1FBB1F6A955A
:1003E000D1F7BC012EC0FFB7F894809176009091B0
:1003F0007700A0917800B0917900E2B708B601FECD
:1004000005C0EF3F19F00196A11DB11DFFBFBA2F26
:10041000A92F982F88278E0F911DA11DB11DE6E0F1
:10042000880F991FAA1FBB1FEA95D1F7861B970B50
:10043000885E9340C0F221503040404050406851A7
:100440007C4F211531054105510569F608957894D1
:100450008AB582608ABD8AB581608ABD83B78260B1
:1004600083BF83B7816083BF89B7826089BF80B74C
:10047000826080BF329A319A309A379A0895982FC5
:100480008E3008F09E50977080917F008295880F83
:10049000880F807C892B87B9369A3699FECF24B194
:1004A00045B1942F80E030E0282B392BC901089505
:1004B000CF93DF93482F50E0CA01865C9F4FFC0129
:1004C0003491405D5F4FFA018491882369F190E097
:1004D000880F991FFC01E25EFF4FA591B491FC01CA
:1004E000EC5DFF4FC591D491662351F42FB7F8947A
:1004F0008C91932F909589238C93888189230BC0AD
:10050000623061F42FB7F8948C91932F90958923E2
:100510008C938881832B88832FBF06C09FB7F89464
:100520008C91832B8C939FBFDF91CF910895482F9F
:1005300050E0CA018C5B9F4FFC012491CA01865C8C
:100540009F4FFC019491405D5F4FFA01349133233A
:1005500059F12223A9F0223081F0233018F4213000
:1005600079F408C0233011F0243051F48CB58F7D1C
:100570008CBD06C08AB58F7702C08AB58F7D8ABDD3
:10058000E32FF0E0EE0FFF1FEC5DFF4FA591B4915C
:100590002FB7F894662321F48C919095892302C09B
:1005A0008C91892B8C932FBF0895CF93DF934FDFCE
:1005B00092DEC0E0D0E0B3DD2097E9F321DDFBCF90
:1005C0000CD0AEC0A6D040F09DD030F021F45F3FFB
:1005D00019F08FC05111D8C092C0B3D098F39923AD
:1005E000C9F35523B1F3951B550BBB27AA276217F7
:1005F0007307840738F09F5F5F4F220F331F441F3C
:10060000AA1FA9F333D00E2E3AF0E0E830D0915073
:100610005040E695001CCAF729D0FE2F27D0660F60
:10062000771F881FBB1F261737074807AB07B0E89F
:1006300009F0BB0B802DBF01FF2793585F4F2AF0B5
:100640009E3F510568F055C09FC05F3FECF3983E58
:10065000DCF3869577956795B795F7959F5FC9F712
:10066000880F911D9695879597F90895E1E0660F9B
:10067000771F881FBB1F621773078407BA0720F014
:10068000621B730B840BBA0BEE1F88F7E09508957D
:1006900004D06894B11178C008955BD088F09F575A
:1006A00090F0B92F9927B751A0F0D1F0660F771FBE
:1006B000881F991F1AF0BA95C9F712C0B13081F09E
:1006C00062D0B1E008955FC0672F782F8827B85FA8
:1006D00039F0B93FCCF3869577956795B395D9F7FF
:1006E0003EF490958095709561957F4F8F4F9F4F09
:1006F000089597F99F6780E870E060E008959FEFA4
:1007000080EC089500240A941616170618060906A8
:10071000089500240A941216130614060506089577
:10072000092E0394000C11F4882352F0BB0F40F4FF
:10073000BF2B11F460FF04C06F5F7F4F8F4F9F4F3F
:10074000089557FD9058440F551F59F05F3F71F0C1
:100750004795880F97FB991F61F09F3F79F0879528
:100760000895121613061406551FF2CF4695F1DFB1
:1007700008C0161617061806991FF1CF8695710541
:10078000610508940895E894BB2766277727CB0175
:1007900097F90895EE0FFF1F0590F491E02D09944D
:0407A000F894FFCFFB
:0A07A400080001000200A3707D3F71
:00000001FF
   

miercuri, 14 ianuarie 2015

Programarea unui microcontroler ATtiny85 cu sketch Arduino

   Pentru proiecte simple se pot folosi microcontrolere mai slabute, cum este ATtiny85 sau ATtiny84.
   Regasind articolul Using an ATtiny as an Arduino de pe site-ul tronixstuff, am zis ca trebuie sa incerc si eu sa programez un ATTiny85 (este un "piciuman" in capsula DIL8), dar folosind o clona Arduino Nano, care era libera, celelate tip Uno fiind in diverse montaje in teste.
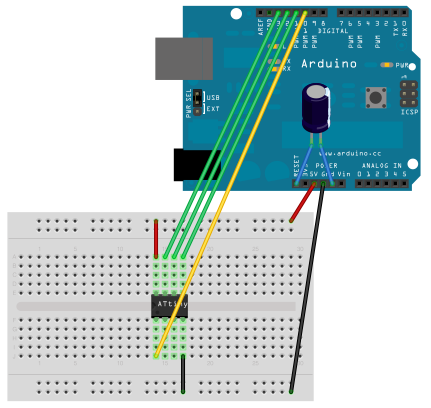
   Avand Arduino Nano am folosit schema urmatoare (nu am utilizat comutator in teste, dar asa ar fi comod):
   Trebuie descarcata fisierul de la https://github.com/damellis/attiny/archive/master.zip
pentru a aparea si lista cu ATtiny-urile in programul Arduino IDE  (Am o copie la https://github.com/tehniq3/ATTiny4x_8x-as-Arduino).
   In mod obisnuit, in lista placilor gasim ceva de genul:
   Dupa ce am descarcat acel fisier, il dezarhivam si copiem subdirectorul numit attiny in locul unde este instalata versiunea de Arduino IDE in subdirectorul hardware:
   Daca intram in subdirectorul attiny vom gasi:
si daca intram si in variants:
... revenim la partea utila.
   Dupa ce copiem acel folder attiny, inchidem si redeschidem programul Arduino IDE, vom gasi urmatoarele placi Arduino:
   Incarcam sketch-ul ArduinoISP din exemple:
   Trecem la placa Arduino pe care o avem:
   Verificam ca programatorul sa fie cel obisnuit:
   Realizam schema prezentata mai sus:
   Incarcam sketch-ul ArduinoISP in memoria placii Arduino Nano, apoi deconectam cablul USB si conectam condensatorul de 10uF intre RESET-ul si GND-ul placii Arduino Nano:
   Incarcam in programul Arduino IDE sketch-ul care se va incarca in ATTiny (eu am folosit sketch-ul al doilea din articolul menttionat la inceput):
   Schimbam placa de dezvoltare:
   Schimbam si programatorul:
   Dam comanda de incarcare si asteptam sa apara pe ecran un mesaj de genul:
care ne indica faptul ca acum avem un microcontroler ATtiny85 incarcat cu programul nostru...
   Deconectam cablul USB de la calculator si desfacem legaturile dintre placa Arduino Micro si ATiny85, pastrand, cel putin pentru moment, doar legaturile de la +5V si masa GND), apoi facem legaturile ca in schema:
   Alimentam si obtinem un joc de lumini, conform programului idn sketch:
   Pentru a fi mai usor de inteles acesti pasi, inclusiv rezultatul, am facut filmuletul numit incarcare sketch intr-un ATtiny85 folosind un Arduino Nano
   PS: In articolul ATtiny85 vs ATmega328 gasiti comparatia intre ATtiny85 si ATmega328 (cel folosit in Arduino Uno, de exemplu).
   PS2: In articolul Programmare un Attiny85 con Arduino se gaseste modul de scriere al unui sketch in limba italiana, aratand mai explicit si corespondenta pinilor:

15.01.2015
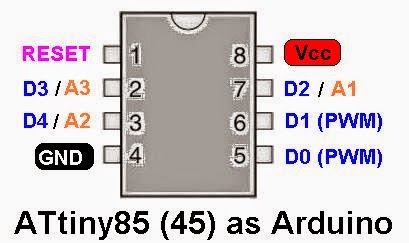
   Cand am vrut sa scriu un sketch mai complex, am constatat ca tot in articolul Using an ATtiny as an Arduino sunt mai bine definiti pinii, asa ca am facut si eu un rezumat, care ma ajuta mult la scrierea sketch-urilor:
   Am realizat un temporizator reglabil cu reset (comanda din acelasi buton) folosind un ATTiny85 programat cu un sketch Arduino si am facut filmuletul temporizator cu reset (3)

16.01.2014
   Un articol similar, SHRINKING ARDUINO PROJECTS USING AN ATTINY85, descrie pinii, mai detaliat:
iar in articolul ATtiny Adventure -- I2C on ATtiny 84/85 apar si colorat si clar descrierile pinilor:

   Nu trebuie uitat articolul Programming an ATtiny w/ Arduino 1.0
21.01.2015
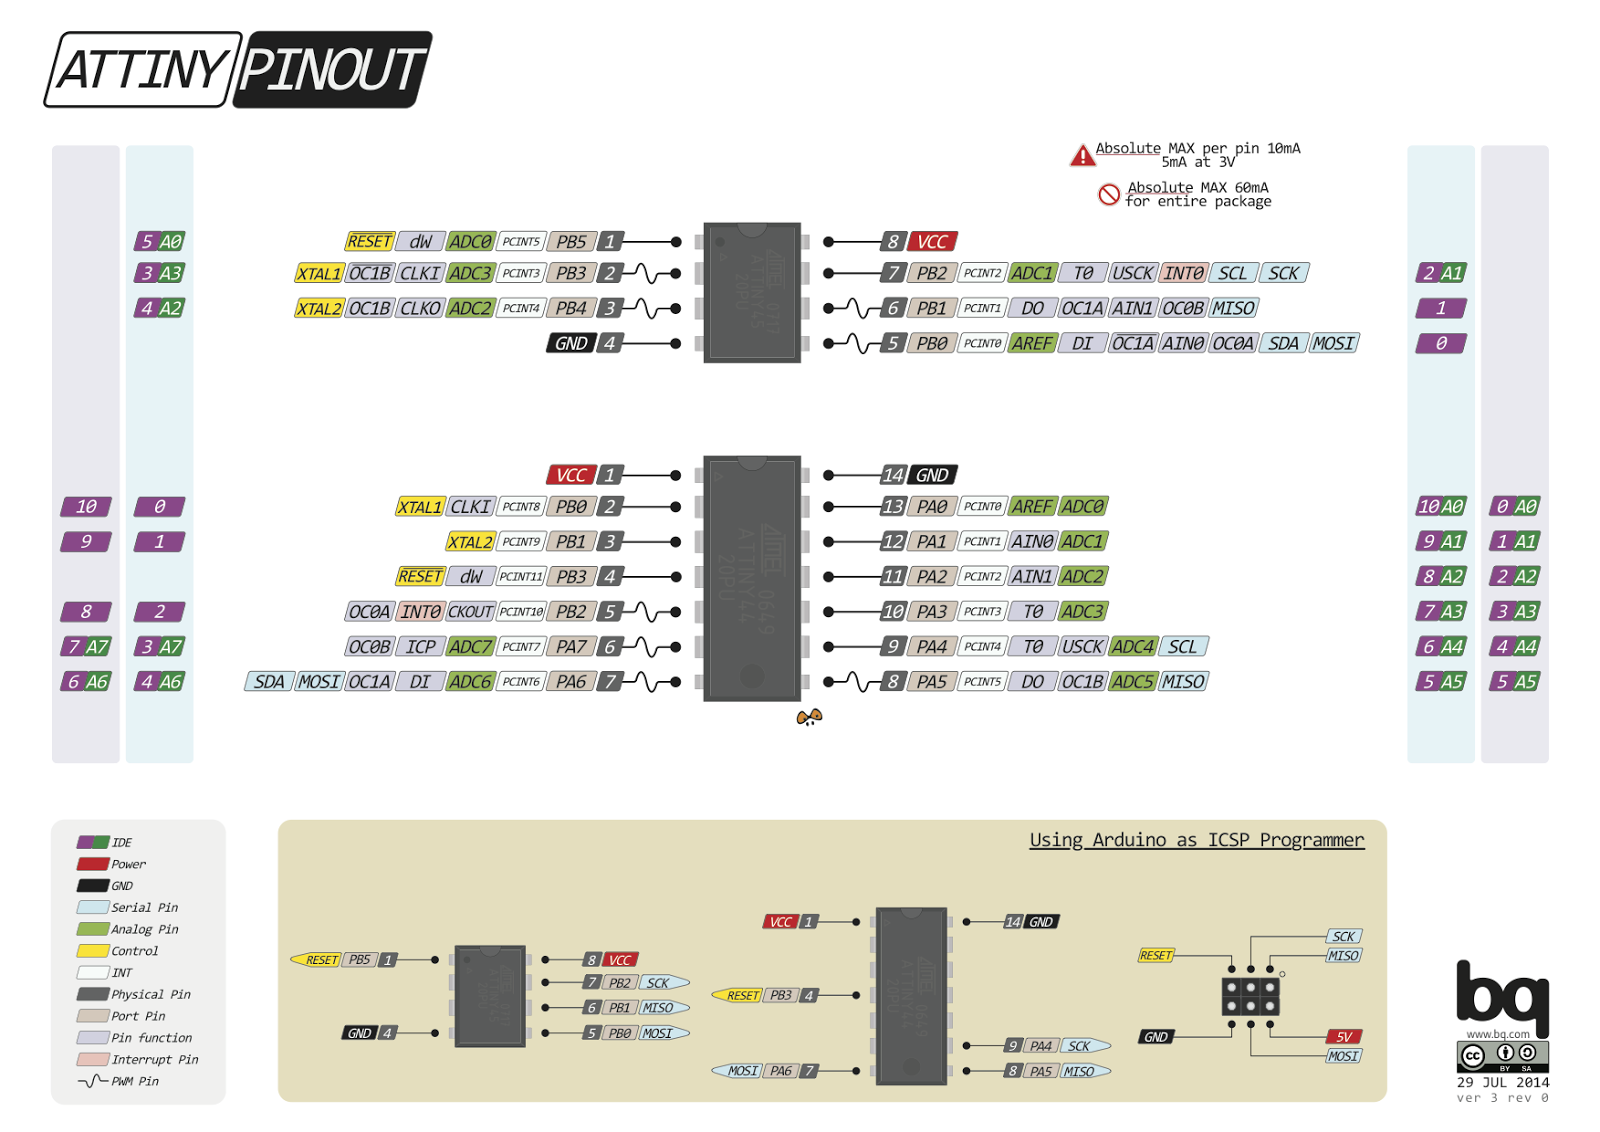
   Am mai cautat diverse informatii si proiecte si am gasit o prezentare frumoasa a pinilor la pighixxx.com, din care rezulta ca pinul fizic 1 al capsulei lui ATtiny85 se poate folosi in sketch-uri ca pin digital D5, respectiv intrare analogica A0:
26.01.2015
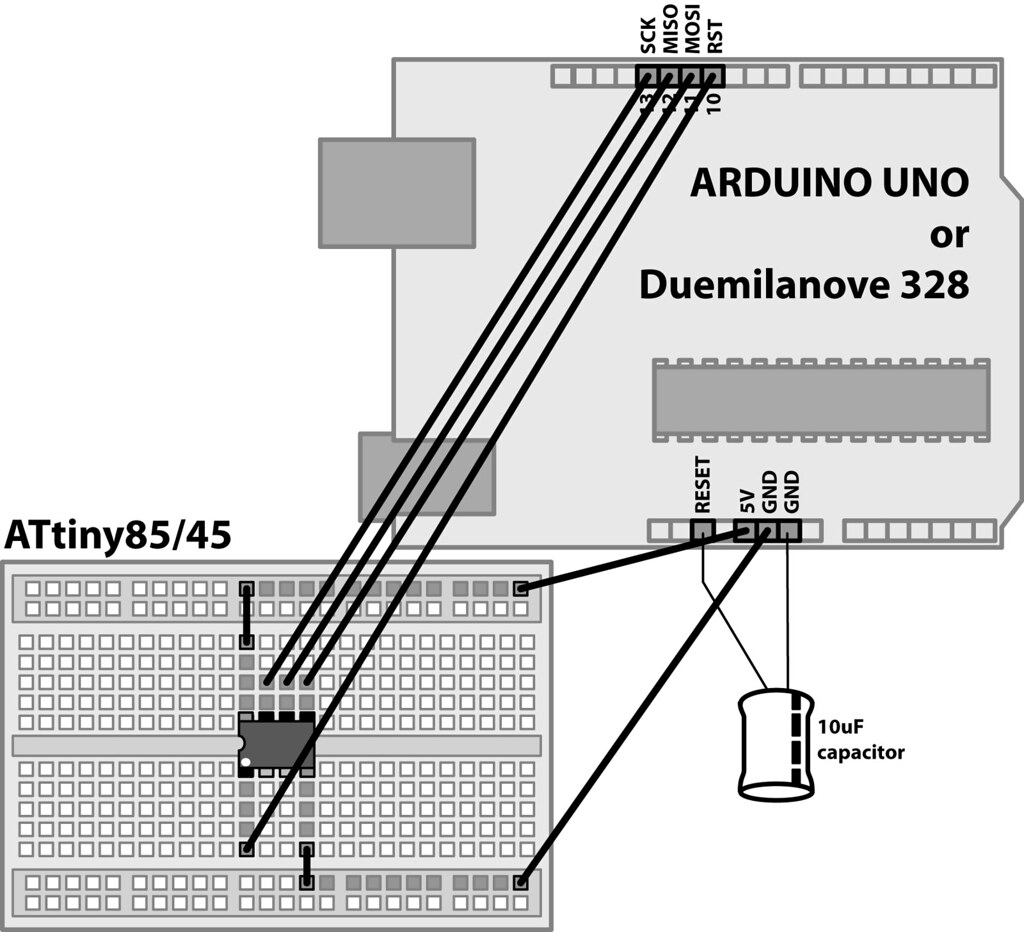
   In articolul de la http://www.kobakant.at/DIY/?p=3742 este o reprezentare frumoasa a schemei de prograre si se prezinta intuitiv modul de setare a microcontrolerului la 8MHz:
09.05.2017
   Pentru versiuni mai noi de Arduino IDE (1.6.x) trebuie introdiusa adresa la placi suplimentare: https://raw.githubusercontent.com/damellis/attiny/ide-1.6.x-boards-manager/package_damellis_attiny_index.json !

Modul de afisare cu 8 cifre LED din 7 segmente fiecare controlate de MAX7219 (VI)

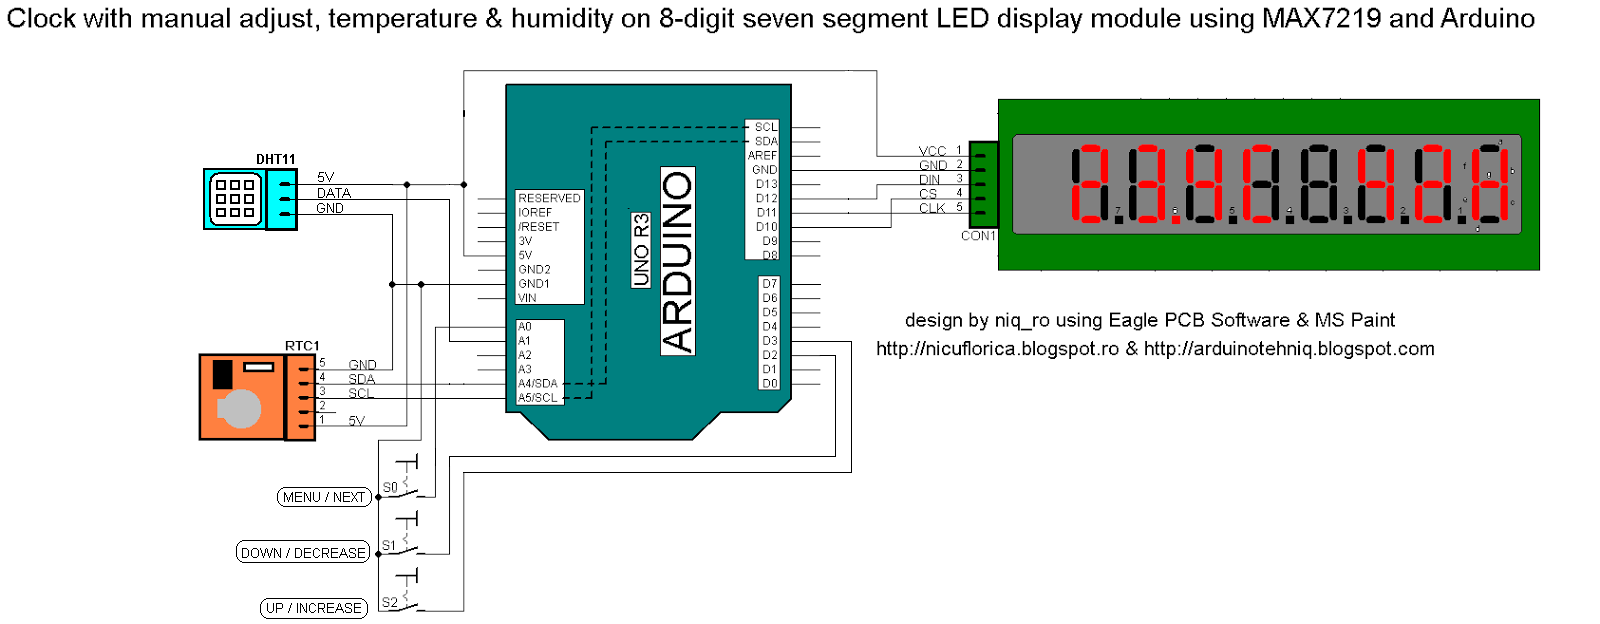
   Fata de articolele anterioare, unde aveam reglaj complet la ceasul RTC cu DS1307 dintr-un encoder (folosindu-ma de informatiile de la http://andydoz.blogspot.com/) acum am 3 taste...
   Schema de conectare este similara, deoarece am pastrat conexiunile principale, punand chiat si tastele ca la encoder):
   In modul obisnuit, pe ecranul apar ciclic informatii despre:
- ora:
- data:
- temperatura si umiditate:
   Daca apas scurt pe tasta MENU/NEXT apare pe ecran ID-ul meu "niq_ro":
   Daca apas lung (mai mult de 3 secunde) se intra in modul de reglaj:
- an:
- luna:
- zi:
- ora:
- minut:
   Am facut si 2 filmulete:
   Sketch-ul folosit de mine este:
// adapted sketch by niq_ro from http://arduinotehniq.blogspot.com
// and http://nicuflorica.blogspot.ro
// version 1.0 in 6.11.2014, Craiova - Romanaia
// curent version in 12.1.2015
// source for LEDControl: http://embedded-lab.com/blog/?p=6862
#include "LedControl.h" 
/*
 Now we need a LedControl to work with.
 ***** These pin numbers will probably not work with your hardware *****
 pin 12 is connected to the DataIn 
 pin 11 is connected to the CLK 
 pin 10 is connected to LOAD 
 We have only a single MAX72XX.
 */
LedControl lc=LedControl(12,11,10,1);

// Example testing sketch for various DHT humidity/temperature sensors
// Written by ladyada, public domain
#include "DHT.h"
#define DHTPIN A1     // what pin we're connected to A1
// Uncomment whatever type you're using!
#define DHTTYPE DHT11   // DHT 11 
//#define DHTTYPE DHT22   // DHT 22  (AM2302)
//#define DHTTYPE DHT21   // DHT 21 (AM2301)

// if is just sensor:
// Connect pin 1 (on the left) of the sensor to +5V
// Connect pin 2 of the sensor to whatever your DHTPIN is
// Connect pin 4 (on the right) of the sensor to GROUND
// Connect a 10K resistor from pin 2 (data) to pin 1 (power) of the sensor

DHT dht(DHTPIN, DHTTYPE);

// declaration for type of value
int t, h;

// Date and time functions using a DS1307 RTC connected via I2C and Wire lib
// original sketck from http://learn.adafruit.com/ds1307-real-time-clock-breakout-board-kit/
// add part with SQW=1Hz from http://tronixstuff.wordpress.com/2010/10/20/tutorial-arduino-and-the-i2c-bus/

// Dawn & Dusk controller. http://andydoz.blogspot.ro/2014_08_01_archive.html
// 16th August 2014 - (C) A.G.Doswell 2014

#include <Wire.h>
#include "RTClib.h" // from https://github.com/adafruit/RTClib
#include <LiquidCrystal.h>
//#include <Encoder.h> // from http://www.pjrc.com/teensy/td_libs_Encoder.html

RTC_DS1307 RTC; // Tells the RTC library that we're using a DS1307 RTC
///Encoder knob(2, 3); //encoder connected to pins 2 and 3 (and ground)

//the variables provide the holding values for the set clock routine
int setyeartemp; 
int setmonthtemp;
int setdaytemp;
int sethourstemp;
int setminstemp;
int setsecs = 0;
int maxday; // maximum number of days in the given month
int TimeOut = 10;
int TimeOutCounter;

// These variables are for the push button routine
int buttonstate = 0; //flag to see if the button has been pressed, used internal on the subroutine only
int pushlengthset = 3000; // value for a long push in mS
int pushlength = pushlengthset; // set default pushlength
int pushstart = 0;// sets default push value for the button going low
int pushstop = 0;// sets the default value for when the button goes back high

int knobval; // value for the rotation of the knob
boolean buttonflag = false; // default value for the button flag

byte SW1 = 2;  // switch for down
byte SW2 = 3;  // switch for up

void setup()
{
// Initialize MAX7219 device
lc.shutdown(0,false); // Enable display 
lc.setIntensity(0,3); // Set brightness level (0 is min, 15 is max) 
lc.clearDisplay(0); // Clear display register 
 
// Initialize HTD sensor
dht.begin();

    Wire.begin();
    RTC.begin();
//  if (! RTC.isrunning()) {
    //Serial.println("RTC is NOT running!");
    // following line sets the RTC to the date & time this sketch was compiled
    RTC.adjust(DateTime(__DATE__, __TIME__));
// }
// part code from http://tronixstuff.wordpress.com/
Wire.beginTransmission(0x68);
Wire.write(0x07); // move pointer to SQW address
//Wire.write(0x10); // sends 0x10 (hex) 00010000 (binary) to control register - turns on square wave
Wire.write(0x13); // sends 0x13 (hex) 00010011 (binary) to control register - turns on square wave at 32kHz
Wire.endTransmission();
// end part code from http://tronixstuff.wordpress.com/

pinMode(A0,INPUT);//push button on encoder connected to A0 (and GND) or MENU/NEXT
digitalWrite(A0,HIGH); //Pull A0 high

 pinMode(SW1, INPUT);  // N.O. push button switch
 pinMode(SW2, INPUT);  // N.O. push button switch

 digitalWrite(SW1, HIGH);
 digitalWrite(SW2, HIGH);

/*
 Serial.begin(9600);
 Serial.println("test for niq_ro");
 Serial.println("------------------");
*/
}

void loop()
{
 // Reading temperature or humidity takes about 250 milliseconds!
  // Sensor readings may also be up to 2 seconds 'old' (its a very slow sensor)
h = dht.readHumidity();
// t = dht.readTemperature(); 
  
/* test part  
// test humidity value
h = 37;
// test temperature value
t = 19;
*/

// 
lc.clearDisplay(0); // Clear display register 

for(int j=0; j<300; j++){
temperatura (t);
umiditate (h);

    pushlength = pushlengthset;
    pushlength = getpushlength ();
    delay (10);
    if (pushlength <pushlengthset) {
      ShortPush ();   
    }
       //This runs the setclock routine if the knob is pushed for a long time
       if (pushlength >pushlengthset) {
       lc.clearDisplay(0); // Clear display register 
         DateTime now = RTC.now();
         setyeartemp=now.year(),DEC;
         setmonthtemp=now.month(),DEC;
         setdaytemp=now.day(),DEC;
         sethourstemp=now.hour(),DEC;
         setminstemp=now.minute(),DEC;
         setclock();
         pushlength = pushlengthset;
       };

}


//delay(3000);

lc.clearDisplay(0); // Clear display register 
for(int j=0; j<300; j++){
DateTime now = RTC.now();
int ora0 = now.hour();
int minut0 = now.minute();
int second0 = now.second();
/*
// serial monitor
  Serial.print(now.hour(), DEC);
  Serial.print(":");
  Serial.print(now.minute(), DEC);
  Serial.print(":");
  Serial.print(now.second(), DEC);
  Serial.print(" -> ");
  Serial.print(ora1);
  Serial.println(":");
  Serial.print(minut1);
  Serial.print(":");
  Serial.print(second1);
  Serial.println("------------------");
*/
ora (ora0, minut0, second0);

    pushlength = pushlengthset;
    pushlength = getpushlength ();
    delay (10);
    if (pushlength <pushlengthset) {
      ShortPush ();   
    }
       //This runs the setclock routine if the knob is pushed for a long time
       if (pushlength >pushlengthset) {
         lc.clearDisplay(0); // Clear display register 
         DateTime now = RTC.now();
         setyeartemp=now.year(),DEC;
         setmonthtemp=now.month(),DEC;
         setdaytemp=now.day(),DEC;
         sethourstemp=now.hour(),DEC;
         setminstemp=now.minute(),DEC;
         setclock();
         pushlength = pushlengthset;
       };


//delay (900);
}

t = dht.readTemperature(); // read data for temperature

lc.clearDisplay(0); // Clear display register 
for(int j=0; j<300; j++){
DateTime now = RTC.now();
int ziua0 = now.day();
int luna0 = now.month();
int anul0 = now.year();
/*
// serial monitor
  Serial.print(now.day(), DEC);
  Serial.print(":");
  Serial.print(now.month(), DEC);
  Serial.print(":");
  Serial.print(now.year(), DEC);
  Serial.print(" -> ");
  Serial.print(ziua0);
  Serial.println(".");
  Serial.print(luna0);
  Serial.print(".");
  Serial.print(anul0);
  Serial.println("------------------");
*/
data (ziua0, luna0, anul0);


    pushlength = pushlengthset;
    pushlength = getpushlength ();
    delay (10);
    if (pushlength <pushlengthset) {
      ShortPush ();   
    }
       //This runs the setclock routine if the knob is pushed for a long time
       if (pushlength >pushlengthset) {
         lc.clearDisplay(0); // Clear display register 
         DateTime now = RTC.now();
         setyeartemp=now.year(),DEC;
         setmonthtemp=now.month(),DEC;
         setdaytemp=now.day(),DEC;
         sethourstemp=now.hour(),DEC;
         setminstemp=now.minute(),DEC;
         setclock();
         pushlength = pushlengthset;
       };


//delay (900);
}


}


void umiditate (int umidit)
{
int zu = int(umidit/10); // determin cifra zecilor
int uu = umidit - 10*zu; // determin cifra unitatilor
  
lc.setDigit(0,2,zu, false); // afisez un 5 pe coloana 2
lc.setDigit(0,1,uu, false); // afisez un 0 pe coloana 1
lc.setRow(0,0,B0110111);  // afisez litera "H"
}


void temperatura (int temper)
{
int zt = int(temper/10); // determin cifra zecilor
int ut = temper - 10*zt; // determin cifra unitatilor
  
lc.setDigit(0,7,zt, false); // afisez un 5 pe coloana 7
lc.setDigit(0,6,ut, false); // afisez un 0 pe coloana 1
lc.setRow(0,5,B1100011); // afisez un semn de grad pe coloana 5
lc.setRow(0,4,B1001110); // afisez un C pe coloana 4
}

void ora (int ora1, int minut1, int second1) 
{
// hour
int zo = int(ora1/10); // determin cifra zecilor
int uo = ora1 - 10*zo; // determin cifra unitatilor
if (zo >= 1) lc.setDigit(0,7,zo, false); // afisez zecile de ore pe coloana 7 (in stanga)
lc.setDigit(0,6,uo, false); // afisez unitatile de ore pe coloana 6
lc.setRow(0,5,B0000001);  // afisez o liniuta pe coloana 5
// minutes
int zm = int(minut1/10); // determin cifra zecilor
int um = minut1 - 10*zm; // determin cifra unitatilor
lc.setDigit(0,4,zm, false); // afisez zecile de minute pe coloana 4
lc.setDigit(0,3,um, false); // afisez unitatile de minute pe coloana 3
lc.setRow(0,2,B0000001);  // afisez o liniuta pe coloana 2
// seconds
int zs = int(second1/10); // determin cifra zecilor
int us = second1 - 10*zs; // determin cifra unitatilor
lc.setDigit(0,1,zs, false); // afisez zecile de secunde pe coloana 1
lc.setDigit(0,0,us, false); // afisez unitatile de minute pe coloana 0 (dreapta) 
}

void data (int ziua1, int luna1, int anul1) 
{
// ziua (day)
int zz = int(ziua1/10); // determin cifra zecilor
int uz = ziua1 - 10*zz; // determin cifra unitatilor
if (zz >= 1) lc.setDigit(0,7,zz, false); // afisez zecile de ore pe coloana 7 (in stanga)
lc.setDigit(0,6,uz, true); // afisez unitatile de ore pe coloana 6
//lc.setRow(0,5,B0000001);  // afisez o liniuta pe coloana 5

// luna (mounth)
int zl = int(luna1/10); // determin cifra zecilor
int ul = luna1 - 10*zl; // determin cifra unitatilor
lc.setDigit(0,5,zl, false); // afisez zecile de minute pe coloana 5
lc.setDigit(0,4,ul, true); // afisez unitatile de minute pe coloana 4
//lc.setRow(0,2,B0000001);  // afisez o liniuta pe coloana 2

// anul (year)
int ma = int(anul1/1000); // determin cifra miilor
int rsa = anul1 - 1000*ma; // determin restul sutelor
int sa = int(rsa/100); // determin cifra sutelor
int rza = rsa - 100*sa; // determin restul zecilor
int za = int(rza/10); // determin cifra zecilor
int ua = rza - 10*za; // determin cifra anilor

lc.setDigit(0,3,ma, false); // afisez zecile de secunde pe coloana 3
lc.setDigit(0,2,sa, false); // afisez unitatile de minute pe coloana 2  
lc.setDigit(0,1,za, false); // afisez zecile de secunde pe coloana 1
lc.setDigit(0,0,ua, false); // afisez unitatile de minute pe coloana 0 (dreapta) 
}


//sets the clock
void setclock (){
   setyear ();
lc.clearDisplay(0); // Clear display register 
   setmonth ();
lc.clearDisplay(0); // Clear display register 
   setday ();
lc.clearDisplay(0); // Clear display register 
   sethours ();
lc.clearDisplay(0); // Clear display register 
   setmins ();
lc.clearDisplay(0); // Clear display register 
   
   RTC.adjust(DateTime(setyeartemp,setmonthtemp,setdaytemp,sethourstemp,setminstemp,setsecs));

   delay (1000);
   
}

// subroutine to return the length of the button push.
int getpushlength () {
  buttonstate = digitalRead(A0);  
       if(buttonstate == LOW && buttonflag==false) {     
              pushstart = millis();
              buttonflag = true;
          };
          
       if (buttonstate == HIGH && buttonflag==true) {
         pushstop = millis ();
         pushlength = pushstop - pushstart;
         buttonflag = false;
       };
       return pushlength;
}
// The following subroutines set the individual clock parameters
int setyear () {
//lcd.clear();
//lc.clearDisplay(0); // Clear display register 
//    lcd.print ("Set Year");
lc.setRow(0,7,B0111011);  // afisez litera "y" pe coloane 7 (in stanga de tot)
lc.setRow(0,6,B1101111);  // afisez litera "e" pe coloane 6
lc.setRow(0,5,B1111101);  // afisez litera "a" pe coloane 5
//lc.setRow(0,4,B0000101);  // afisez litera "r" pe coloane 4
lc.setRow(0,4,B10000101);  // afisez litera "r" cu punct jos

    pushlength = pushlengthset;
    pushlength = getpushlength ();
    if (pushlength != pushlengthset) {
      return setyeartemp;
    }

//lc.clearDisplay(0); // Clear display register
    if (!digitalRead(SW1)) { //bit of software de-bounce
      knobval = -1;
       delay(150);
          setyeartemp=setyeartemp + knobval;
    if (setyeartemp < 2014) { //Year can't be older than currently, it's not a time machine.
      setyeartemp = 2014;
    }
    }
    if (!digitalRead(SW2)) {
      knobval = 1;  
       delay(150);
          setyeartemp=setyeartemp + knobval;
    if (setyeartemp < 2014) { //Year can't be older than currently, it's not a time machine.
      setyeartemp = 2014;
    }
    }
 //   setyeartemp=setyeartemp + knobval;
 //   if (setyeartemp < 2014) { //Year can't be older than currently, it's not a time machine.
 //     setyeartemp = 2014;
 //   }
//    lcd.print (setyeartemp);
int zua = setyeartemp - 2000;  // aflu ultimele 2 cifre din an
int za = zua / 10;  // aflu cifra zecilor din an
int ua = zua - 10*za; // aflu cifra unitatilor din an
lc.setDigit(0,3,2, false); // afisez cifra "2" din an pe coloana 3
lc.setDigit(0,2,0, false); // afisez cifra "0" din an pe coloana 2
lc.setDigit(0,1,za, false); // afisez cifra zecilor din an pe coloana 1
lc.setDigit(0,0,ua, false); // afisez cifra unitatilor din an pe coloana 0 (dreapta de tot)
    setyear();
//    delay(150);
}

  
int setmonth () {
//lcd.clear();
//lcd.print ("Set Month");
lc.setRow(0,7,B0110111);  // afisez litera "H" (in loc de "m") pe coloane 7 (in stanga de tot)
//lc.setRow(0,7,B1001111);  // afisez litera "E" (in loc de "m") pe coloane 7 (in stanga de tot)
lc.setRow(0,6,B0011101);  // afisez litera "o" pe coloane 6
lc.setRow(0,5,B0010101);  // afisez litera "n" pe coloane 5
lc.setRow(0,4,B0001111);  // afisez litera "t" pe coloane 4
lc.setRow(0,3,B0010111);  // afisez litera "h" pe coloane 3

    pushlength = pushlengthset;
    pushlength = getpushlength ();
    if (pushlength != pushlengthset) {
      return setmonthtemp;
    }

//    lcd.setCursor (0,1);
   if (!digitalRead(SW1)) { //bit of software de-bounce
      knobval = -1;
      delay(150);
        setmonthtemp=setmonthtemp + knobval;
    if (setmonthtemp < 1) {// month must be between 1 and 12
      setmonthtemp = 1;
    }
    }
    if (!digitalRead(SW2)) {
      knobval = 1;
      delay(150);
      setmonthtemp=setmonthtemp + knobval;
    if (setmonthtemp > 12) {
      setmonthtemp=12;
    }  
    }  
  
 //   lcd.print (setmonthtemp);
 //   lcd.print("  ");
int zl = setmonthtemp / 10;  // aflu cifra zecilor din luna
int ul = setmonthtemp - 10*zl; // aflu cifra unitatilor din luna
lc.setDigit(0,1,zl, false); // afisez cifra zecilor din luna pe coloana 1
lc.setDigit(0,0,ul, false); // afisez cifra unitatilor din luna pe coloana 0 (dreapta de tot)
     setmonth();
}

int setday () {
  if (setmonthtemp == 4 || setmonthtemp == 6 || setmonthtemp == 9 || setmonthtemp == 11) { //30 days hath September, April June and November
    maxday = 30;
  }
  else {
  maxday = 31; //... all the others have 31
  }
  if (setmonthtemp ==2 && setyeartemp % 4 ==0) { //... Except February alone, and that has 28 days clear, and 29 in a leap year.
    maxday = 29;
  }
  if (setmonthtemp ==2 && setyeartemp % 4 !=0) {
    maxday = 28;
  }
//lcd.clear();  
//    lcd.print ("Set Day");
lc.setRow(0,7,B0111101);  // afisez litera "d" pe coloane 7
lc.setRow(0,6,B1111101);  // afisez litera "a" pe coloane 6
lc.setRow(0,5,B0111011);  // afisez litera "y" pe coloane 5

    pushlength = pushlengthset;
    pushlength = getpushlength ();
    if (pushlength != pushlengthset) {
      return setdaytemp;
    }

 //   lcd.setCursor (0,1);
    if (!digitalRead(SW1)) { //bit of software de-bounce
      knobval = -1;
      delay(150);
        setdaytemp=setdaytemp+ knobval;
    if (setdaytemp < 1) {
      setdaytemp = 1;
    }
    }
    if (!digitalRead(SW2)) {
      knobval = 1;  
      delay(150);
        setdaytemp=setdaytemp+ knobval;
    if (setdaytemp > maxday) {
      setdaytemp = maxday;
    }
    } 
  
//    lcd.print (setdaytemp);
//    lcd.print("  "); 
int zz = setdaytemp / 10;  // aflu cifra zecilor din zi
int uz = setdaytemp - 10*zz; // aflu cifra unitatilor din zi
lc.setDigit(0,1,zz, false); // afisez cifra zecilor din zi pe coloana 1
lc.setDigit(0,0,uz, false); // afisez cifra unitatilor din zi pe coloana 0 (dreapta de tot)
    setday();
}

int sethours () {
//lcd.clear();
//    lcd.setCursor (0,0);
//    lcd.print ("Set Hours");
lc.setRow(0,7,B0010111);  // afisez litera "h" pe coloane 7
lc.setRow(0,6,B0011101);  // afisez litera "o" pe coloane 6
lc.setRow(0,5,B0011100);  // afisez litera "u" pe coloane 5
lc.setRow(0,4,B0000101);  // afisez litera "r" pe coloane 4

    pushlength = pushlengthset;
    pushlength = getpushlength ();
    if (pushlength != pushlengthset) {
      return sethourstemp;
    }

//    lcd.setCursor (0,1);
    if (!digitalRead(SW1)) { //bit of software de-bounce
      knobval = -1;
       delay(150);
        sethourstemp=sethourstemp + knobval;
    if (sethourstemp < 0) {
      sethourstemp = 0;
    }
    }
    if (!digitalRead(SW2)) {
      knobval = 1;
     delay(150);  
    sethourstemp=sethourstemp + knobval;
    if (sethourstemp > 23) {
      sethourstemp=23;
    }
    }
//    lcd.print (sethourstemp);
//    lcd.print("  "); 
int zo = sethourstemp / 10;  // aflu cifra zecilor de ore
int uo = sethourstemp - 10*zo; // aflu cifra unitatilor de ore
lc.setDigit(0,1,zo, false); // afisez cifra zecilor de ora pe coloana 1
lc.setDigit(0,0,uo, false); // afisez cifra unitatilor de ora pe coloana 0 (dreapta de tot)
    sethours();
}

int setmins () {
//lcd.clear();
//   lcd.setCursor (0,0);
//    lcd.print ("Set Mins");
lc.setRow(0,7,B0110111);  // afisez litera "H" (in loc de "m") pe coloane 7 (in stanga de tot)
//lc.setRow(0,7,B1001111);  // afisez litera "E" (in loc de "m") pe coloane 7 (in stanga de tot)    
lc.setRow(0,6,B0010000);  // afisez litera "i" pe coloane 6
lc.setRow(0,5,B0010101);  // afisez litera "n" pe coloane 5
lc.setRow(0,4,B0011100);  // afisez litera "u" pe coloane 4
lc.setRow(0,3,B0001111);  // afisez litera "t" pe coloane 3
//lc.setChar(0,2,'e',true);
lc.setRow(0,2,B11101111);  // afisez litera "e" cu punct jos


    pushlength = pushlengthset;
    pushlength = getpushlength ();
    if (pushlength != pushlengthset) {
      return setminstemp;
    }

//    lcd.setCursor (0,1);
   if (!digitalRead(SW1)) { //bit of software de-bounce
      knobval = -1;
       delay(150);  
         setminstemp=setminstemp + knobval;
    if (setminstemp < 0) {
      setminstemp = 0;
    }
    }
    if (!digitalRead(SW2)) {
      knobval = 1;  
       delay(150);   
    setminstemp=setminstemp + knobval;
    if (setminstemp > 59) {
      setminstemp=59;
    }
    }
//    lcd.print (setminstemp);
//    lcd.print("  ");
int zm = setminstemp / 10;  // aflu cifra zecilor de minute
int um = setminstemp - 10*zm; // aflu cifra unitatilor de minute
lc.setDigit(0,1,zm, false); // afisez cifra zecilor de minute pe coloana 1
lc.setDigit(0,0,um, false); // afisez cifra unitatilor de minute pe coloana 0 (dreapta de tot)
    setmins();
}


void ShortPush () {
  //This displays show something
lc.clearDisplay(0); // Clear display register
for (long Counter = 0; Counter < 10 ; Counter ++) { //returns to the main loop if it's been run 604 times 
                                                 
//  lcd.setCursor (2,0);
//  lcd.print ("Hi, niq_ro!");
lc.setRow(0,6,B1100010);  // afisez litera "n" pe coloane 6
lc.setRow(0,5,B0100000);  // afisez litera "i" pe coloane 5
lc.setRow(0,4,B1110011);  // afisez litera "q" pe coloane 4
lc.setRow(0,3,B0000001);  // afisez semnul "-" pe coloane 3
lc.setRow(0,2,B1000010);  // afisez litera "r" pe coloane 2
lc.setRow(0,1,B1100011);  // afisez litera "o" pe coloane 1
delay(200);
}
lc.clearDisplay(0); // Clear display register
}